Pantherman is correct.
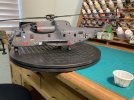
I had about a ¼ full of Tamiya thin and dropped small pieces of sprue in the bottle. The chemical reaction melts the sprue creating the goo. You can make the goo as thin or thick as you wish depending on how much of cement and sprue used. Mine is about a medium consistency like a thick white glue. It does set fairly quick but you should have enough time to work with it. Application can be done by an old paint brush or even toothpicks (cocktail sticks).
I found this method on YouTube as a way to close gaps for the fuselage.
I hope this helps.