Trumpeter Cougar AVGP

NecronautDrummer said:
I'm sure all of you have run into this problem: micro-voids where two pieces meet at a sharp angle. Mitered edges were pre-molded into the plastic. While test fitting the pieces, I thought to myself wow, what a nice little touch! I put together the hull halves and the rear door plate, and I now have these hair-thin gaps where the pieces meet at a sharp obtuse angle. What to do? I have a couple thoughts...

Just jam some putty in there and sand away? But the gaps are so thin! Could I even get putty into the gap?

Use CA glue to fill the void via capillary action? But the applicator nozzles on the bottles are so big! It'll make a huge insta-drying mess on the plastic that'll have to be sanded away.

Paint in some Mr Surfacer/Dissolved Putty? I just got this stuff, and I'm still trying to figure it out. It doesn't flow well at all (even the 1200, I found tonight), so I don't foresee using it for any capillary action filling. I could paint it on, but what a mess to clean up! A recent issue of FSM says that acetone will clean it up, once it's sat for a few minutes. I, on the other hand, made the beginner/impatient mistake of using lacquer thinner (hey, i had it right there in front of me in my brush cleaner, taunting me to use it) on a brush to wipe away excess Mr Surfacer i had just applied, and now I've got a spot of slightly melted plastic.

What to do? Any and all advice would be appreciated, fellow modellers. ???

PS. How long does it take for Mr surfacer or Mr Dissolved Putty take to cure? I don't read Japanese. :p

If you have some Tamiya X-thin cement, use it's small brush to run a bead of the cement into the hairline cracks. Will probably be enough to close the gap, and if not completely, a coat of primer will probably do the rest.
 
Yeah, I've considered doing that once I stick some shaved sprue or really thin styrene strip in the crack.

Ugh, I should really get myself a junker-practice kit!
 
I used Mr. Surfacer (out of jar) all the time for those hairline cracks. Let it cure for a few hours and then soak a q-tip (cotton bud) full of 91% alcohol and start rubbing it off. It'll take a few moments but it WILL come off. Any sink-age would be taken care of by your primer coat.
 
Myke said:
I used Mr. Surfacer (out of jar) all the time for those hairline cracks. Let it cure for a few hours and then soak a q-tip (cotton bud) full of 91% alcohol and start rubbing it off. It'll take a few moments but it WILL come off. Any sink-age would be taken care of by your primer coat.

Use lacquer thinner, will work better for you, since Mr. Surfacer is a lacquer base.
 
Just to prove that I'm still working...

PB240727.jpg
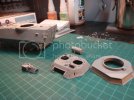
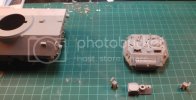
The hull is assembled, and I'm starting the sanding and customizing of the turret before I add all the little fiddly bits. With all the handling I'm doing with the hull right now, bits are starting to fall off.
I'm using Mr Surfacer 1000 to fill in the hairline cracks between the hull halves. After it's set for a few minutes, I rub off the excess with an acetone-soaked cotton swab. It's working pretty good, so far. I've done two applications, and one more should seal it all up. Still some more filling and sanding to do around the bottom where the hull meets the rear hatch plate. No door chain yet (Tiger models is taking their sweet time with my order...).

PB240726.jpg
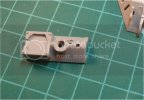
Here's the turret mantle. This kit came with the bolt-on shroud around the C6 coax mount. Since the '94 era Cougars had C5's for coaxes, some grinding and drilling had to take place. I'll need to fit a liner around the hole I drilled, and then somehow fashion myself a Browning 1919-C5 barrel:
1919A4-On-Tripod-B.jpg

Any ideas on how to drill all those tiny holes into a piece of brass or styrene rod, modellers?
 
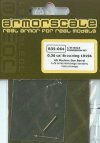
Oh look, Armorscale makes one, and it's got some good reviews:
armorscaleb35064reviewcs_1.jpg

But the Barrel Store's out of stock. They have a couple others (in cast brass) that would do the trick. Besides, I need some door chain. They size it from no.3 to no.12; which is right for me?
100_4827.jpg
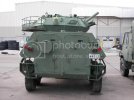
Hey, the towing hitch is in the wrong spot! Glad I looked!
 
Is that the Strat shacks in Ed? Looks way too familiar. LOL

Good job so far!

The counter ballance weight on the mantlet looks a bit off though. I don't recall there being a depression in the center of it. Is there a part missing? Is that the spacer and not the cap?

Regards
 
Yeah, that's a part o my 'do all the body customzing, filling, and sanding before attaching all the little parts' thing. Too many things falling off the hull as I fill cracks I should have filled before much of the assembly. Something I never considered before heading down the road to attempting to correct and accurize a kit. The counterweight is still on the sprue.

And that certainly looks like the home of the LDSH here in Edmonton, doesn't it?
 
Really nice progress on this so far !!! keep up the good work !

Do you recommand the kit ? as is or with all the extra you are putting into it ???


Take care !
 
Well, it's a model of a vehicle that hasn't been around in the model's configuration for about 15+ years. What you build won't match what you find in real life. However, the sprues are laid out in such a way that by Trumpeter swapping out a few sprues, you'd have the late model version of the vehicle (eg. Michelin X-Tra Wides, a mesh turret basket). I know that a company from France makes a resin conversion kit for the late model Cougars.
The fit of most parts is pretty good, although I find that plates that have to be glued down in recesses take some coaxing and modifying to fit reasonably well.
The fit of the hull halves is not perfect. It's close (hairline gaps) but would be noticeable, even with a coat of primer & paint (IMHO).
The kit looks to be made based on the UN versions of the vehicle, with turret wire cutters mounted (no choice in that), and all the UN decals (no NATO/Cdn Forces decals are included). It contradicts the box art, which is a regular service Cougar.
It is missing details like some hatch handles, hook loops, brake guards, but as you can see, they are replicated with minimal/beginner scratchbuilding skills, of which I most certainly fall into that category!
It comes with photo-etch parts, but I haven't used any of them yet (i will soon!). I'm using Eduard Scorpion PE for whatever details I can.
If you like modern Canadian Armour, definitely get it. In my Army days, the only readily available Canadian Armour model kit was for the Leopard 1's. Personally, I was starving for more back then, and I am still. It'll look great & very recognizable out of the box, and it will look even better (and more true to life) when I'm done modding it. I will definitely be picking up the Husky Recovery Vehicle variant when it gets released. But first, let me at that Canadian Leopard 2 you reviewed!
 
More progress...
PB300729.jpg
The turret's almost finished. The kit says to mount a small stowage box on the CC's side of the turret, but the only stowage I've ever seen in old pic's is a much larger, ungainly bin there. In my days, the CC's side was bare, aside from a few loopman points. So it stays bare (until Tiger Models sends me my loopman & chain order from 6 weeks ago!!).
Wire cutters on the turret were molded in one option only: upright. I can't remember ever having them mounted, so they stayed off. Unfortunately, the turret's front lifting points were molded to the wire cutters. After an hour of cutting and sanding, I managed to liberate the lift points. I may have been a little overzealous with the sanding, as they seem a bit thin now.
I searched high and low for era correct figures to throw in the turret, but no luck. I was hoping that since Trumpeter is releasing all these 80's-90's era Cdn wheeled vehicles (rumor mill says that after the Husky comes out, they MAY release a Bombardier 5/4 ton LSVW kit bwaa haa haa!!!), they might support it with some 80's-90's era infantry/AFV crew sets. Because of that, I sealed the turret hatches shut with cement. They were a VERY tight fit, and needed a lot of plastic removal to get them to fit even a little. I know I could have used PVA glue instead, but those hatches would have been popping off all the time.
The smoke grenade discharger mounts for this kit are awful looking. With some better fit engineering, they would have been fine. Right now, all those rounded edges are making for some pretty cavernous voids to fill. They stay off until that's fixed.
Right now, I've got some Mr Surfacer curing in some hairline cracks along the turret (not nearly as bad as the hull) and along the top of the gunner's periscope (not a great fit). I need to mount the rear stowage bin, side stowage boxes, antenna mounts, aaand...
PB300728.jpg
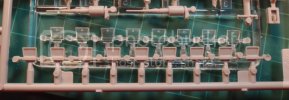
Periscopes! These are the periscope options for the turret. Clear or solid plastic. Which should I use? BTW, the driver periscopes, gunner sights, and CC front periscope only came in the solid plastic. None of the periscopes on vehicles of this era came with the anti-laser reflective coatings.

Happy modelling! ;D
 
You can still give them a green tint! There are made as I recall. With multilayered glass panels? Right?

Either a light chrome or bright silver as a background and then hit it with a clear green? Or go for the shinny confetti and cut a few strips!

Either way! You will find a middle ground that makes you happy! And if I recall, they had a thick rubber membrane to black out the light! .?? So if you paint a few dark green or black? That could simulate that black out panel?

Good luck!

Norm

Out!
 
That was my plan for the viewports on the side of the hull: clear green over silver or gray. I might use gloss black over the other periscopes. I've used silver with blue clearcoat over periscopes on other vehicles, but it looks so toy-ish.
Time to look in the gallery for some ideas. Thanks Norm! ;D
 
I've decided to go with the deep clear green/turquoise look for the periscopes, which would match up well with the side viewports.

She's ready for some paint (once they repair the fume hood at school, that is...). Well... maybe one more shot of Mr Surfacer along the odd seam...

The plan is to use some Vallejo gray primer over everything, then pre-shade with Vallejo dark green primer. Then final assembly of the odd part, along with a coat of the appropriate primer. Let it cure for a week. After, I'll be using Tamiya acrylic color for the NATO camo scheme. Please let me know if I'm doing anything wrong here! :p

Once I'm onto the painting steps, I've got NO KITS TO BUILD. So what to build next? ???
For my next serious build, I've had my eye on some of AFV Club's Stryker series (thanks schweinehund227! ;D ), probably the 1127 infantry carrier with Legend resin stowage from Lucky Model. In the meantime, I think I'll do a straight OOB build of a decent Harrier kit for the Air Group build (they're naval/marine, right?), to work on my paint masking skills. Any suggestions for a relatively painless 1/48 or 1/72 scale Harrier kit? ??? I'm not picky on which service or country.
 
NecronautDrummer said:
The plan is to use some Vallejo gray primer over everything, then pre-shade with Vallejo dark green primer. Then final assembly of the odd part, along with a coat of the appropriate primer. Let it cure for a week. After, I'll be using Tamiya acrylic color for the NATO camo scheme. Please let me know if I'm doing anything wrong here! :p

Doesn't sound like you're doing anything wrong but using Vallejo primer, you really don't need to let it cure for a week.

24 hours would be fine, 48 even more than enough. I usually prime and paint on the same day within a few hours, did it today with my Harley.

Looks good so far though.
 
PC050728.jpg
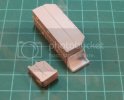
Forgot that I had to do these. Scratchbuilt from styrene, and dry-fitted to the turret bin. What looks like a gap in the corner is just green marker used to draw my cut lines...meh. I don't know, what do you guys think? Does it look OK?
 
Looks pretty good from here!!! ;D A little sanding to the outside edge there and I think you have a winner!!! Keep it rolling!! ;)
 
I hate them. :mad: And I still have to build one more. They'll be mostly covered up by a roll of barracuda camo net, though. That will make me hate them a little less. ::)

I don't want to use a PE barracuda net. I would envision something that looks more like a roll of chicken wire propped up on the stowage bin, rather than a cloth/net pile like it should be. I've thought about using medical gauze, but how could you create that 'barracuda' look with it? I was thinking of maybe shredding bits of tissue paper, soaking it in some scenic cement, and pasting it onto the outside layer of the medical gauze roll.

FYI, the first person who sends me the link to the Swedish guy's tissue paper camo net cut from a teeny tiny round chisel gets a frowny face. I don't have the patience, tools, nor the requisite insanity level to do that. Yet.
 
I've seen gauze used as a base with oregano glued to it and then painted the standard NATO pattern and then rolled up and tied off with straps.

Looked kinda funky but it's an option.

Regards
 
Yeah, I bought a sheet of the Eduard cam nets. I don't see how it could be used other than rolled up tightly and strapped down.

I have been told that if you anneal it, it will become much softer and easier to work with. I have yet to try this....but I think it would still end up being hard to work with, and still very "metallic" like.
 

Latest posts

Back
Top