[COMPLETED] Snowspeeder takeoff scene

Solander

Active Member
Joined
Jun 8, 2010
Messages
1,407
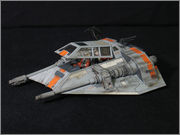
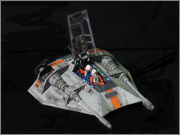
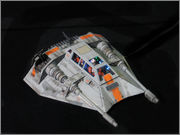
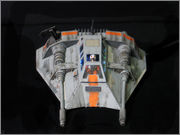
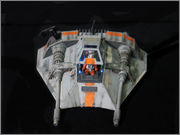
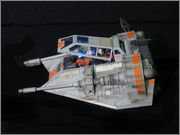
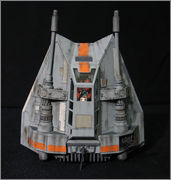
Here I would like to start with my movie scene diorama, representing a takeoff of a rebel's snowspeederfrom the hangar of the Echo base you may probably remember from the Empire.

First, about the kits I'm going to use. I've allready presented them in the main discussion topic before the beginning of the GB, but if you've missed it or just boring to search for or whatever here is a short list:
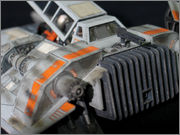
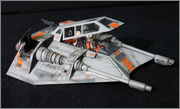
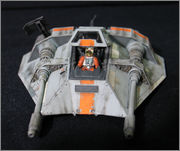
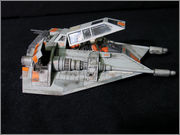
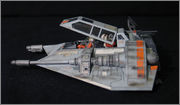
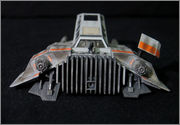
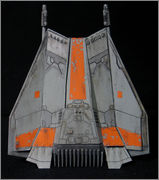
- a FineMolds 1/48 Snowspeeder - the main hero of my project=)

- and some materials for the diorama and small details

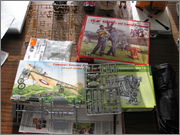
They include the following kits:
- 1/48 RAF Pilots and Ground Personnel by ICM
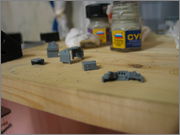
- 1/72 Aircraft Bleriot XI by Eastern Express
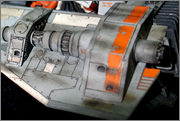
- 1/35 V-2 Engine and Transmission Set for a T-34 Tank by MSD
and finally a small set of two barrels and four canisters in 1/48 scale by MasSHTAB

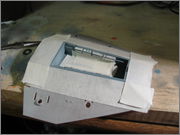
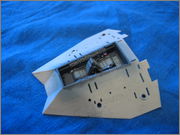
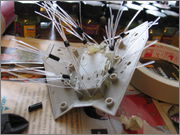
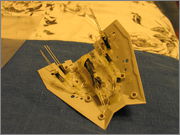
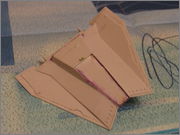
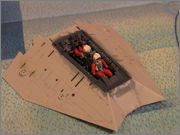
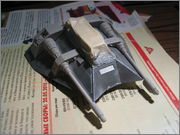
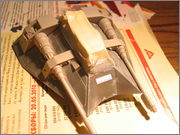
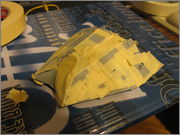
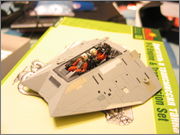
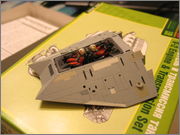
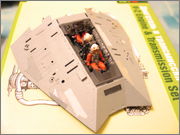
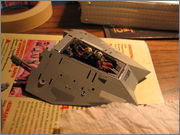
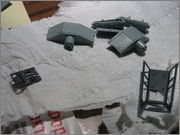
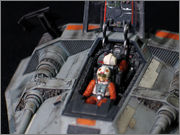
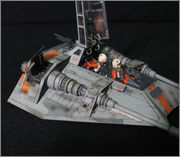
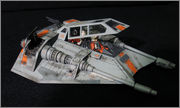
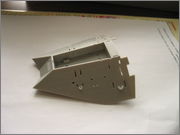
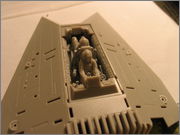
Taking the first steps in building my diorama I’ve designed to manage with the vehicle first.


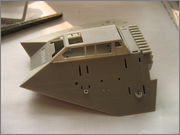
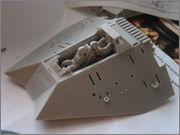
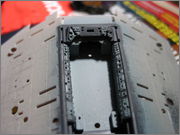
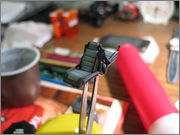
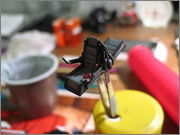
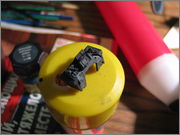
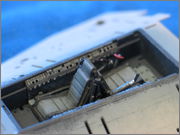
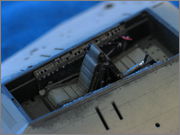
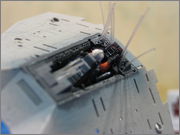
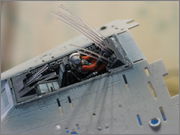
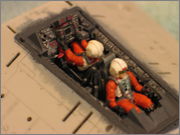
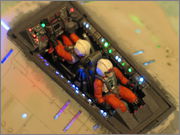
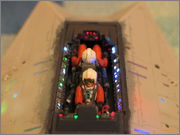
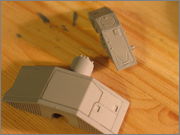
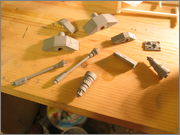
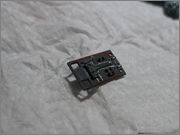
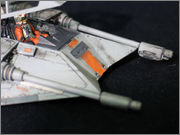
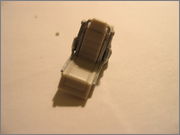
After the primal look at the result of “dry”-building I’ve found the chair-part to be badly detailed and fixed that with the parts of 1/72 Breliot XI Aircraft (all that tiny pistons, plungers and rams were just the right thing needed)


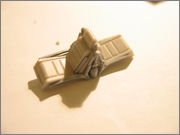
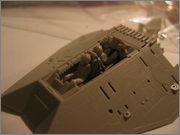
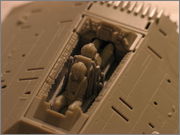
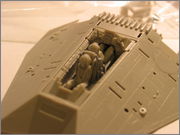
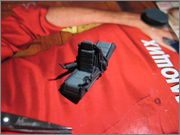
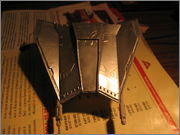
And as the final touch I’ve glued in additional controls for the gunner, made from the same source as above.


Thank you for your attention, guys!
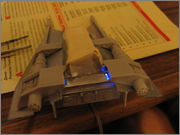
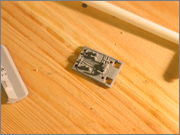
More is coming quite soon, as a major work of lighting the cockpit has been already done, but always not anougth time to take photos. So don't miss the updates ;)
 
Re: [WIP]Snowspeeder takeoff scene

Ok, a couple of things.
1. that kit is crisp! wow! I really like the deatail they molded in.
2. Your additional details look Awesome! They add alot to the cockpit! Great work!

I'll be watching this one! keep at it!
 
Re: [WIP]Snowspeeder takeoff scene

So Small... yet... looking so Detailed !!! Harrgg... must buy one !

Looking forward to your build !!!

take care !

Norm

OUT !
 
Re: [WIP]Snowspeeder takeoff scene

Thank you for a warm welcome, guys!=)
And here, after a short break, the snowspeeder project is back with some new achievements.
When the pilot’s and gunner’s chair was completed it has come the time for painting cockpit. Having passed numerous viewings of a corresponding fragment from a film and searches of photos from shootings, I discovered that first of all the cockpit itself is dark-gray with built-in light-gray device panels. These panels are probably removable, which makes it easier to replace them at breakage or optimize under concrete needs and maintain an installation the controls for additional equipment. Anyway, my first step was a layer of dark-tank-gray with 50 percent of light-blue-gray:


Then, after masking the needed areas I’ve put the second layer of dark-gray, and, before final gluing-in I have highlighted all those buttons and screens with black washing and silver dry brush:


After that the work with fiberoptics has followed. Threads have been inserted into in advance drilled apertures in instrument panels, and then in the apertures in the floor under that panels. I fixed them under the bottom of the cockpit with a glue-pistol.


Time has come to lay the fiberoptics in place, fix it and connect to LEDs. Guys, THAT_WAS_HELL. For the small sizes of model and still smaller space between a floor of a cockpit and a bottom detail throwing these extremely unmanageable (even despite heat treatment) threads on seven LEDs and laying them as much as possible compact was AWFULL difficult. They constantly strove to be torn off from their place together with gel, and the soldering the already laid LEDs was similar to operating of a coronary artery.


But the problems did not end on that. No matter how hard I tried, I did not manage to place all the electronics compact enough to glue the hull to its bottom. That forced me to cut off the flat panel on the bottom piece and place it under a little bit more high angle (You can see the signs of that work by the purple sparks of putty on the pictures bellow)


Finally, here we go with the lighted cockpit:


To avoid light-leaks I primed all the hull with silver


Then, all the major parts were colored with light-gray, and some panels of the hull received alternative colors airbrushing to follow the movie model’s pattern:


As You can see from the last picture, the model was airbrushed with Future, and it is currently in process of washing.

And, as a final accord for todays update here are some pictures of the cockpit bottom with all those tubes, buttons and lights. You all know that, right? The main rule in sci-fi movies: lights_mean_SCIENCE ;))

 
Re: [WIP]Snowspeeder takeoff scene

Great work here!! I understand the problems with the LED's. I had the same problems with my contest build.
 
Re: [WIP]Snowspeeder takeoff scene

Looking really good so far, especially with such a small model
 
Re: [WIP]Snowspeeder takeoff scene

Very nice detailing on the cockpit. And the lights really bring life to the kit, great work.
 
Re: [WIP]Snowspeeder takeoff scene

This is looking like a quick build. My downfall is i get distracted and move onto something else. cockpit looks awesome. The kit appears to be a vast improvement over the older MPC or the new Revell snap. YOu mentioned Future. What is your thinning ratio and what do you thin it with. Hope this turns out great. I still remember seeing Empire when i was 9 i was just blown away by the Battle of Hoth.
 
Re: [WIP]Snowspeeder takeoff scene

Wow, just flying thru this build.... Wow
I like the lighting, well done!

The paint job is slick, keep up the good work!

Norm.

Out.
 
Re: [WIP]Snowspeeder takeoff scene

Thanks everyone for your attention and replies - it really helps to stay on cource of one model in spite of the first autumn frosts, beginning of a new semester and other quite depressive things usually making jump from one kit to another and again along with your mood=))

noc5659 said:
YOu mentioned Future. What is your thinning ratio and what do you thin it with.

For thinning Future I'm usually using medicine alcohol. Unfortunately, it spoils Future's peachy smell =), but along with that it makes it completely dry in terms of less than a minute, thus doesn't give it time to collect on the corners. The proportion is chosen by eye. Its consistence must be similar to water, or fresh milk, but it must leave a vivid oilish trace on the glass walls when you spin it. Such thinning ratio allows You to avoid bumps of Future on the surface of the model and its sand-like texture.
 
Re: [WIP]Snowspeeder takeoff scene

SAWEET! That sure looks awesome. Can't wait to see more.
 
Re: [WIP]Snowspeeder takeoff scene

Sorry for keeping you waiting for so long for the new updates, guys. Just had not enough time to make good photos for the last week. And, as I've finished the speeder itself, I wanted the following pics to be really good.

Well, before the sweetest part, here is a small listing of my progress:

- Completed washing process.
- Assembled all the parts with the hull.
- Made the top-right flap opened and the lower-left airbraker down, as the dio will depict the model turning left to the cave entrance. Made everything according to what I've seen in the movie, but still can't completely understand this strange physics-shmysics with that flaps: guess the guilt is on the repulsor technology =)
- Applied a new layer of Future, and, after that, the decals.
- Finnaly, after a layer of mat finish, I've done weathering, drybrushing and all that stuff.

As for the diorama, I'm currently assembling the surroundings - already done a workbench, cylinders with the compressed gas, the cart for them, the step-ladder, two flanks and something around of 6 fuel canisters + gallant RAF are gradually turning into the covered with termowear rebels =) Will make the pics of all that in matters of a couple of days.

And now! (drums) Incom T-47 Airspeeder (Hoth environment modified version):


Re: [WIP]Snowspeeder takeoff scene

Looking really good there. Gives me ideas of what to do with the one in my stash
 
Re: [WIP]Snowspeeder takeoff scene

Your 'speeder looks great.
 

Latest posts

Back
Top