TRM
New Member
- Joined
- Mar 18, 2011
- Messages
- 5,024
Kit Review:
Hobby Link Japan Build Series - Tamiya IJN Yukikaze
1/350th Scale Ship Series No. 20
Japanese Navy Destroyer Yukikaze
By Todd Michalak (TRM)
Kit Produced by Tamiya (TAM78020)
Originally release in October of 2008
Suggested retail price: $53.24 USD / 40.82 EUR - Hobby Link Japan - http://www.hlj.com/product/TAM78020
Total finished length of model – 13.25 in./338mm
IJN Yukikaze History:
Yukikaze, meaning "Snow Wind" or "Snowy Wind" was a Kangero Class Destroyer. Her keel was laid down in August of 1938 in Sasebo Navy Yard, Japan. Launched in March of 1939 and finally commissioned in January of 1940, the IJN Yukikaze would eventually see battle from February of 1942 till her last mission in April of 1945.
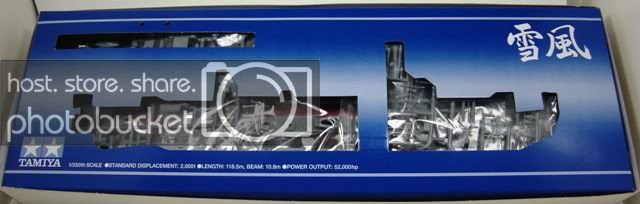
Ship Stats 1942:
Displacement - 2,530 ton
Length - 118.5 m (388 ft 9 in)
Beam - 10.8 m (35 ft 5 in)
Draft - 3.8 m (12 ft 6 in)
Speed - 35 knots
Complement: 240
Armament: • 6 × 5 in (130 mm)/50 caliber DP guns
• up to 28 × 25 mm AA guns
• up to 4 × 13 mm AA guns
• 8 × 24 in (610 mm) torpedo tubes
• 36 depth charges
The Yukikaze's was often called "Lucky Ship", The Unsinkable Ship" and "The Miracle Ship" due to the fact of the ship returning from many a battle unscathed while the ships or convoys she was charged with escorting would sustain heavy casualties. Subsequently labeling her as a "bad omen" as well.
Stricken from the Japanese Naval Registry in 1945, she was turned over to the Chinese Government where she served in the Chinese Navy until about 1965 where she was placed into reserves. Being damaged from typhoon, she was decommissioned and finally broken up in 1970. In 1971 the Chinese returned her Rudder and one of her anchor to Japan.
Sources: www.lowerre.com
http://en.wikipedia.org/wiki/Japanese_destroyer_Yukikaze
In the box:
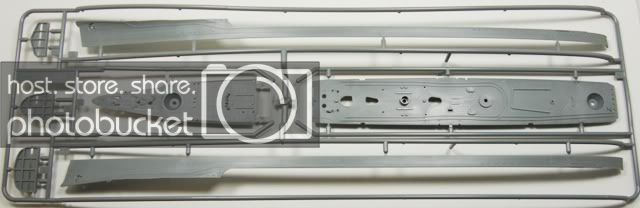
6 – Sprue trees containing 226 finely detailed parts
1 – Clear sprue tree containing 2 parts
1 – Base with small sprue tree containing finials for display
1 – Waterline plate for depicting the model in the water
1 – Hull Bottom for use with a display
1 – Bag containing: 2 Screws and 2 nuts for mounting the model,
2 Small chains for the anchors
4 Large Poly Caps for mounting the Main Turrets
8 Smaller Poly Caps for mounting the smaller guns
2 Metal propeller shafts
1 – Japanese Flag Sheet – Contains 8 Various WWII period naval flags
1 – Decal Sheet – Containing Ship identification markings and draft markings
1 – Aluminum Name Display Sheet – Contains ships name in both Japanese and English
1 – Photo-etch Sheet – Containing 32 parts including Radar, AA Gun Shields & Ladders
1 – 16 page set of directions for assembly of the model
1 – Color fold out painting and decal placement guide
1 – Storage and transport cardboard cutout
Getting a look inside the box:
Upon opening the box, the first thing that is noticed is the blue cardboard cutout with the silhouette of the Yukikaze. This should be saved. You can use this to either store the model or pack the model for transport. Directions for setup of this model holder are clearly depicted on the back of the color fold out painting and decal guide supplied in the kit.
After lifting the storage template off, reveals all the parts for constructing the model. This model can either be constructed as a waterline version or can be placed on the base stand included in the kit.
Each one of the 235 plastic parts for constructing and displaying this model are finely detailed. Little to virtually no flash is found throughout this kit. There are some pretty tiny parts included with this kit. Some care and patience will be needed in constructing this model, but even Out of the Box, this kit will build up really well.
Instructions:
The 16 page directions are clear a easy to follow. They also contain a nice description of the history of this vassal in multiple languages. Along with this, the color fold out painting and decal sheet that comes with the kit is a nice addition as well. Very easy to see placement of the decals, this also gives you a good idea on how this ship looks when painted.
There are some parts within this kit that deserve mentioning. First would be the Smokestack grills. These are molded really well with openings between the grills giving a more realistic feel to the tops of the stacks. Next would be the Captain’s bridge clear plastic piece. This gives a nice touch to the model without having to cut out the windows or color them to give the appearance of depth of the bridge. Next would be the searchlight. Two pieces, the light housing and separate lens make this a nice touch. Not having to drill out the light to add a realistic feel to it is very nice. There are numerous other parts that stand out as well, like the AA guns, the masts and deck tops to mention a few more.
Not so notable parts:
There are few things I do not like about this kit. But there is two areas that stands out for me though; first would be the separate hull and waterline plate. I like the fact that this model can be made to look like it is at sea. If you intend to make this a static display attached to the supplied base you will need to apply a little more effort in the area along where the bottom hull meets the upper hull side pieces. Some filling and sanding will be required to reduce the seam. The only other thing that I noticed that could be improved upon is the lack of vertical hull plating joints on the upper hull as well as the bottom hull. This is easily corrected by marking and carefully scribing staggered vertical joint lines.
Conclusion:
All in all, this well made kit is what we have come to expect from Tamiya. The finely molded parts, fairly trouble free construction, easy to interpret instructions and some nice little extras, to enhance and already decent model. Well worth the cost and would make a nice addition to anyone’s collection.
Would you like to purchase this kit - Go to Hobby Link Japan HJL Product code - TAM78020
OR
Tamiya 1/350th Scale Ship Series No. 20 Japanese Navy Destroyer Yukikaze
Aftermarket and Special Detailing Parts:
Lion Roar Full Set Super Detail Photo-etch Upgrade
1/350 Barrels for IJN Yukikaze Class Destroyer (34pcs)
1/350 WWII IJN Railing
All these Items and more can be found at Hobby Link Japan - http://www.hlj.com/
Special Thanks for making this review possible:
Hobby Link Japan - http://www.hlj.com/
Hobby Link Japan Build Series - Tamiya IJN Yukikaze
1/350th Scale Ship Series No. 20
Japanese Navy Destroyer Yukikaze
By Todd Michalak (TRM)
Kit Produced by Tamiya (TAM78020)
Originally release in October of 2008
Suggested retail price: $53.24 USD / 40.82 EUR - Hobby Link Japan - http://www.hlj.com/product/TAM78020
Total finished length of model – 13.25 in./338mm
IJN Yukikaze History:
Yukikaze, meaning "Snow Wind" or "Snowy Wind" was a Kangero Class Destroyer. Her keel was laid down in August of 1938 in Sasebo Navy Yard, Japan. Launched in March of 1939 and finally commissioned in January of 1940, the IJN Yukikaze would eventually see battle from February of 1942 till her last mission in April of 1945.
Ship Stats 1942:
Displacement - 2,530 ton
Length - 118.5 m (388 ft 9 in)
Beam - 10.8 m (35 ft 5 in)
Draft - 3.8 m (12 ft 6 in)
Speed - 35 knots
Complement: 240
Armament: • 6 × 5 in (130 mm)/50 caliber DP guns
• up to 28 × 25 mm AA guns
• up to 4 × 13 mm AA guns
• 8 × 24 in (610 mm) torpedo tubes
• 36 depth charges
The Yukikaze's was often called "Lucky Ship", The Unsinkable Ship" and "The Miracle Ship" due to the fact of the ship returning from many a battle unscathed while the ships or convoys she was charged with escorting would sustain heavy casualties. Subsequently labeling her as a "bad omen" as well.
Stricken from the Japanese Naval Registry in 1945, she was turned over to the Chinese Government where she served in the Chinese Navy until about 1965 where she was placed into reserves. Being damaged from typhoon, she was decommissioned and finally broken up in 1970. In 1971 the Chinese returned her Rudder and one of her anchor to Japan.
Sources: www.lowerre.com
http://en.wikipedia.org/wiki/Japanese_destroyer_Yukikaze
In the box:
6 – Sprue trees containing 226 finely detailed parts
1 – Clear sprue tree containing 2 parts
1 – Base with small sprue tree containing finials for display
1 – Waterline plate for depicting the model in the water
1 – Hull Bottom for use with a display
1 – Bag containing: 2 Screws and 2 nuts for mounting the model,
2 Small chains for the anchors
4 Large Poly Caps for mounting the Main Turrets
8 Smaller Poly Caps for mounting the smaller guns
2 Metal propeller shafts
1 – Japanese Flag Sheet – Contains 8 Various WWII period naval flags
1 – Decal Sheet – Containing Ship identification markings and draft markings
1 – Aluminum Name Display Sheet – Contains ships name in both Japanese and English
1 – Photo-etch Sheet – Containing 32 parts including Radar, AA Gun Shields & Ladders
1 – 16 page set of directions for assembly of the model
1 – Color fold out painting and decal placement guide
1 – Storage and transport cardboard cutout
Getting a look inside the box:
Upon opening the box, the first thing that is noticed is the blue cardboard cutout with the silhouette of the Yukikaze. This should be saved. You can use this to either store the model or pack the model for transport. Directions for setup of this model holder are clearly depicted on the back of the color fold out painting and decal guide supplied in the kit.
After lifting the storage template off, reveals all the parts for constructing the model. This model can either be constructed as a waterline version or can be placed on the base stand included in the kit.
Each one of the 235 plastic parts for constructing and displaying this model are finely detailed. Little to virtually no flash is found throughout this kit. There are some pretty tiny parts included with this kit. Some care and patience will be needed in constructing this model, but even Out of the Box, this kit will build up really well.
Instructions:
The 16 page directions are clear a easy to follow. They also contain a nice description of the history of this vassal in multiple languages. Along with this, the color fold out painting and decal sheet that comes with the kit is a nice addition as well. Very easy to see placement of the decals, this also gives you a good idea on how this ship looks when painted.
There are some parts within this kit that deserve mentioning. First would be the Smokestack grills. These are molded really well with openings between the grills giving a more realistic feel to the tops of the stacks. Next would be the Captain’s bridge clear plastic piece. This gives a nice touch to the model without having to cut out the windows or color them to give the appearance of depth of the bridge. Next would be the searchlight. Two pieces, the light housing and separate lens make this a nice touch. Not having to drill out the light to add a realistic feel to it is very nice. There are numerous other parts that stand out as well, like the AA guns, the masts and deck tops to mention a few more.
Not so notable parts:
There are few things I do not like about this kit. But there is two areas that stands out for me though; first would be the separate hull and waterline plate. I like the fact that this model can be made to look like it is at sea. If you intend to make this a static display attached to the supplied base you will need to apply a little more effort in the area along where the bottom hull meets the upper hull side pieces. Some filling and sanding will be required to reduce the seam. The only other thing that I noticed that could be improved upon is the lack of vertical hull plating joints on the upper hull as well as the bottom hull. This is easily corrected by marking and carefully scribing staggered vertical joint lines.
Conclusion:
All in all, this well made kit is what we have come to expect from Tamiya. The finely molded parts, fairly trouble free construction, easy to interpret instructions and some nice little extras, to enhance and already decent model. Well worth the cost and would make a nice addition to anyone’s collection.
Would you like to purchase this kit - Go to Hobby Link Japan HJL Product code - TAM78020
OR
Tamiya 1/350th Scale Ship Series No. 20 Japanese Navy Destroyer Yukikaze
Aftermarket and Special Detailing Parts:
Lion Roar Full Set Super Detail Photo-etch Upgrade
1/350 Barrels for IJN Yukikaze Class Destroyer (34pcs)
1/350 WWII IJN Railing
All these Items and more can be found at Hobby Link Japan - http://www.hlj.com/
Special Thanks for making this review possible:
Hobby Link Japan - http://www.hlj.com/


") ,great start too bro
,great start too bro