GrosserHund in progress / see if Keith can figure out posting pics

So , the feet are anticlimactic :(

128_zpscbf58d9d.jpg the spring sections need a bunch more detail..
109_zpsc8e011a1.jpg

He likes the new gun .... 116_zpsec779b48.jpg

I think it scales well

126_zpsc65355b5.jpg
158_zpsb8039eb4.jpg
153_zpsd512b0a4.jpg

Off to work ---- finished gun next ( finally ::) :p )
Any criticism , suggestions , comments and food orders taken with a smile ( drive-thru open 24 hrs )

..... THink he'll need more / expanded armor below the waist ? Might need to beef up his arms ...
 
I will take a double cheeseburger, onion rings and a large orange drink...

Fast Food

Yeah I think those arms need a bit of beefing up, you gave him a very large gun.....
 
Yeah ,, I just drive on to the window ::)
I know you remember when JackNBox had the clown heads with the speaker lol .
 
urumomo said:
Yeah ,, I just drive on to the window ::)
I know you remember when JackNBox had the clown heads with the speaker lol .

I have a clown head to put on your car antenna still in the package....
 
Oooooh :D a collector's item .

Well , since we're off topic ,,,
I was just watering some plants and thought I'd share some happiness ;D

I planted that crape myrtle last fall and thought it was dead ::) ... glad I was so wrong

014_zpse65ea1e5.jpg
 
The flamethrower and feet are perfect! I like that figure you included for scale, too--looks like a 19th-century composer in a futuristic jumpsuit. Franz Liszt, fighting for the mercs ;)

The crepe myrtle is lovely, too. My black-eyed Susans and other daisies are fixing to bloom shortly.
 
;D Welcome back , Baron
Glad you like the mods thus far ...
LOL ,,That guy does look trippy ::) Crazy '80 hair --- he's one of those Tamiya race car figs ---soon to be the Dog's pit crew ;)

This dude , with his neck craned is a bonus
011_zpseebfb8ca.jpg


So ,, a little bit ago I was setting some decals with Microset and wondering " WTF ? Where is this goo coming from ? Why is the paper towel shredding onto the brush ? ???

Yeah ,, OH ! That's NOT Microset -- it's Decal Film ::) !

So I marked that bottle a little better ----
001_zps61d22575.jpg

Ha Ha
I'll have some pics of the gun in an hour or so ,,,
 
.. O K ,,
Here it is so far - now that it's in one piece I can spend time on the paint ( need sunglasses )
I'm keeping to the original diorama idea with the new gun being fitted / still on chain hoists etc , so I'm leaving it 'primer' but ::) .. I think I'll tone down the sunshiney-ness ......... it almost smells lemoney ;D

017_zps552cf4eb.jpg
020_zps3609abab.jpg

I need to add a little control arm(s) to that smaller , original armor plate ;

022_zps51b64a3a.jpg
024_zps60ae09e1.jpg
026_zpsf967e63d.jpg
036_zps955b87f5.jpg

.. 8) I like it . .. It's designed to be rammed thru walls with that nice little chin on it ;D

038_zps5ae41c89.jpg

.... Man ,, that 'll do till the yellow paint arrives ::) lol
 
Outstanding! I like the primer idea. You could a mechanic standing by with an airbrush to apply the top coat.

Thanks for the info on the figures. I didn't recognize them, the set I have are in grey plastic. I thought yours were resin, from the color.

I've discovering Modeler's Racing Figures, too, from Japan. The various drivers would make good Strahl space pilots; their racing overalls are already much like flight suits.
 
:) Ha ha ,,, Yeah , I had previously mentioned having one guy setting up for paint in the dio ...
so far my original original idea is intact --- the gun mods grew out of it ;)
I see the Hund under a site-built hoist and all under camo netting ...... And with all you guys doing the lighting coolness ,, I'm strongly considering placing strung work lights around ----- yeah , think that will be the ticket ;D

I surmise you're Ebay'in the figures , Baron ?
Hobby Link Japan shows them to be discontinued :( :(

Are you using 1/24 scale ? that ~20% difference in scale bugs me ::) ... I know the practice is ubiquitous but :p

Now ,

I've moved the placement of the aft shield and made it articulated ( this example is static :( ) :

006_zps51768d2d.jpg

Knock Knock ;)

009_zps5a82c830.jpg
 
Hey John ! Yeah ,, the blooms are great :)

;D ;D Recap ....

And , YES , he can still stand upright with all the add-ons lol 034_zpsde44ed0d.jpg

And he still needs his Fuel packs ( good counterweight ) --- I'll be starting on the finish units today .
I'm going to make a little ' jig ' to plot the geometry of the armor plates before I tear it down for duplication

058_zps75f5bd43.jpg
062_zpsf3c45341.jpg
 
Step 1A of genome armor mapping ...
...... at least till after Big Bang Theory ;D

078_zps0d1135c8.jpg ::)
 
I really want this Jeep for the diorama ,, but :( it's a lotta coin
fnm82001_00.jpg
Like 60+ bucks delivered ::)
... well , HLJ can do it for ~ 50 $ .. still pricey ------ maybe if it had a couch in it .. .

Pretty Sweet

fnm82001_2.jpg
 
urumomo said:
I surmise you're Ebay'in the figures , Baron ?
Hobby Link Japan shows them to be discontinued :( :(

Are you using 1/24 scale ? that ~20% difference in scale bugs me ::) ...

I hear ya, it bugs me, too. No, I'm sticking with figures packaged as 1/20--there's enough variation there as it is.

Yes, I troll eBay for them, but I've also browsed HobbyLink's catalog. There are still good and useful figures available, despite the ones that have been retired. That's what gets me about HLJ's online catalog, though. They show a lot of things as discontinued, so you can look at it and stew that you can't have it. "Nyah, nyah, nyah, nyah, nyah!"
 
LOL ! I know ! HLJ keeps long gone stuff on there --- like that " nyah nyah ..." ::)

I've got a good visual in my head for the pit crew lay-out -------- with epoxy/putty it will happen ;D


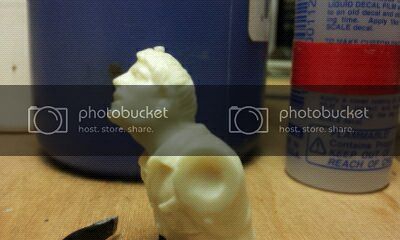
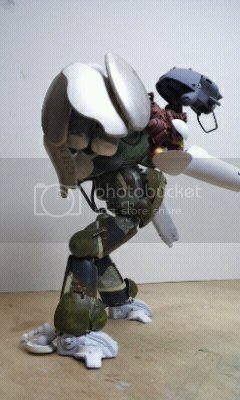
So -- I,m mapping the armor layout , , I should have duplicated the existing shields before I affixed them to the mock -up , but , no problem .

I rotated the forward pair further forward :

BEFORE
005_zps7c7a7d55.jpg


NOW 042_zpsd797c0d1.jpg


I need to wait for this tacky glue to set ,,, passive-aggressive construction -- just blobbed on to affix the new position

060_zpsd25dfbff.jpg You can see the amount of displacement from the original frame position

The Process :

I chart the positions of 3 'apex' points for each shield .
The fuel tanks are anchored square to the base and base index .
The 'X' and 'Y' come from 062_zps16fd045a.jpg

Then those points are transferred to the 'fence' -- and drilled
The fence is positioned and fixed here when it is ready 050_zps2a8306c2.jpg though I may move it away a bit ... I'm restricted by nail length , so I'll need to substitute for the lowest shield points ...

Then casing nails are inserted to reach the 'depth' of the coordinate

052_zps58cf998d.jpg

When all 12 are positioned and affixed with tacky glue from behind , the fence is removed
The extended points are spray painted white
053_zps20af8e9b.jpg

To recreate the mirror image Left side arrangement :
The nails are reversed in their holes to the depth now marked
The fence can be rotated to register with two new tanks anchored in the exact same place or placed horizontal with the shields temp glued to the points to allow the construction of the frame

056_zps89dd679b.jpg

::)
 
Finally back at this .. can't believe it's already Sunday --and almost Monday

Beginning X/Y plot . . I'll need to cut the card down for the lower points ...

126_zps7fed1260.jpg
 
....need to build one of these for the diorama - Fan art
says its a MaK Minesweeper - fits right in for these guys' role

See this thing being about 4 maybe 5 feet tall . ?

I like it's digitigrade design

Commission_Ma__K__MINESWEEPER_by_dasAdam.jpg

Perfect subject for tons of shrapnel damage
 

Latest posts

Back
Top