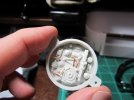
Grendel's Falcon

That's a nice mod John. I'm thinking you might even be able to thin a couple panels underneath and bend the edges...then put a backing under it all of sheet stock so you don't have a hole.

I wouldn't sweat that scratch at all man. It's the Falcon after all.
 
Thanks, I took a look at it and it is possible to do that. The plastic is thick enough that just cutting through would work, and then putting a bit of sheet behind it would be easy so that there was no light leak.
 
Great work John, i'm also following your lead on this mod but I'm cutting through from behind and and building a structure to give put strength back into the panel.
I must get back on it but it's real cold here right now and I have no heating in the man cave! Brrr!
Keep up the good work!
 
Great update, I had a bit of trouble with the same area, you only did a scratch or two, I made a bit of a mess. may have to replate and fill more than one scratch. LOL. Nice clean work

Looking forward to your review.

ozzy
 
Thanks! I tried my hand a bending brass tonight, it went pretty well. I will post photos tomorrow. Keep in mind that this was my first attempt at bending brass. So it isn't perfect.
 
Here are the promised photos:

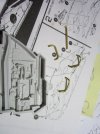
I started with this part:

IMG_0560.jpg

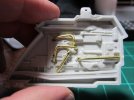
Then I started to remove some of the details, and bending out some brass to replace that detail with:

IMG_0561.jpg

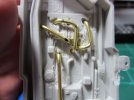
I didn't do the best at removing the detail. This is something I need to work on. Here is the brass glued in:

IMG_0562.jpgIMG_0564.jpg

Even with the chewed up detail, I think it looks better.

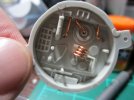
Thanks to Tanker 52, I now know how to straighten up copper, and I started working with the Jewelry wire to detail out a few other parts:

IMG_0565.jpgIMG_0566.jpg

I stopped here for now. I want to do this for some of the other inserts, just to busy them up a bit, and distract from the soft details in the kit. I haven't started on the piping on the hull yet, I am a bit apprehensive about removing the pipes without tearing up the hull. Don't worry I won't let that hold me back for long......
 
Awesome work John, I WAS going to leave these parts but now you had to go there and I've had to add it to my list.... Man! This thing's never gonna get done!!! :D
 
It really doesn't take that long to do this. I think I spent an hour with the two smaller ones and then an hour with the larger one. Brass is pretty hard to work with, but the copper is easy. I will get a video of it up sometime in the next week or two.

Go back and look up Tanker52's comments about how to straighten up wire, very useful!
 
Tanker52 said:
“If one of you knows how to straighten out wire, please post it!”

Grendals, how I straighten out copper wire or any small wire, is to bend it as best to straight as I can by hand. Then I have a wooden plate and ruler, place the wire between and roll back in forth until the wire is straight. Sometimes it takes a second or two to get the wire rolling. Instead of using a ruler, I have also use a 1 inch by 1inch by 6 inch long piece of wood to add more pressure. I never used this technique on brass wire but with enough pressure should straighten out.

The resin kit is a nice upgrade and detail sharp.

Also, in my previous post I said I had the MPC kit MF, correction I have the AMT/Ertl cut away MF.

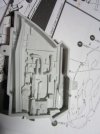
Here it is so you don't have to look it up!
 
Somebody covered that very same technique some time ago at SSM. That bending of the copper and brass looks great. Grendel try a single pass of Ambroid by brush over the cleaned up rough-like areas in those deeps. The solvent will relax those sharp edges and clean up any extremely minor gaffs that might show up with a wash.
 
[quote author=Lord Vader]
Impressive..... Most impressive
[/quote]

Seriously though, your build looks amazing. I'm sitting on the fence as to whether I want to try my hand at scribing the lip as you showed previously or if I'll try to get a false effect with shading. I know what my scribing skills are, so that's why I'm still debating it.

Your scratch building of the piping detail looks awesome.
 
I absolutely love those piping... but you need to take car about this clean up situation underneath....

That would improve this totally...
 
Glorfindel said:
Somebody covered that very same technique some time ago at SSM. That bending of the copper and brass looks great. Grendel try a single pass of Ambroid by brush over the cleaned up rough-like areas in those deeps. The solvent will relax those sharp edges and clean up any extremely minor gaffs that might show up with a wash.

Thanks! gave it a try last night and it helped quite a bit. I am also going to get out some strip styrene and put in a few greeblies to help it out.

CodeMaster said:
Lord Vader] Impressive..... Most impressive [/quote] Seriously though said:
I absolutely love those piping... but you need to take car about this clean up situation underneath....

That would improve this totally...

I am on it......
 
I'm in the process of taking the conduits off of my build Grendel. The tools that I'm using are these;

http://www.micromark.com/TWEEZER-SPRUE-CUTTER-DESPRUING-TWEEZER,8012.html

http://www.micromark.com/mini-scrapers-set-of-4,8422.html

http://www.micromark.com/miniature-chisels-set-of-7,8423.html

...and a rotary tool to clean up some really thick plastic that needs to be removed. I used these for the details on the back near the engine vents.

I also sanded with a 600X paper, but I trimed a piece off a round toothpick at a 45 degree angle and glued a small piece of sandpaper to it with CA. After dried, I trimed the paper and tip of my fine sanding stick so that I can get into the tight areas. I made about six of these at different surface sizes.
 
scratchy said:
I'm in the process of taking the conduits off of my build Grendel. The tools that I'm using are these;

http://www.micromark.com/TWEEZER-SPRUE-CUTTER-DESPRUING-TWEEZER,8012.html

http://www.micromark.com/mini-scrapers-set-of-4,8422.html

http://www.micromark.com/miniature-chisels-set-of-7,8423.html

...and a rotary tool to clean up some really thick plastic that needs to be removed. I used these for the details on the back near the engine vents.

I also sanded with a 600X paper, but I trimed a piece off a round toothpick at a 45 degree angle and glued a small piece of sandpaper to it with CA. After dried, I trimed the paper and tip of my fine sanding stick so that I can get into the tight areas. I made about six of these at different surface sizes.

Wow I thought I was the only mental case that fashioned his own micro sized sanding stick tips. Should have seen me two nights ago drawing out new contraptions....a regular DaVinci.
 
Scratcy: thank you for the links! I will put them to good use later this week, when I have the time to look the site over. From just a glance, there is a lot of good stuff there.... and I want to spend some time looking about.

And thank you for the tip on the sanding stick.

Here is the after market parts review:

Millennium Falcon part 7: Aftermarket Goodness....
 
Nice review on those AM kits. I need to get that Blue Moon and Photo Etch Grill sets from SSM. Interested to see how the new gun well kit turns out for you. That alone would make someone want to peer inside and take a look.
 

Latest posts

Back
Top