Grendel's Falcon

Grendels

Active Member
Joined
Nov 24, 2009
Messages
9,092
I was posting my build up at the top with the lighting tutorial, but decided to move my actual build here and keep the lighting part separate. That way we will have a bit more post on this thread.

Here are the first three videos:

The kit review:

Millennium Falcon: Kit review

Where I get started, and find out just how horrible the cockpit is:

Millennium Falcon: Getting Started

My work on the chairs for the cockpit:

Millennium Falcon: The chairs are done!

And the new installment after a month break:

Millennium Falcon part 4: Getting back to her
 
Nice update John! Good work with removing that detail. Makes me wanna bust out my mpc kit, still need to finish the fine molds 1/144 weathering though... So much to do lol! :p
 
Nice update bud! Those micromachine figures rule!! i may copycat you on that. You have inspired me to pull mine back out! How do those resin sidewalls look??? I have a new lady in my life too so I understand how that can get in the way of gluing plastic ;) I think you should go the full montey and replace all the piping with brass or steel, it really adds some nice weight and depth to the model. It is a lot of work but soooo worth it. Looking forward to your review of the blue moon and trilliance stuff.
 
merseajohn said:
Nice update John! Good work with removing that detail. Makes me wanna bust out my mpc kit, still need to finish the fine molds 1/144 weathering though... So much to do lol! :p

I know the feeling I have four active builds right now:

This one
The A-wing
Desslok's command cruiser
Brakiri cruiser

And if I count the Girlfriend's Christmas present, that makes 5. At least three of them are very near done.

MrNatural said:
Nice update bud! Those micromachine figures rule!! i may copycat you on that. You have inspired me to pull mine back out! How do those resin sidewalls look??? I have a new lady in my life too so I understand how that can get in the way of gluing plastic ;) I think you should go the full montey and replace all the piping with brass or steel, it really adds some nice weight and depth to the model. It is a lot of work but soooo worth it. Looking forward to your review of the blue moon and trilliance stuff.

I will have the side wall video up in about a week, but might take photos and post them sometime sooner. They look much better than the kit parts!

I am going to take a try at bending music wire tomorrow night. If it goes pretty good, then I will probably work the whole ship. I think it will be something I can work at 5 minutes here, 15 minutes there, basically whenever I have some free time.
 
Nice update Grendel! I have to agree,... rip all that piping and conduit off and replace it with brass and steel, I plan on doing the same on my build.
 
Thanks Scratchy, I will give it a shot tonight, if I like the results, then they will all go.....
 
Also doing it and oh boy! It's ALOT of work!!! :eek:
Not sure my method is good but I have scraped up the surface of the plates around the pipes, a little work with fine paper and it's all good.
I do think the work is worth the result though, really makes the detail pop.
 
Not to add to your to-do list, sir, but I've recently seen in some studio model pics that the saucer section plates in the front are actually slightly elevated above the front mandibles, so there's a little gap. My FM Falcon should be arriving any day now, and I'm wondering if anyone's ever tackled that detail, and how they went about it.
Always a pleasure to watch your vids, Grendels!
 
Great updates Grendels,

I am looking forward to seeing your review of the side walls replacementparts. It so much more informative seeing on video than text. I am hoping your review will give me an idea on how to approach my scrach built ones.

ozzy
 
Thank you Gents!

Patrick: I am sure going to give her a try!

Ozzy: I will probably do both. The reason why is that I really can't put up a video for a few days. And the next video will be about the A-wing I am building. After that the 555 timer chip and then another MF video. I have to give it a few days between videos to give my subscribers a chance to watch what I put up. If I flood them with videos, then some of them don't get watched.

I can however put up photos of the sidewalls in the mean time. So I should get that done in the next day or two.

NecronautDrummer: I checked my references, and you are correct there is a lip between the saucer section and the front. I took my scribing tool to it as a test and it looks ok, I will get photos up along with those side walls later.

Now off to eat, then I have two hours to build!
 
Grendels said:
NecronautDrummer: I checked my references, and you are correct there is a lip between the saucer section and the front. I took my scribing tool to it as a test and it looks ok, I will get photos up along with those side walls later.

Sounds like a quick and easy fix/mod. Awesome!
 
5 builds! All live and running! :eek:
G, I think You really deserve a name of multimodeler ;)

Nice job on this MF. It will be very interesting for me how all the add-al parts would change the look of the engine deck, since I'm going to use the same Blue Moon's accurising kit, and I'm curious if it's details for the engine deck would be enough.
 
Solander said:
5 builds! All live and running! :eek:
G, I think You really deserve a name of multimodeler ;)

Nice job on this MF. It will be very interesting for me how all the add-al parts would change the look of the engine deck, since I'm going to use the same Blue Moon's accurising kit, and I'm curious if it's details for the engine deck would be enough.

Actually, I have two A-wings going so that really makes 6 builds.....

But right now, I have a lot of free time in the evenings, so they are going to get done!

The blue moon kit has far more detail to it than the kit parts, but probably not enough for you Solander.

I will get that review done in the next two days....

NecronautDrummer:

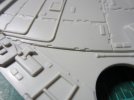
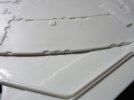
Here are a few photos of the scribing I did on the saucer section:

20120119_6.jpg
20120119_7.jpg

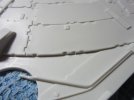
And as you can see, I still have a bit of cleaning up to do:

20120119_10.jpg

But you can see that it is a definite improvement! Thank you for pointing it out.

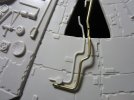
I also gave bending some brass a try last night:

20120119_15.jpg

This was just a trial piece, to see how difficult it was going to be. Not too bad, but time consuming. And from the photo you can see that the diameter of the brass is too large.

Sigh....the diameter of the pipes on this ship is a real problem. There is zero consistency to them. I got the micrometer out to take a few measurements and found that even one pipe can vary in diameter by 0.5mm along it's length. So brass or steel rods will make it look much better.

Off to the hobby shop to get more brass! ;D ;D
 
AWESOME job G! As soon as it was suggested to lift/separate the plates, I went to the man cave to look at it, I was looking at re building the plates along that section..... Not sure???
Good work Grendel! :)
 
Just got my FM Falcon in the mail today (thanks, punkpigpen!!). It looks like they used the ESB/ROTJ studio model for their beauty shots on the in-box art. The saucer/mandible plates seem to meet flush, as opposed to the old ANH 5 foot model. What do you use for your scribing tool and where did you pick it up? BTW, which version of the Falcon is the FM kit?

What are you using to bend your pipe? I use cheap craft store wire bending pliers, a zig-zagging bending jig I found at an R/C hobby shop, and a grab-iron bender meant for train modelling. I find the grab-iron bender works the best for those 90 degree bends found all over the place on the kit.

Watching carefully for helpful tips & trick for whenever I get brave enough to tackle my new behemoth!!
 
NecronautDrummer said:
What are you using to bend your pipe? I use cheap craft store wire bending pliers, a zig-zagging bending jig I found at an R/C hobby shop, and a grab-iron bender meant for train modelling. I find the grab-iron bender works the best for those 90 degree bends found all over the place on the kit.

I used small flat pliers with good results.
On a side note.... Following Grendel's lead on opening the edges at the front of the saucer, I approached it from another angle and cut it out from the rear using a multi tool and I don't know if I'm making more work for myself. :-\
 
NecronautDrummer said:
Just got my FM Falcon in the mail today (thanks, punkpigpen!!). It looks like they used the ESB/ROTJ studio model for their beauty shots on the in-box art. The saucer/mandible plates seem to meet flush, as opposed to the old ANH 5 foot model. What do you use for your scribing tool and where did you pick it up? BTW, which version of the Falcon is the FM kit?

What are you using to bend your pipe? I use cheap craft store wire bending pliers, a zig-zagging bending jig I found at an R/C hobby shop, and a grab-iron bender meant for train modelling. I find the grab-iron bender works the best for those 90 degree bends found all over the place on the kit.

Watching carefully for helpful tips & trick for whenever I get brave enough to tackle my new behemoth!!

For scribing I prefer the Tamiya scribing tool. I will be posting a video to YouTube later today about that. But with this one, the Tamiya tool wouldn't work. The area was too small and tight, so I used a dental pick. It worked quite well as you can see in the photos. I still have one section to do and I will video tape that.

As for bending wire, I bought a few tools for working with jewelry, and don't like them much. I am still working out my methodology. So I am not going to use that wire in the photo for the model. I will probably bend out two or three more test pieces before I am ready to do some work on the kit.

Today I am getting the right sized wire, and I am going to pick up a small vice. I think a vice will help get better bends when the wire changes direction in a very small bit of space. That is the real tricky part, holding the wire when you have to make two 90 degree bends right next to each other.

To bend this wire I used really small needle nose pliers that I got from Harbor freight tools along with a pair of flat nosed pliers. I will put up a photo later tonight when I get time to take one.

Omega: I don't know if I would have cut it out from the rear. I thought about it for a bit before I began and decided that at this scale, it really didn't need much of an opening to look right. Just remember that the reference photos we are looking at are for a model at least twice as large as the one we are working on. (The 32 incher, the 5 footer is much larger.) So the opening on those models would look much larger as well.

Later tonight I will get photos of the after market kits posted as well as a list of the sizes of the wires I am using to redo the plumbing.
 

Latest posts

Back
Top