The "Original" USS Odysseus NCC-26278

Quaralane

Well-Known Member
Joined
May 22, 2009
Messages
11,263
Okay, for what's likely to be my last build before the Big Spring Contest, I decided to recreate a much earlier build.
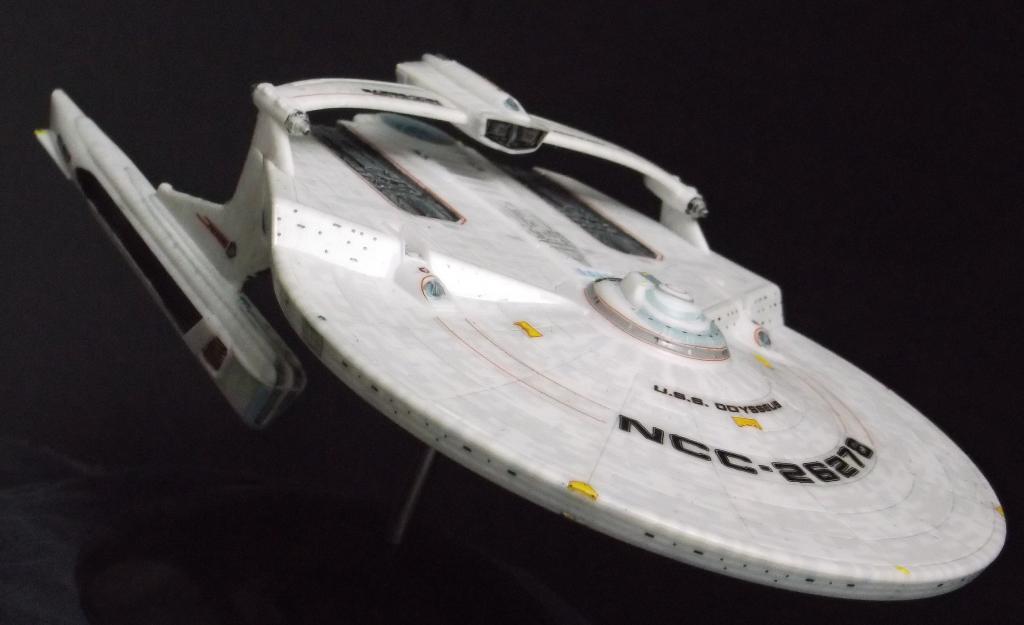
I'm going to build the Polar Lights 1/1000 Reliant.
I'll be using the ship to recreate the "original" USS Odysseus that we used in an RPG from way back in the late 80s when Star Trek: The Next Generation first came on the air.
Using the old FASA "Federation Ship Recognition Manual," our group decided we'd use a "Reliant" class ship.
After looking over the available names and registries, we chose the USS Odysseus, NCC-26278
PL-Odysseus-Reliant-00.jpg

A look at the sprues for the kit.
The parts layout is something like a cross between the old AMT 1/537 Reliant, and the Polar Lights 1/1000 Enterprise Refit
PL-Odysseus-Reliant-01.jpg
PL-Odysseus-Reliant-02.jpg
PL-Odysseus-Reliant-03.jpg
PL-Odysseus-Reliant-04.jpg
PL-Odysseus-Reliant-05.jpg

Basic assembly went VERY fast, given that this was intended as a snap kit.
To aid with seamwork, I opted to glue the kit together
PL-Odysseus-Reliant-06.jpg

With the subassemblies finished, I went in and painted up the sensor pallets, nacelle grilles, and a couple of other details before starting work on the aztec decals
PL-Odysseus-Reliant-07.jpg
PL-Odysseus-Reliant-08.jpg
PL-Odysseus-Reliant-09.jpg

Youtube link:
http://www.youtube.com/watch?v=3ct288gCqy8
 
Eh up buddy,not really into the trek...sorry if i offend all trekkies!
but i love the shape and style of this ship....will keep looking in on this
build dude....
just gonna have a look at the spring contest to see what the theme is..
cheers mym8 peza
 
First off, amy apologies for not updating this more regularly.
I was concentrating more on the build than the log of it.

Now, that said, it's time for an update on the original Odysseus.

Started aztecing the lower side of the main hull.
I also added "main gangway" details using the same markings as I did with the Odysseus Twins.
Fair warning here, the windows near the lower dome are not supplied on the aztecs, you'll need to use the kit decals for these
PL-Odysseus-Reliant-10.jpg
PL-Odysseus-Reliant-11.jpg

Started adding the other details and markings, such as the shuttlebays and the registry.
I also added the kit supplied markings for the phaser banks and rcs assemblies.
I also painted in the lower impulse dome with a second coat of metallic light blue
PL-Odysseus-Reliant-12.jpg
PL-Odysseus-Reliant-13.jpg

That side done, I turned my attentions to the upper side of the main hull.
With the aztecs in place, I put in the other detail markings, including the phaser blocks and rcs thrusters.
I also went in and used some of the detail markings from the Refit Enterprise kit to dress up the bridge
PL-Odysseus-Reliant-14.jpg

Registry markings were added, along with the docking port for the back of the bridge module
PL-Odysseus-Reliant-15.jpg
PL-Odysseus-Reliant-16.jpg

With the main hull mostly done, I moved to the roll bar.
After adding the kit aztecs, I used more custom registries for the upper side of the roll bar
PL-Odysseus-Reliant-17.jpg
PL-Odysseus-Reliant-18.jpg

Decalling of the struts and nacelles went along similar lines.
The only real problems I had were with the decals I was using for the inner sides of the warp grills, which I solved the same way I did on the Odysseus twins, by reversing them.
I also learned the hard way that you do not try to adjust decals while there is Micro-Sol on them. They WILL stick to your fingers, rather than the model surface.
I wound up having to fix the banner on the port strut for nearly the same reasons.

The running lights were picked out in yellow, red, and green.
Impulse engines were painted in with red.
Went in and added the pinstripe decals for the saucer registry numbers as well as the Starfleet banner on top of the wepon pod
I also painted in the rcs thrusters on the nacelle fins using yellow and black.
With a fine tip Sharpie, I went in and drew in the windows for the band around the bridge.
I did the same thing to replace the vent decals on the edges of the nacelle struts.

Finished build pics:
PL-Odysseus-Reliant-19.jpg
PL-Odysseus-Reliant-20.jpg
PL-Odysseus-Reliant-21.jpg
PL-Odysseus-Reliant-22.jpg

PL-Odysseus-Reliant-23.jpg
PL-Odysseus-Reliant-24.jpg

PL-Odysseus-Reliant-25.jpg
PL-Odysseus-Reliant-26.jpg
PL-Odysseus-Reliant-27.jpg
PL-Odysseus-Reliant-28.jpg

Youtube link:
http://www.youtube.com/watch?v=oRyXRt3xNpI
 
Eh up Q,well done mym8 i love the way she's turned out.
that's one sweet build buddy... ;)peza
 
Nice work, Q.
The Odysseus is what can now be called a kind of "trademark of your craftsmanship", and it is always great to see You getting back tothis theme.
The executionis superb as always, thumbs up!
 

Latest posts

Back
Top