Be looking forward to your finished productSo last week began the journey I've waited for years for...
I won't be starting this yet, as I need to finish getting the new workspace together and need more supplies and gear, as well as the new lighting kit PL will be putting out soon, but I AM STOKED.
Gonna do some slight tweaks, but more or less aiming to build and paint her as seen onscreen. The weathering will be slightly different from what most people do, and I am debating attempting to do an extremely subtle aztek paneling on it.
Will have a lit 3d printed bridge, 1/350 crew, and a new hangar bay(also 3d printed) that is designed to accomodate the lighting better. I am also gonna do the fake spotlight effect as Trekriffic has done on his Enterprise E.
While I am gonna put my best effort into this, it's just a preliminary to my REAL goal: buy a 2nd kit to convert into my fan design the USS CONDOR.View attachment 1858
Obviously the 3d inages are ones I made of the Condor and the fancomic she will appear in.
The One I Have Been Waiting for
- Thread starter Thereal9thdoctor
- Start date
Thereal9thdoctor
Well-Known Member
- Joined
- Jun 27, 2021
- Messages
- 571
Gettin pretty close. I figure a couple more weeks, end of the month at most.Be looking forward to your finished product
Thereal9thdoctor
Well-Known Member
- Joined
- Jun 27, 2021
- Messages
- 571
So got the gloss on the nacelles.
But I have a BIG problem. Test fitting the shauttlebay into the sec. Hull. With all the wires coming out the back, I simply CANNOT fit the bay properly. I cut out the areas in the hull dictated by the instructions to make room for em, but they still refuse to lay flat enough to smoosh the bay in where it needs to go. There is also damage to at least on LED wired to the bay as a result, which likely means the bay won't light at all now.
I am thinking about ditching the bay altogether at this point. That means cutting the bay doors off, gluing the pie wedge into the open door and using the alternate part for that area, but I simply do not think I can get the bay in there without damaging it, the wires or sec. Hull.
Thereal9thdoctor
Well-Known Member
- Joined
- Jun 27, 2021
- Messages
- 571
I made the call. The doors and tower came off ok, though I have to redo the wiring now as part of the bay leds got damaged and had to cut em off. Not a big deal thouvh now more splicing to do, which I hate doing. So now since I had cut those area away the alt piece can't sit right I gotta build that back. Sigh... and part of the bay got damaged so I can't even just display it. All that work...
trekriffic
Well-Known Member
- Joined
- Jan 6, 2012
- Messages
- 1,030
That's a real shame. It looked so nice too. When I built mine I had to grind away about a sixteenth of an inch of plastic from the thickness of the hull using my Drexel to get it to fit:
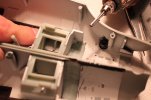
IMG_4401 by Steve J, on Flickr
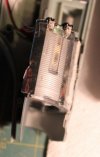
IMG_4402 by Steve J, on Flickr
Then, after gluing the hull together, the LED that lit the control room over the clamshell doors wouldn't light so I had cut a hole in the upper hull to resolder a broken wire. Loads of fun:
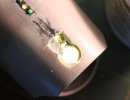
IMG_4583 by Steve J, on Flickr
Thank god for AVES epoxy putty:
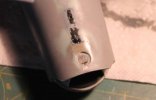
USS Enterprise NCC-1701 Spinal Surgery by Steve J, on Flickr
I'll bet you anyone who ever attempted building this model with the hangar bay has some kind of horror story they could share about it.

IMG_4401 by Steve J, on Flickr

IMG_4402 by Steve J, on Flickr
Then, after gluing the hull together, the LED that lit the control room over the clamshell doors wouldn't light so I had cut a hole in the upper hull to resolder a broken wire. Loads of fun:

IMG_4583 by Steve J, on Flickr
Thank god for AVES epoxy putty:

USS Enterprise NCC-1701 Spinal Surgery by Steve J, on Flickr
I'll bet you anyone who ever attempted building this model with the hangar bay has some kind of horror story they could share about it.
Last edited:
Thereal9thdoctor
Well-Known Member
- Joined
- Jun 27, 2021
- Messages
- 571
Yeah. My GF wants to try to repair the roof part that got broken. Hopefully it works. I'd at least like to display the thing since I put so much work in it.That's a real shame. It looked so nice too.
But I am not terribly upset in general about it, as after going through this I honestly think the lighting kit is simply not well designed for the entirety of the job. I think only custom lighting is the way to go for lighting the shuttlebay.
Thereal9thdoctor
Well-Known Member
- Joined
- Jun 27, 2021
- Messages
- 571
The shame is that this 3d printed bay is SUPPOSED to allow everything to fit better as well as be more accurate. Well, one outta two ain't bad I guess. I wasn't gonna do anything that might bite me in the butt as far as doing hull surgery, and the only way I can see getting the bay to fit right would have been to cut away half of the pylon holders, which no way was that happening.That's a real shame. It looked so nice too. When I built mine I had to grind away about a sixteenth of an inch of plastic from the thickness of the hull using my Drexel to get it to fit:
View attachment 88222
IMG_4401 by Steve J, on Flickr
View attachment 88223
IMG_4402 by Steve J, on Flickr
Then, after gluing the hull together, the LED that lit the control room over the clamshell doors wouldn't light so I had cut a hole in the upper hull to resolder a broken wire. Loads of fun:
View attachment 88224
IMG_4583 by Steve J, on Flickr
Thank god for AVES epoxy putty:
View attachment 88225
USS Enterprise NCC-1701 Spinal Surgery by Steve J, on Flickr
I'll bet you anyone who ever attempted building this model with the hangar bay has some kind of horror story they could share about it.
trekriffic
Well-Known Member
- Joined
- Jan 6, 2012
- Messages
- 1,030
I totally agree. I went with SMD LED's to light mine using the clear bay parts:
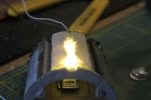
USS Enterprise 1/350 Scale - Shuttle Bay Light Test by Steve J, on Flickr
i lit the control room with a rectangular LED that I had to file even flatter to fit.
Even then I still had to carve a trench along the seam between the hull halves at the top of the bay for the wires to lay in:
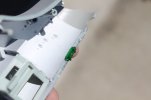
IMG_4400 by Steve J, on Flickr
Of course, I had to remove the flanges from the backside of all the window inserts too so they sat flush with the inside surface.
All the grinding left me with a small light leak thru the thinned hull plastic, thankfully I noticed this during the test fitting phase so I could brush the inside surface with black Tulip paint from the craft store:
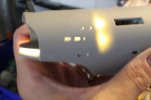
IMG_4407 by Steve J, on Flickr

USS Enterprise 1/350 Scale - Shuttle Bay Light Test by Steve J, on Flickr
i lit the control room with a rectangular LED that I had to file even flatter to fit.
Even then I still had to carve a trench along the seam between the hull halves at the top of the bay for the wires to lay in:

IMG_4400 by Steve J, on Flickr
Of course, I had to remove the flanges from the backside of all the window inserts too so they sat flush with the inside surface.
All the grinding left me with a small light leak thru the thinned hull plastic, thankfully I noticed this during the test fitting phase so I could brush the inside surface with black Tulip paint from the craft store:

IMG_4407 by Steve J, on Flickr
Thereal9thdoctor
Well-Known Member
- Joined
- Jun 27, 2021
- Messages
- 571
Maybe I will do all this for the Condor build, as I will be more familiar with this kit at that point. But being so far along, and still familiarizing myself with it, I am hesitant to do anything that could ruin it.I totally agree. I went with SMD LED's to light mine using the clear bay parts:
View attachment 88226
USS Enterprise 1/350 Scale - Shuttle Bay Light Test by Steve J, on Flickr
i lit the control room with a rectangular LED that I had to file even flatter to fit.
Even then I still had to carve a trench along the seam between the hull halves at the top of the bay for the wires to lay in:
View attachment 88227
IMG_4400 by Steve J, on Flickr
Of course, I had to remove the flanges from the backside of all the window inserts too so they sat flush with the inside surface.
All the grinding left me with a small light leak thru the thinned hull plastic, thankfully I noticed this during the test fitting phase:
View attachment 88228
IMG_4407 by Steve J, on Flickr
Thereal9thdoctor
Well-Known Member
- Joined
- Jun 27, 2021
- Messages
- 571
So in prep for using the alternate aft piece, I made a bulkhead from two pieces of (I think) 0.20 styrene sheet, sanded to match the hull contours. The gap at the top is for wires. I put this in because even with this setup getting this all together when I close up the hull will be tricky, and there is a chance for the alternate part to slide further back into the hull. This will prevent that.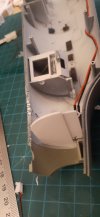 And here is the bulkhead with the alternate puece to show how this will work.
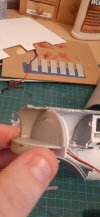
 And here is the bulkhead with the alternate puece to show how this will work.
Thereal9thdoctor
Well-Known Member
- Joined
- Jun 27, 2021
- Messages
- 571
So finally worked up the courage to do the splicing. So here is the simplified wiring that was the shuttlebay.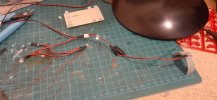
Just tested it and it works fine. So I have the alternate bay piece lightblocked and the fit of the pie piece to the open door piece has been improved for glue up. I dunno if I will do all the 2nd hull stuff today but possibly tomorrow.

Just tested it and it works fine. So I have the alternate bay piece lightblocked and the fit of the pie piece to the open door piece has been improved for glue up. I dunno if I will do all the 2nd hull stuff today but possibly tomorrow.
Thereal9thdoctor
Well-Known Member
- Joined
- Jun 27, 2021
- Messages
- 571
Thinking after I get the decals on the nacelles Ima take maybe a week break. I need more gloss clear for the secondary hull and I am getting kinda stressed over this kit. Since I just had issues due to being stressed over other crap in my life I think staying away from this for a bit to destress is in order.
Thereal9thdoctor
Well-Known Member
- Joined
- Jun 27, 2021
- Messages
- 571
Edit: doing it now. Just lost one each of the underside nacelle decals from eacj decal set. The PL one worked great but needed to be scootched forward slightly. It tore in half when I moved it. The HDA decal didn't wanna work at all.
Thereal9thdoctor
Well-Known Member
- Joined
- Jun 27, 2021
- Messages
- 571
Contacted PL again, asking to see if I could buy a new set of decals. They never called me back when I was trying to replace the wire so I doubt they call me back on this.
I can't win.
I can't win.
Thereal9thdoctor
Well-Known Member
- Joined
- Jun 27, 2021
- Messages
- 571
Ok... so if I don't hear back from PL, I plan to buy Aztek Dummy's window mask set, as it has masks for the underside nacelle bits. I can easily do that. So I plan on buying that if all else fails.
This may end up working on my favor. It forces me to slow down on this.
This may end up working on my favor. It forces me to slow down on this.
trekriffic
Well-Known Member
- Joined
- Jan 6, 2012
- Messages
- 1,030
Did you try rewetting the decals on the model to repositioning the two halves? I can't think of how many times I was able to salvage a decal that tore on me over the years. So long as it didn't fragment too badly of course.Edit: doing it now. Just lost one each of the underside nacelle decals from eacj decal set. The PL one worked great but needed to be scootched forward slightly. It tore in half when I moved it. The HDA decal didn't wanna work at all.
Thereal9thdoctor
Well-Known Member
- Joined
- Jun 27, 2021
- Messages
- 571
The problem was that the forward half had already started to stick down, and since I'd put Microset on it, the more I'd try to move it the more it'd rip apart.Did you try rewetting the decals on the model to repositioning the two halves? I can't think of how many times I was able to salvage a decal that tore on me over the years. So long as it didn't fragment too badly of course.
The HDA decal I am not sweating as it was not the right color and I fully expected it to not work right given how thin they are.
trekriffic
Well-Known Member
- Joined
- Jan 6, 2012
- Messages
- 1,030
i see. Yes, Microsol pretty much screwed you up.The problem was that the forward half had already started to stick down, and since I'd put Microset on it, the more I'd try to move it the more it'd rip apart.
The HDA decal I am not sweating as it was not the right color and I fully expected it to not work right given how thin they are.
Thereal9thdoctor
Well-Known Member
- Joined
- Jun 27, 2021
- Messages
- 571
That is my belief as well. Though usually I have a bit of time before it starts digging like that. I dunno. But I think painting those ares will look better anyhow.i see. Yes, Microsol pretty much screwed you up.
Similar threads
- Replies
- 6
- Views
- 190
- Replies
- 7
- Views
- 782
- Replies
- 2
- Views
- 402
