The One I Have Been Waiting for

Thereal9thdoctor

Well-Known Member
Joined
Jun 27, 2021
Messages
571
So last week began the journey I've waited for years for...

I won't be starting this yet, as I need to finish getting the new workspace together and need more supplies and gear, as well as the new lighting kit PL will be putting out soon, but I AM STOKED.

Gonna do some slight tweaks, but more or less aiming to build and paint her as seen onscreen. The weathering will be slightly different from what most people do, and I am debating attempting to do an extremely subtle aztek paneling on it.

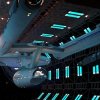
Will have a lit 3d printed bridge, 1/350 crew, and a new hangar bay(also 3d printed) that is designed to accomodate the lighting better. I am also gonna do the fake spotlight effect as Trekriffic has done on his Enterprise E.

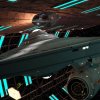
While I am gonna put my best effort into this, it's just a preliminary to my REAL goal: buy a 2nd kit to convert into my fan design the USS CONDOR.20210627_141531.jpg

Obviously the 3d inages are ones I made of the Condor and the fancomic she will appear in.
 

Attachments

  • 390cddd0-7225-458f-aad8-8a46f44f0002.jpg
    390cddd0-7225-458f-aad8-8a46f44f0002.jpg
    302.2 KB · Views: 13
  • 6eabbeed-1adc-416b-a037-f4daafcc5192.jpg
    6eabbeed-1adc-416b-a037-f4daafcc5192.jpg
    252 KB · Views: 13
  • 831c6234-3eea-46ee-8d69-db0c227af60a.jpg
    831c6234-3eea-46ee-8d69-db0c227af60a.jpg
    452.5 KB · Views: 13
Should be an interesting build.
Going to be HUGE
Yes! I am still getting furniture for my new apartment(I have to get approval from the GF on certain stuff since she is moving in here this fall), and was gonna put this on a shelf unit when done. But my GF suggested getting a small end table and modding it to be a base for the E, as I am terrified about this thing taking a shelf dive. I liked the idea, and will do that for both this and the Condor.
 
Looking forward to following your progress. having a 3D printed shuttle bay should make for an easier build than those of us who had to grind away hull plastic to make it fit using the original kit parts.
 
Looking forward to following your progress. having all the aftermarket painted shuttle bay should make for an easier build than those of us who had to grind plastic to make it fit using the kit parts.
Hopefully. But I am getting a moto tool kit this payday just in case.

Maybe you can answer a question... I was hoping that the shuttlebay doors can be swapped between open and closed. Is that possible? Looking at the kit it SEEMS possible, but I'm not at all certain.
 
Last edited:
Not exactly, but that is even better than what I meant. How is the center section held in? Magnets?
Nope. It’s a friction fit. The top of the pie slice fits under the shuttle bay control room (?). You slide it under it and push the section into the opening at the bottom. You want to use a fine toothed razor saw to make your cuts; lIke the ones that come with the small aluminum hobby miter boxes.
 
Last edited:
Nope. It’s a friction fit. The top of the pie slice fits under the shuttle bay control room (?) once you slide it under it and push the section into the opening at the bottom. You want to use a fine toothed razor saw l8ke the ones that come with the aluminum hobby miter boxes.
Nice! I have razor saw and a mini hacksaw designed for Gundam kits, so that should be a snap
 
This is likely a pointless question, but does anybody know when the new light kit for this ship is coming out? I preordered it on CultTvMan.com, but it just says mid 2021. I kinda need a better idea when its due to drop cos the way my bills run I have to be careful about preorders or I could shoot myself in the foot regarding either the bills or the preorder. I had heard rumors from a model building friend at work that it might be next month, but this guy isn't really a Sci fi builder so he could be just sayin that.
 
So I have pretty much decided that rather than trying to match screen accuracy, I am gonna go with what looks good to me as far as main hull color goes. I've pretty much settled on Tamiya AS-26. The more accurate grey color is just too green for me, regardless of accuracy. I never even noticed the green in the main color till I saw video of the 11 footer, and I've never really liked it.

I am gonna try to stay closer to the right colors on most everything else however.
 
Starting to get stuff in for the Enterprise. Saturday I got in the Paragraphix gridline compass, and Monday I got the 3d printed improved bridge and shuttlecraft with INTERIOR!:320210719_235604.jpg20210719_235423.jpg

As you can see I have removed a couple parts for the compass. I'm only gonna pencil in the upper saucer for gridlines, as on the 11 footer.
 
Not much of an update... but I have ordered more Parapgraphix photoetch, and the screens for that 3d printed bridge. If I can swing it this pay I am gonna get the weathering decals, though even if I use em I am adding more weathering. Not alot, but I wanna add stuff like paint chipped off on all leading edges ect.
 
Nope. It’s a friction fit. The top of the pie slice fits under the shuttle bay control room (?). You slide it under it and push the section into the opening at the bottom. You want to use a fine toothed razor saw to make your cuts; lIke the ones that come with the small aluminum hobby miter boxes.

Got another question for you. Any ideas on how I might make the bridge have decently lit ceiling lighting? I doubt LEDs would fit, and I was thinking fiber optics but I doubt it'd be bright enough. Course since I don't have the lighting kit yet I don't even know exactly how it loghts the bridge...
 
Got another question for you. Any ideas on how I might make the bridge have decently lit ceiling lighting? I doubt LEDs would fit, and I was thinking fiber optics but I doubt it'd be bright enough. Course since I don't have the lighting kit yet I don't even know exactly how it loghts the bridge...
I made this to sit between the top of the bridge piece and the hull. The white tubing‘s inner diameter matches the inner diameter of the round opening over the bridge:

8938310027_80e117684f_c.jpg
IMG_4218 by Steve J, on Flickr

The clear plastic ring has been sanded for better light diffusion. I glued it and the collar into the underside of the opening. The diffusion ring is wide enough to overhang inside the walls of the bridge like the colored lighting panels you can see over the bridge stations on TV. Two LED‘s are mounted right up tight - one on each side of the bridge touching the ring where the little external red lights are on the sides of the bridge deck. A third LED sits at the front to light up the main view screen as well as the ring:

8938309615_6b24bbf0f1_c.jpg
Enterprise B-C Deck and Bridge Light Test by Steve J, on Flickr

Here’s how it looks lit up:

8938932458_93496913ef_c.jpg
Enterprise Bridge Dome Open by Steve J, on Flickr

I lit the bridge dome itself using a tiny warm white SMD LED wired up and glued to a clear disc glued flush to the underside of the translucent dome. A second grey plastic ring with a hole drilled in its center was then glued to the clear plastic disc to fit inside the opening over the bridge:

8938309965_3e713d300e_c.jpg
IMG_4221 by Steve J, on Flickr

9265807520_6bffbcbacc_z.jpg
Enterprise Bridge Dome Pops Up by Steve J, on Flickr

9263031029_eac117b88b_c.jpg
IMG_4660 by Steve J, on Flickr
 
Last edited:
I made this to sit between the top of the bridge piece and the hull. The white tubing‘s inner diameter matches the inner diameter of the round opening over the bridge:

View attachment 17068
IMG_4218 by Steve J, on Flickr

The clear plastic ring has been sanded for better light diffusion. I glued it and the collar into the underside of the opening. The diffusion ring is wide enough to overhang inside the walls of the bridge like the colored lighting panels you can see over the bridge stations on TV. Two LED‘s are mounted right up tight - one on each side of the bridge touching the ring where the little external red lights are on the sides of the bridge deck. A third LED sits at the front to light up the main view screen as well as the ring:

View attachment 17069
Enterprise B-C Deck and Bridge Light Test by Steve J, on Flickr

Here’s how it looks lit up:

View attachment 17070
Enterprise Bridge Dome Open by Steve J, on Flickr

I lit the bridge dome itself using a tiny warm white SMD LED wired up and glued to a clear disc glued flush to the underside of the translucent dome. A second grey plastic ring with a hole drilled in its center was then glued to the clear plastic disc to fit inside the opening over the bridge:

View attachment 17071
IMG_4221 by Steve J, on Flickr

View attachment 17072
Enterprise Bridge Dome Pops Up by Steve J, on Flickr

View attachment 17073
IMG_4660 by Steve J, on Flickr

That is too frikkin cool! Definitely will use that inner ring and led idea. I was thinking of making the ceiling frame that the 3d model of the TOS bridge I use in my fanart has, based off the upper ceiling from TAS. Its almost like a spiderweb frame, with a device in the center to deactivate hostiles' weapons. I wasn't gonna make that part, just the frame itself. And then let the light from the bridge itself light the upper dome. I dunno if I can rig the dome the way you have it. I love the idea though. Thanks for the ideas!
 
That is too frikkin cool! Definitely will use that inner ring and led idea. I was thinking of making the ceiling frame that the 3d model of the TOS bridge I use in my fanart has, based off the upper ceiling from TAS. Its almost like a spiderweb frame, with a device in the center to deactivate hostiles' weapons. I wasn't gonna make that part, just the frame itself. And then let the light from the bridge itself light the upper dome. I dunno if I can rig the dome the way you have it. I love the idea though. Thanks for the ideas!
I thought I could light the upper dome using just the ambient light from the ring but it just wasn’t bright enough which is why I lit the dome up with its own LED. Now if you were to use the clear dome instead of the translucent doe to be able to see the bridge underneath you wouldn’t be lighting the dome anyway,
 
I thought I could light the upper dome using just the ambient light from the ring but it just wasn’t bright enough which is why I lit the dome up with its own LED. Now if you were to use the clear dome instead of the translucent doe to be able to see the bridge underneath you wouldn’t be lighting the dome anyway,
Yeah, I wanna use the clear dome. Now when I build the second kit as the Condor I will not use the bridge, as the Condor's bridge has a different layout as well as being a blend of the TOS and TMP styles. I'm not even gonna begin to try to do that at that size.
 

Latest posts

Back
Top