Revell/Monogram Cylon Raider

A perfect build presentation for a perfect result !

This Cylon Raider is so cool ! Great job ! :D
 
What a fantastic paint tutorial on pre-shading, beautifully executed my friend.

Can you tell us what ratio's of paints you used in the base coat, top coat & high lights?

Great stuff, can't wait for the weathering tutorial ;D
Gag
 
Glorfindel, JohnSimmons, kiwi gav, & YOULI - Thanks so much! I appreciate the feedback from you all. A large part of the enjoyment I get from this hobby is sharing with like-minds. I consider your feedback high praise. :)
--
What a fantastic paint tutorial on pre-shading, beautifully executed my friend.

Can you tell us what ratio's of paints you used in the base coat, top coat & high lights?

Great stuff, can't wait for the weathering tutorial
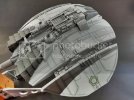
Thank you Gag! I'm glad you see value in what I shared! Rather than my final post being the finished piece, I'll post some additional pics through the weathering process. I've never tried oils before so I hope I don't screw things up. :(

Concerning paint ratios:

All Tamiya acrylics thinned with generic isopropyl alcohol. I used an Iwata Eclipse and it sprayed Tamiya paints better when they were thinner.

1. Preshade - XF-69 @ 30/70 paint/thinner
2. Base Coat - 50/50 XF-80/XF-66 @ 40/60 paint/thinner
3. Highlights - Base coat lightened ~10% w/ XF-12 @ 20/80 paint/thinner
4. Shadows - X-19 @ 10/90 (maybe even 05/95) paint/thinner

Like I mentioned, the 10% highlight mixture was subtle and looked great when I sprayed it. But, when the Future clear coat went on, nearly all these highlights disappeared. Next time, I'll get bolder and mix a lighter concoction - maybe going up to 15-20% in some areas.

Hope this answers your question and I'm happy to elaborate if need be.
 
Looks great, so nice a cleanly executed unlike mine (I painted using an acutal brush so you can see brush strokes in spots). The surface is nice and smooth so it doesn't ruin the scale of things. Nice shading as well

Makes me want to strip and repaint mine
 
Hi Guys,

I've made painting progress but have had no time to take good pictures. I quickly snapped a couple this afternoon.

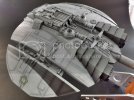
I added highlights reminiscent of a color modulation technique. Then, completed an oil wash. I used the oils to selectively shade in areas where I wanted stronger shadows. So far, I'm liking the look. I suppose a coat of Future is next followed by some minimal chipping and wear.

Am I keeping the grime too "clean", you think?

Photo_1_zps15d4fdca.jpg

Photo_2_zps96280b4b.jpg
 
That looks amazing! Just caught up on this thread, unbelievably good work and terrific attention to detail.


1. The 'master modeler' link you posted is so inspiring.


2. What's the block being used to hold your painted pieces? I want one!


Seen in this photo:


DSCF5213_zps8f88e503.jpg
 
Ian - Thanks for the kind words!

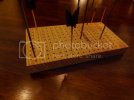
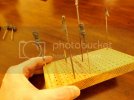
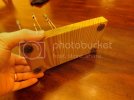
The block you see is homemade. I build Gundam kits too and they have zillions of parts to be painted. I needed something to keep the parts seperate and upright while I painted. Here's what I did:

1. Purchased (1) 4' 1x4 piece of pine from the home improvement store.
2. Cut it in 7" sections
3. Drilled holes with my drill press
4. Added felt feet on the bottom

I made a stack of these stands (~6) in about 1 hr and spent $3.00.

I also made the part clips: A bag of alligator clips from radio shack, a handful of brass rod, and some solder. I can paint and dry model parts for days! ;D Here are some pics for reference:

DSCF5370_zps727738c9.jpg

DSCF5371_zpsf02212e8.jpg

DSCF5372_zps23e5ea9c.jpg
 
So simple! Thanks for the details, I'll be making mine tomorrow. I'm also looking for alligator clips without teeth, or something not as sharp as the ones I got from RS.
 
Great work on this. The painting is outstanding.

One question, so i am familiar with where to get everything needed for the nifty paint stand you made, except for the brass rod? Is this something you get at a home improvement store? I think I may have seen wooden dowel this diameter at the craft store, may try that. Thanks for the great tip, think i am goin to steal it ! :eek:
 
I know you were asking @CheesyGrin - I'm just using wooden skewers, but the brass rod seems like a more permanent and stable solution.
 
One question, so i am familiar with where to get everything needed for the nifty paint stand you made, except for the brass rod? Is this something you get at a home improvement store? I think I may have seen wooden dowel this diameter at the craft store, may try that. Thanks for the great tip, think i am goin to steal it !

I used brass rod from a grab-bag of rod and tubing. Hobby Lobby sells these grab bags for ~$17. But you can absolutely use wooden dowel or wooden kabob skewers as well. The wooden dowel will be less expensive than brass rod and just as functional. To Ian's point - the brass rod is stronger. But as long as you're careful, the dowels should service the need just fine!
 
This has to be the best War Raider I have ever seen. Outstanding work! :eek:
 
In every part classic - great job so far...!
Now I feel bad for raping that kit as donor for a kitbash :/
;)
 
Ken, struschie, Ozzman78, Hook1169 -

Thanks so much! The great feedback encourages me to finish up sooner than later! Well, that and my wife is tired of me critiquing it mercilessly! ;)
 

Latest posts

Back
Top