Revell 50th Anniversary 1/144 Saturn V Rocket (Complete)

rastanz

Well-Known Member
Glue Member
Joined
Jan 27, 2011
Messages
191
Hey guys, hope ya'll are safe and well.

I'm back to attempt another fun build this time I've chosen a 'real space' model of the Revell 50th Anniversary 1/144 Saturn V Rocket.

I would've been 2yrs mini human at the time of it's historical launch so I can't really remember if I watched it or not but I did manage to catch a few there after on live black n white television as a youngster along with my brothers and sisters.

Model consists of 82 parts which includes the base (no clear parts), it stands 775 mm or 30.51" when completely assembled and mounted on it's base and is moderately detailed by which I mean, some of the inner details are lacking (the rocket bells) and are very much just basic shapes. I guess Revell's approach was people would only display the rocket in it's entirety and not in separate sections.

The exterior detail is good but not great as there's are a few issues to address that I noticed of which I will start on.

Stage one and the corrugated panels:

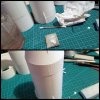
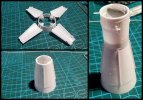
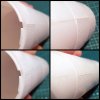
Going over the sprues there's a lot of flash present which I guess is a tell tale sign of this models age, I did a dry fit of the SI cylinder halves and noticed that they do not line up and that there's a bump along the corrugated panels where the cylinder halves join, I could've left the raised area as is but it would be noticeable and hard to ignore knowing that it's there, as for the the misalignment, it can be easily fixed.

I've begun working on one side which I've started sanding the raised area's down to even them out also re-scribing the panel lines which brings me to another noticeable find, the corrugated pattern is a shallow step type and not an actual groove so I had to go in on an angle with my scribing tool which presented my first challenge, don't slip and eff it up!

Top pics is the opposite side yet to be done where you can clearly see the bump, the bottom pics I've been working on to even them out.
A11SV03.jpg

Cheers.
 
Looking great, can't wait to see more.
Thanks mate!
.....................................
Little update:

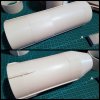
The cylinder halves for stages I and II have been glued together, puttied and sanded smooth, I've finished the first pass of cleaning up the seams but there's a couple of places that need some attention where the corrugated areas begin but I'm happy how it's turning out.

A11SV05.jpg

A11SV04.jpg

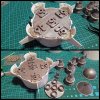
Also prepped stage III but wont be gluing that together as there's no way to slide one of the end sections into place because there's a narrow channel around the inside edge of the upper lip where the piece is suppose to sit, the opposite end is fine and will slide into place but it looks like I'll be detailing and painting these end caps ahead of gluing the cylinder halves together.

Glued the engine bell halves together which are riddled with seams, I'm not looking forward to fixing the bells as there's a bit of filling to do... I also started scratch detailing the under section with some thin brass rod.

A11SV08.jpg

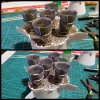
I used my Vallejo putty bottle as a guide to bend the brass into shape, measured (guesstimated) the distance and the height of the prototype, cut extra pieces and added some minor details. I then used my pin vice to drill the holes.

Tested with a dry fit which worked out pretty good.

A11SV06.jpg

I used the prototype as my template and built three more, I'll add more details to the area, not looking to be accurate just space filling.

A11SV07.jpg

I know it's probably pointless detailing the area as it wont be seen but at least I'll know it is there.

Thanks for looking.
 
Liking the work you're doing here
Thanks, having fun with it.

I just picked this kit up myself. Looking forward to some inspiration for detailing it
I think I'll just do some basic detailing.

Had a busy weekend away at work so I spend today detailing the engine bells and adding some more piping to the lower section.

Had to rack the ole brain cells as to how I would approach the tiny piping around the fuel line? of the engine bells.

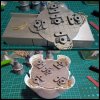
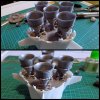
I used my pin-vise to drill a small holes that would act as anchors on the undersection then took my needle nosed pliers as my shaping tool and wrapped some thin brass rod into tiny 'C' shapes (65 pieces) and glued them to the bells. The first bell was a little fidgety but I soon got into a flow during the second as it became much easier once I figured out a plan.

Added some thicker brass rod piping to the bells but I think I'll stop there, it doesn't look so empty now the extra details have been added.

I don't think I'll worry about the seam lines on the inside of the bells as I wont be looking inside them.

A11SV09.jpg

Cheers.
 
A little more detailing on the other sections, once I'm done with detailing these area's I will start on the lunar module.

A11SV10.jpg
 
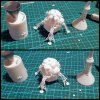
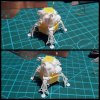
Started detailing the luna module by adding some piping to the legs just under the elbow, scratch built the little module ramp complete with hand rails, I couldn't make it any wider because it would've caught on the ascent module when turning it into place... contemplated on stripping off the ladder and rebuilding it but though nah, the original does the job just fine.

Also scratch built the thrusters out of some styrene rod and strip, talk about fidgety at antman scale, what a mish that was especially when most of the little nubs I was cutting out were lost to the carpet monster, a couple of the thrusters turned out better than others, the rear one's are a little rough around the edges from glue flash but I'll clean that up once they set, overall it adds to the lack of detail on the piece.

There was as chunk in one corner of the ascent module that I removed and replaced with styrene rod as my reference photo's showed a pipe there instead of a solid structure.

Added an antenna using thin brass wire... I'm looking for a suitable piece to replace the small radar dish but haven't found anything in my parts stash that has a suitable shape.

A11SV111.jpg

Thanks for looking.
 
Working on the Luna module compartment, this is where the the rocket starts raising it's ugly head.

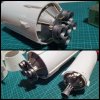
The area presented a lot of gaps and misalignments once the LM flaps were in place,

To try and achieve a gapless fit I trimmed the top inside edge with my hobby knife as well as thinning part of the hinges.

Another thing I noticed is the Service Module is slightly wider and when in place pushes the flaps out creating more gaps,

I also had to work out some sort of inner structure to help stop the flaps falling inwards as they weren't supported in any way.

I cut four pieces of styrene strip to use as tab support and glued to only two of the flaps as the remaining two would just fit into place.

Once that was sorted I cut four thin strips of styrene and glued them along the edge of each flap, this helped fill the gaps between.

The flaps and the Service Module are now at a better alignment but I'll have to do something with the step created between this stage and stage 3 which I'll probably sand it away at the loss of detail.

A11SV112.jpg

Cheers for looking.
 
Spent some time filling more gaps on the LM compartment which I am happy with, I also continued detailing the Lunar Module.

I back-ordered some rare earth magnets as I will be using them to join the service, command and escape modules in place instead of relying on the insertion plugs because I will be trimming those off.

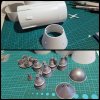
I added some more piping to the legs using brass rod and styrene tube to act as hinges, the brass piping can be rotated from stowed to extended position which rests on the inner structure of the legs, I think it adds a to the look of the module base as being more sturdy and solid as I thought the area looked too bare and open making the legs look flimsy and weak.

Rebuilt the platform with handrails and made it wider, there's just barely enough clearance from the handrails for the module section to rotate into position, I think it looks more in scale than my previous attempt.

I removed the silly looking radar dish and scratch built a couple of my own using some thin sheet and my circle stencil, I scribed out a couple of round pieces with my hobby knife and used the blunt curved end of a dremel bit to press the circles into a some what decent dome shape.

I managed to get some gold craft foil but it might be too brittle to use on the model because I tore one sheet simply by handling it, they come in 8 x 8 cm x 15 sheets per order and I just effed one up, I'll give them a try but if they tear I may just use some regular tinfoil and paint it gold.

Held together by masking tape for a dry fit, once the glue sets I will tidy it up.

A11SV113.jpg

Thanks for looking.
 
Thank you!

Love it... Scratching and adding detail is such fun and it just makes it more your model.
Thanks... yes I love scratch building as it is fun and challenging.

I was looking over some reference photo's of the Apollo 11 and the stage 3 engines and decided to add more details to the bells and piping around the base as it still looked a bit empty to me.

A11SV114.jpg

Not the ideal weather for painting today, hopefully tomorrow I can throw down a coat or two.

Thanks for looking.
 
Looks really great. When you paint this thing will you go all "brand new" or give it that hint of "not quite perfect" surface?

Are you painting outside? Is that by choice or necessity?
 
Looks really great. When you paint this thing will you go all "brand new" or give it that hint of "not quite perfect" surface?

Are you painting outside? Is that by choice or necessity?
Thanks, I might go the 'not quite perfect' look :)

Not painting outside, I use a paint booth indoors, I just don't favour painting on damp rainy days as it plays funny buggers with my paints, I usually plop my models on a bench by a window in the sun to let dry.
Awesome job. I haven't tried to scratch build additions to my models yet.
Thank you, give it a whirl I reckon you'll enjoy it, to me it's the best and most creative part of building as there's absolutely no pressure to be 100% accurate if you're only looking to fill empty space on the model.

Tere
 
Awesome job. I haven't tried to scratch build additions to my models yet.
Dude try it. Like ras said, there's not much to loose. I hope ras won't mind me showing... I replaced some wires, and scratched the cloth on the back of the old mpc speeder bike.
IMG_20200726_173810.jpgIMG_20200801_084318.jpg
Rastanz I'm sorry for jacking your thread... Just say the word and I'll take em down.
 
It is a shame how sparse the Revell kit is one details, You think for the 50th anniversary kit they might do some extra details similar to how the 30th Anniversary BSG kits addressed some of the shortcomings of the older kits

At any rate, it is a vast improvement!
 
Thanks, I might go the 'not quite perfect' look :)

Not painting outside, I use a paint booth indoors, I just don't favour painting on damp rainy days as it plays funny buggers with my paints, I usually plop my models on a bench by a window in the sun to let dry.

Thank you, give it a whirl I reckon you'll enjoy it, to me it's the best and most creative part of building as there's absolutely no pressure to be 100% accurate if you're only looking to fill empty space on the model.

Tere
I probably will on a future build, its just working up the courage to do that.
 

Latest posts

Back
Top