R2-D2

YOULI

That which does not kill us makes us stronger !
Joined
Nov 28, 2011
Messages
947
It's not a kit, it's a toy you can find in a McDonald's Happy meal :D

As you can see R2 is not bad at all, he can project images and the shape is right, same for the details. But the legs are hollowed and needed to be completed with plastic card.


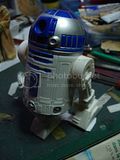
For example the feet and leg...


I haven't Polyester Mastic from Tamiya with me so I used plastic card and cut the right shape to be glued in place.


The screws are not common one (triangular shape) so I wasn't able to removed it. But I will keep the batteries panel since I'll certainly need to replace them someday.


The dome needed some work and improvement. Nothing complicated.

I managed to work on it, add jewelry as new optics and so on, use wash and inks to obtain, somehow, this...
Not quite finished but close... Very close :D

 
YOULI you must be the busiest modeler I have ever known. Love looking down the topics list and seeing your name 14 times in a row. It's like I'm looking at some kind of circus glass.
 
A simple toy... But a good one, perfect to perfect myself in Painting job.

Not as busy as you may think Glorfindel. Got several projects, as Grendels, on my workbench and I grab any opportunity to learn and do something with may hands and tools :D
Last week end was a perfect example, I brought R2, Yoda, the Falcon and even several cups glued into spheres to do... The Cetacean. Ring you some bells ? Yeah, OK, i'm busy... :D :D :p
 
Nice job on a little item that may otherwise be overlooked or even discarded. I like doing that sort of thing as well.
;D
 
This is awesome!!! I did a repaint on a McDonalds C3PO a few months back with some Tamiya Gold leaf, drilled out some eye holes, weathered him up, and gave him a tatooine base...He was originally this really bad pale orange color I could not help myself ;)
001-42.jpg


Great job on the R2D2 so awesome
 
Hey, didn't know that one... Good job even though the general shape, and pose, is not what you can see with C3-PO but it has potential (would have modified the hands, the pose, and cut here and there for the chest but it's only me, :D ).

Yeah, some times it's hard to let an object you like AS IS. We do like to complicate our lives with painting where everyone else simply dump the stupid thing in the garbage (just seen it today, at a McDonald's restaurant, a pokemon toy threw away without mercy by a young woman, DAMN YOU young woman, and gimme that willya ?). :D
 
Now, this looks absolutely outstanding!
Wish I had your eye for details and gave this McDonalds toy a chance as you did - the result is really outstanding, and the price for this little guy was compared to nothing.
 
Come on, you do an excellent job Solander... I'm no match compare to your wonderful kits.

And here it's a practice ground, due to the necessity to paint and build something with what I can pay : let's say nothing. I simply do with what I've got in my hands and around me. Fortunatly I had a lot of tools and paint at my disposal before the financial crisis.

And like I always said when I was Editor in chief "there is no problem, only solutions !".
I found some way to do the cables by the way, cuting cotton tips and using strings from shoes. :D
 
I complicated things glueing and puttying the dome. Bad choice here since it was barely noticeable. But I had no choice after that than sanding, puttying again and repaint the dome... Losing the up panels in the way... Plus, the projector let a red light passing trhough my aluminium paint. Blast !


I glued a blue lense, wich is the good color, but when you activate the projector it's still the red light you see. See ? :D


I worked on th body, washing it in a better way, checking for the variation of color and details here and there. The blue panels were repainted with a blue irridescent paint from CREATEX. And I protected the lenses with Patafix. Let's check the result compared to the original, and unmodified, toy.


At the rear section some details are not good but modify anything would mean to lost the batteries panel, and the rotating images as well. Well, too bad but I'll pass this one.


I tried to repaint the up panels, using all the tools that I could think of, drawing, masking and I can't even do a good circle with a mask... Will solve this later.


Les pseudos cables ont été rasés, j'ai trouvé ce qu'il faut pour les figurer, ça rendra super classe.


THE CHOPPER. A very useful tool even if it costs a lot of money (60 euros). I managed to break the blade and wasn't able to change it since the screw was... Screwed. But I used my dremel and put it away. Change the screw with a better one, and of course changed the blade. HERE I AM plastic parts ! You'll be cut... shortly !


This are Cotton tips cuts... Very useful... Will use it A LOT ! :D

 
Until I gathered all the pictures on Photobucket, feel free to see the evolution, an nearly completion of R2 on Facebook... :D

http://www.facebook.com/4oh4.php#!/media/set/?set=a.10150550898171473.393243.580936472&type=1
 
Look....the Chopper! I love the Chopper! Youli you should put a name plate on that thing and call it Hank. Sounds appropriate. "I had Hank chop up some 1 mil thick styrene today".
 
CUT !!!!

;D ;D ;D ;D


OK, Glorfindel, let's try another shoot will ya ? :D
 
I've got a lot of mirror stuff, jewelry, paper, here it's a sticker I'll use for a Spaceshuttle from LifeForce that will be useful. I simply cut the small part of it I do need, place it in the rear part of the dome, even the leftovers will be used for the sensors at the front...


Now I need to add details on the feet, cables and stuff...


Crazyglue, Mesh pipe from Japan, and a drill... 4 holes made to insert cables.


I cut the wire with the correct length that will let me some "rope" to bend it correctly. I glue a a part on the "batteries" and let it dry. Then I bend it over to insert the rest on the feet.
I Add details with electronic metallic part.


Here is the result. The black cable will be painted in gold or copper, then a wash will be applied.


And "voila". The weathering is done, please note that i've added some details here and there, on the articulations, with the plastic circles. The articulation of the feet was not complete, it needed a "void" but I wouldn't do any hole with that plastic (too soft) so I painted it. The result is good IMHO.


A little comparison with the original toy. Check out...


Happy with the result. But forgot to rip of the Patafix masking material from the translucid parts. Here we go... Better without it. Glued again the big blue eye that put of itself from his socket... 2 pictures from my worktable.


On a black background...

 
" You're R-2 unit looks a little beat up. Are you sure you don't want a new one?"
He looks great!!!! Terrific job!...AND, he's all dirty!
:D:D:D
 
The Exhibition took place this last week end.

Took a lot of pictures of the convention, costumes, people, others scale models, but not mine... Will wait after the pictures of my friends ! :D

To have a sense of what it looks like to be in a little french Sci-fi convention, click here if you are registrated on Facebook :D

A complete album
http://www.facebook.com/ericriddick.laroche#!/media/set/?set=a.3393941052013.161732.1374296995&type=1

R2
http://www.facebook.com/photo.php?fbid=3394000733505&set=a.3393941052013.161732.1374296995&type=3
http://www.facebook.com/photo.php?fbid=3394000973511&set=a.3393941052013.161732.1374296995&type=3
http://www.facebook.com/photo.php?fbid=3394051454773&set=a.3393941052013.161732.1374296995&type=3

Me, waiting to say "KHAAAAAAANNNNNNN !"
http://www.facebook.com/photo.php?fbid=3394017533925&set=a.3393941052013.161732.1374296995&type=3

Other pictures later. :D
 
For those that don't have Facebook Account...
Pictures was done at MIGENNES COLLECTOR 10 days ago.


And how the diorama was made in a few hours.
A base, a plastic, square, plate, some wood paste and dirt. And more wood paste since I never found the real, fine, sand I kept preciously (so I thought) to do a perfect Tatooine soil (it's sand from the actual Star Wars set, in Tunisia).


I made another one, just in case, the paste don't dry easily, and eventually take that for my Gonk Droid.


The result, making the trace of R2 driving on the sand... The feet were glued on !


A great result even though with no real sand. The comparison with the toy will proove, if needed, that some weathering and attention to details can make the difference.


Latest posts

Back
Top