Ian McQue Inspired Flying Rig

Photon

Active Member
Joined
Feb 26, 2020
Messages
41
Here's a project I've been working on and off since the summer. It's based on this drawing by concept artist Ian McQue.
BNH5JDMCcAEWQCf.jpg

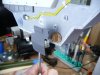
I started by building a simple structure from some .030 styrene and some Evergreen square profiles to set the vertical height.

P1040798.jpg

P1040800.jpg

I transplanted the entire top from a 1:35 Armoured personnel carrier
to quickly get some detail on the top deck. This will form a nice detail base to build on.

P1040804.jpg

Then it was really just a matter of cladding the sides in styrene sheet. This model feels quite sturdy
and came together quickly over couple of afternoons.

P1040806.jpg

P1040810.jpg

I also added a 4-40 threaded insert in the bottom to support the model for display.

P1040809.jpg
 
Last edited:
I added some panels to the super structure and started to build out the front end. I've also added a couple of kit parts to the top.

side.jpgleft.jpg

I was at a local stationary shop (which has an odd assortment of model kits in the back) and I spotted a 1:35 scale M-977 HEMTT heavy truck. I thought the cab was very interesting looking, so I picked it up thinking this would save me from building the cab from scratch. I wasn't sure how well it would fit or look, but I threw caution to wind and bought it.

I also built up the bottom half of the ship, but I forgot to take any pictures.

P1040897.jpg

P1040900.jpg

I'm liking how it looks and I'm glad I don't have to detail the interior myself, since this was really supposed to be a quick, low-stress diversion from my other model.

I built the engine up separately, so I could more easily paint it. The white fairing is made from some 1" diameter styrene rod. The engine itself is mostly from the AMT Pod Racer kit and some bottom-of-the-barrel kit parts since they will mostly be in the shadows.

P1040916.jpg


After a dusting of primer:

P1040917.jpg

And in place:
P1040926.jpg

Thanks for looking.
more soon....
 
y9biijT.jpg
Sweet .

So what's this other model you're building ?
 
I'm loving your build. And Ian's concept art is a real passion of mine. I need to build some of his stuff just for the fun of it. Thanks for sharing.
 
Thanks, Andrew!
yeah, Ian’s stuff is amazing. I’m definitely going to be building more McQue inspired models ( & I hope you do, too).
 
Thanks, Andrew!
yeah, Ian’s stuff is amazing. I’m definitely going to be building more McQue inspired models ( & I hope you do, too).
I can't remember where I saw it but someone had done a build of his little tramp steamer looking ship a few years ago now, and that really did it for me. How I zeroed in on his style. Retro tech crap chic, so to speak.
Link to >> original image <<
 
This is cool.. I'll be watching this one come together ..
Gets you itching to do some scratching...dud'nit...?
Cheers
 
I found a suitable 1:35 pilot. He's made of resin, so of course I broke his hand off and lost it almost immediately. ( I did accidentally find it a couple weeks later).

pilot.jpg

I painted him up and installed him in the cab. I tried to make him look a little less "modern armor" and a bit more "guy from the future." And nothing says "guy from the future" quite like an orange jumpsuit.
guy.jpg

The windows were glued in and the cab was sealed up. Unfortunately, while taping up the windows, the drivers side window came loose and fell into the sealed cabin (!)

cab.jpg
window.jpg
I was able to fish it out after much effort. I'll try to repair it, but if I can't, it will make masking interesting.

I added some 1:35 bolt heads to some of the panels. Hard to see here, but they look really cool in person.
holes.jpg
Next, I started to add some more surface details. These were mostly kit parts, but I also cut some square holes and fit some square Evergreen tubes. I'm not sure what they're supposed to be, but there were some details in the original drawing that were suggestive of these. I think they'll look cool with some rusty stains running from them.

side.jpg
I also tried scribing some flame cut marks on the edge of the "steel" plates that make up the bottom of the ship. A stippled coat of Tamiya putty will hopefully look like a rolled steel texture.

Also added some greebles to the top. The round radar shroud was made from two fenders glued together from a Flakvierling 38. top.jpg


Next up I started to think about detailing to the rear panel of the ship. I picked through my cache and laid out some good candidates.
greebs.jpg


I'm pleased with out this turned out... I like having a concentration of detail that contrasts with the more sparse large side panels. I'm trying to keep a heavy industrial look throughout. The smooth hoses are 20 gauge wire. The convoluted hose is a styrene kit part, formed with a heat gun.

tfKqAVw.jpg
 
Last edited:
Continuing to work on the lower sides. The conduits are some solid core wire meant for electronics protoboarding. I stuck them down with super glue and a few bits of aluminum tape.
side.jpg

Next up are the two front stabilizers on the bottom of the ship. This was one of those magic scratch building moments, where I agonized for weeks time about how I was going to make these and then today I pulled some parts from 4 different kits and they all fit perfectly. These came together in a few minutes. :cool:

fins.jpg

(I probably should fill those ejector pin marks...)
fin-back.jpg

fins-front.jpg

Here they are in place:

fin-installed.jpg

The front of the ship is still kind barren. I have no idea whats gonna happen here yet...
threequarter.jpg

Alright. We're caught up. Like I said, I've been working on this since around August of last year.
Thanks for looking. Updates will probably come a bit slower...
 

Attachments

  • fin-installed.jpg
    fin-installed.jpg
    53 KB · Views: 5
Photon;
Love the work done so far with the greeblies. Really cool and very functional looking. Great stuff. Rather than actual wiring, for cabling, I suggest using solder, off the spool in different gauges. I'm working on a fun project at the moment and that's what I've used. I'll put pictures of it up in the next day or so to show you what I mean.

Now as for cut marks and weld beads, there's this guy I follow on YouTube - and his work on this area is AWESOME! Watch >> Flame cut marks and armour texturing <<, and then >> Epoxy weld beads <<. Hope that this helps if you've not followed NighShift on YT before.
 
Thanks guys.
Yes, Martin Kovac (nightshift) is amazing. I watch his videos nonstop. it’s those very videos you mentioned that inspired me to try those techniques.
 
Andrew, Your miniature building looks great. I bet that will be a lot of fun to paint and weather. Do you know the work of David Hourigan? He’s a Melbourne based model maker who does a lot of miniature buildings of various Melbourne landmarks. His blog is here:
http://www.davesmodelworkshop.com/
 

Latest posts

Back
Top