Destroid Spartan 1/72 Bandai (Imai Reissue)

YOULI

That which does not kill us makes us stronger !
Joined
Nov 28, 2011
Messages
947
In order to complete my Macross 30th anniversary exhibition, and expose more than 25 years old model kits of mine, I began to build a number of kits, here the Destroid Spartan.

This is the recent model kit re-issued by Bandai. It's a vintage kit, even though some amelioration has been done on some parts.

The box


Just compare the art design and the finished model... There is some differences...


Notice


The runners.


Decals


I began to paint in black the interior parts (the surface that will be visible). And glue the feet, the gun, the torso...

What I wanted to do is obtain the missiles in the shoulders. I've got straws and lollipop sticks, and some rivets to do so. I cut the shoulder and found some articulation (some stuff to put paintings on walls you know...) and here is the first result.


The articulation will be glued with cyanoacrylate in the shoulder, the fun part will be to dissimulate as much as I can this fellow...


I sanded, sanded and sanded again. The plastic is easy to deal with.


That was the important modification I wanted to do. There is more to scrib and scratch, details here, fingers to cut and glue again in different position etc.

Stay tune !
 
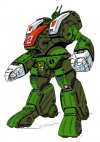
BTW this is what a Spartan look like in the show, at least, on paper. :)

74934192destroid-spartan-jpg.jpg

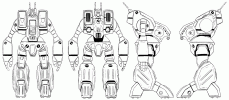
Sketches

destroid-spartan-schematics.gif

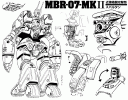
Details in the cockpit, the missiles, and so on....

destroid-spartan-lineart.gif

There is also some color variation.

images
 
Cool, I love the Destroid mechs, A shame they need quite a lot of work, but the design is still awesome.

Waiting for more pictures ;P
 
Thanks... There are more modern kits by Wave i Think, but really don't have the money for it. There poseabilities are great, the details too... ANd they have a Phalanx in 1/72 if I'm correct.

But I've got the old models, will build them no matter what. :D
 
Yeah more Macross!!! Thanks for reminding me to get my Tomahawk done.

Terry 8)
 
Hinges... That's the word I was looking for ! Thanks Grendel ! :D
 
YES! Another Macross build! From one Macross Fan to another--I've got this kit and will be starting soon! I also picked up the Monster re-issue. I'll be keeping an eye on your build for sure! 8)
 
Thanks !

It will be resume soon, I hope...
 
I updated a lot since I'm almost about to complete the model.

It's a huge step for me since it was a crazy week glueing and sanding, sanding and painting, sanding and glueing... The old stuff you know ! :D

I took all the pictures for a wonderful WIP, nearly 130 meg of pictures actually, with other kits I managed to finish like the Rancor, the Gratan (Nadia Secret blue water), and many more projects at hand...

More to share with you, guys, soon. :)
 
Some teaser... ;)

I've got 100 pictures to upload in Photobucket with an intermitent Web connexion :(

So here we go. ;)


Thanks quaralane... :)

The missile launcher in the shoulders are made with plastic part from a Peritel Cable, and the missile with lolipop sticks.

I'll go with a regular WIP as soon as my connexion problem will be solve... :)
 
Correct :D

Even though Robotech is a worldwide known TV show, and the model kits has been sold everywhere in the 80's, you don't have many often choice of WIP or build up kits especially concerning the Destroids from Macross...

I'm glad to have finished it since it's a Bandai reedition of the old Imai kit, with all the issues you may encounter with this kind of vintage model. And with the 1/72 scale it will be ok to place it near some of my Hasegawa 1/72 Fighter or even battloid Valkyries. :D
 
OK let's go with a complete WIP, not at once but step by step, in order to use the Photobucket files I, painfully, uploaded lately.

First of all, as you can check on this topic, I worked on the shoulders of the Destroid Spartan but most of the parts were not built since it's an old fashion kit : you have to glue two parts, then glue two other parts on it and even others on this two... It makes the building process tricky since you can't reach some areas to fil, sand or even paint. You have to plan the fil, sand and paint process at EACH steps of glueing each parts.
Paint it dark in the interior is important, then, you don't know what can show up lately.

But let's resume the built of the soulders, the missiles, the canon, etc.

The main Canon.
The hatch has been upgraded with metal parts taken from a broken connexion cable (a game one ?), it's just perfect. THe canon interior is still a part taken from a Lighter.


The missiles.
Searching for a comptible object I found out that the inside of peritel cable could provide me just the part I needed (In Fluorescent green). The inside of the Missile Hatch is parts cut in Plastic Coffee Spoon. The little hooks are taken from another electronic device I found month ago. Maybe a console game connexion cable, really don't know.


The missile hatch.
The articulation has been done last year so nothing new here. It's still the attachment for painting boards. I drilled some holes to make them fit but, ultimatly, I had to bend them to fit IN it. This angle allow me to glue it on the missiles pad.


The result, so far, is very like the way i imagined it.


The shoulders are on, the bust is done.


Next, the missiles :)

 
Thanks QUaralane :)

As you guessed, since the missiles hatch are not opened in the "staight from the box" kit, I have to improvise and build them.

My first choice is, obviously, lolipop sticks cut with my Chopper II but I still needed to find the cap for it.
I found some bolts years ago, with a round shape, and it's just perfect fit... Or almost. Nothing some superglue can deal with...


Then I wanted to add more details here and there, the kit ni not very accurate (we already saw the obvious differences between the mecha design drawings and the actual kit).
I choose a metal grill taken from an old kitchen device.


I simply cut pieces of it with a metal scisor.
Some are put in the air exit of the shoulders.


Some, smallers, are pu on the legs parts.


Now is a very boring phase of puttying and sanding... Boring but important since the surface need to be flat with no major gaps allowed :)

On the shoulder hatches


The feet...


I tried some test fitting (was worried the torso could be too heavy with the missiles and extra details in the shoulders). It's ok, and the articulation is OK too.


Then I began to spray white and black on the parts done. The hatches are white anyway... Painted the red detail too.


Painting the torso is important since doing it with a Brush could be difficult once all of it built and glued. Note than I began to place and glued the Missiles on the left shoulder.


Latest posts

Back
Top