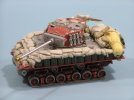
Battlewagon: M4A3E8 ETO
- Thread starter errains
- Start date
panzerace007
New Member
- Joined
- Dec 17, 2010
- Messages
- 2,118
ERIC,
It was Great to meet ya' & I'm glad you were able to make th trip to come see US ( AMPSCV).
Awesome Build !! It's something to see inperson ! Great work on th mantlet ERIC !! Th casting #'s look Steller ! Great Job on texturing th Mantlet !! Th Sand Bags & M.G.'s look Smokin' !
It was Great to meet ya' & I'm glad you were able to make th trip to come see US ( AMPSCV).
Awesome Build !! It's something to see inperson ! Great work on th mantlet ERIC !! Th casting #'s look Steller ! Great Job on texturing th Mantlet !! Th Sand Bags & M.G.'s look Smokin' !
errains
New Member
- Joined
- Apr 10, 2011
- Messages
- 288
Everything but the Kitchen Sink - Stowage
Greetings everyone! ;D
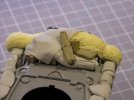
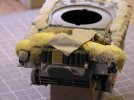
I have been working up the stowage arrangement for the rear deck. I followed the basic steps as laid out by ScaleModelMedic’s YouTube vid on Modelling Stowage as I wanted to try my hand at modeling tarp material using magic sculpt epoxy putty.
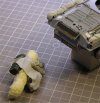
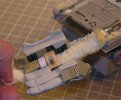
In order to paint and weather the stowage I wanted to make it so that I could remove the stowage from the tank once it was built. However I wanted to maintain a good attachment point when I was finished so I use a small block of basswood and a piece of sprue from the kit and drilled a hole into top of the engine deck. I also cut out some of tools that interfered with the placement of the stowage arrangement. So that the stowage would not adhere to the kit I used cooking foil as a barrier. Using the basswood as an anchor I attached all the items of aftermarket stowage accessories to it and ran pieces of doubled folded tape underneath for putting indents from the strapping. Once the first layer of stowage was dry I add the camouflage netting made from first aid gauze (cheese cloth) and wood glue and them formed it to fit. Lastly using epoxy putty once more I made the airâ€"identification panel and draped it over the stowage.
I think the results are not too awful for the first time using this method.
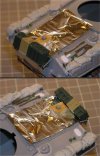
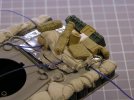
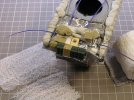
Let me know what you all think and Thanks for stopping by
The playlist
Metallica - St. Anger
Static X- Wisconsin Death Trip
Black Label Society - The Blessed Hellride
Pantera - Cowboys From Hell
Greetings everyone! ;D
I have been working up the stowage arrangement for the rear deck. I followed the basic steps as laid out by ScaleModelMedic’s YouTube vid on Modelling Stowage as I wanted to try my hand at modeling tarp material using magic sculpt epoxy putty.
In order to paint and weather the stowage I wanted to make it so that I could remove the stowage from the tank once it was built. However I wanted to maintain a good attachment point when I was finished so I use a small block of basswood and a piece of sprue from the kit and drilled a hole into top of the engine deck. I also cut out some of tools that interfered with the placement of the stowage arrangement. So that the stowage would not adhere to the kit I used cooking foil as a barrier. Using the basswood as an anchor I attached all the items of aftermarket stowage accessories to it and ran pieces of doubled folded tape underneath for putting indents from the strapping. Once the first layer of stowage was dry I add the camouflage netting made from first aid gauze (cheese cloth) and wood glue and them formed it to fit. Lastly using epoxy putty once more I made the airâ€"identification panel and draped it over the stowage.
I think the results are not too awful for the first time using this method.


Let me know what you all think and Thanks for stopping by
The playlist
Metallica - St. Anger
Static X- Wisconsin Death Trip
Black Label Society - The Blessed Hellride
Pantera - Cowboys From Hell
panzerace007
New Member
- Joined
- Dec 17, 2010
- Messages
- 2,118
WOW !! That Stowage is Rockin' !! Great Idea with using th basswood & dowel to keep everything centered & anchored !! I can't wait to see it all painted !!
Rock-On !!
Metallica - For Whom The Bell Tolls (Live 1985)
Rock-On !!
Metallica - For Whom The Bell Tolls (Live 1985)
errains
New Member
- Joined
- Apr 10, 2011
- Messages
- 288
I just wanted to THANKS to everyone for the nice comments ….So THANKS! 
@ f2k; Magic Sculpt (click the link) is similar Milliput in that it is also a two part epoxy putty. The major difference is the working time. MS seems to have a longer working time then MP, usually about 30-45 minutes for MS. This working time can be increased with the use of water to keep it damp. Keep in mind that this also equates to longer drying time to full hardness. I have used MP in the past and I think it is great for filling large areas. However for the type of work I have been doing lately, sandbag and tarps, I need more time to work in the details.
Not sure about the colors but the MS web site may provide more information. I noticed that you are from “The Cold North†so availability may be problem. However if your willing to shop on ebay you can find it there, that is where I got my current supply. Give Magic Sculpt a try this stuff totally rock and I think you will really like it. Hope this helped out.
f2k
New Member
- Joined
- Apr 2, 2011
- Messages
- 301
errains said:I just wanted to THANKS to everyone for the nice comments ….So THANKS!
@ f2k; Magic Sculpt (click the link) is similar Milliput in that it is also a two part epoxy putty. The major difference is the working time. MS seems to have a longer working time then MP, usually about 30-45 minutes for MS. This working time can be increased with the use of water to keep it damp. Keep in mind that this also equates to longer drying time to full hardness. I have used MP in the past and I think it is great for filling large areas. However for the type of work I have been doing lately, sandbag and tarps, I need more time to work in the details.
Not sure about the colors but the MS web site may provide more information. I noticed that you are from “The Cold North†so availability may be problem. However if your willing to shop on ebay you can find it there, that is where I got my current supply. Give Magic Sculpt a try this stuff totally rock and I think you will really like it. Hope this helped out.
Thanks for the answer.
Yes, availability is quite a problem. We used to have a handful of hobby shops in town, catering to everything from tabletop gaming over scale models and to model trains. Now I can't even get my hands on a single sheet of plast-card...
I've found a UK-based supplier of Magic Sculpt on eBay. I might try to import some, just to see what it's like. But having to import everything is getting ridiculously expensive...
schweinhund227
New Member
- Joined
- Jun 24, 2009
- Messages
- 2,511
I am shocked !
All that nice work... and its all covered up with sand bags...??? and Tarps.. you are a lot more
courageous than me...
I could not cover up so many hours... of tedious work ... but I guess you know its there !! right ?
Love the welding, How to!!! always wondered how to do that ! the right way ! Love your HOME made Handle bar Wedge !!! Brilliant ! Loved the Lifting hook replacement, How to! you were right ! the kit ones did look kind off Smallish !
Keep up the good work !!!
errains
New Member
- Joined
- Apr 10, 2011
- Messages
- 288
@ Schweinhund227; I was a bit shocked myself! When I was building up the lower hull I just added and replaced the items that I wanted to. The plan was always to depict a heavily used Sherman in the field conditions. I wasn’t totally sure what would be seen and what would not. After I got done with the sandbag I kind of scratched my head and asked myself “dude, why did you do that?†But hey it was fun and I'm happy with the results and after all that is what it is all about. Isn’t it?
Similar threads
- Replies
- 18
- Views
- 2K

