Airbrush problem/backfeed?

Marktastrophe

Well-Known Member
Joined
Nov 19, 2021
Messages
371
I was sitting here airbrushing with my Paasche Talon (TG1217) when I noticed a bit of air on my knuckles...
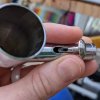
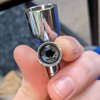
I was finishing up with a color anyways, so I flushed it, emptied it, and began to inspect to find that thinner (paint wasn't thin enough to flow back freely?) had backfed into the shaft and trigger area...
PXL_20220208_201344693.jpg
PXL_20220208_201400397.jpg

Does anyone have any ideas what's happening here?
 
The needle gasket needs to be tightened , but best to inspect it first . Clean / replace if necessary .
remove the teflon gasket from the throat -- held in there by a small bushing .
You'll need a thin ,narrow , flat blade -- long enough to reach down to it of course . I keep one at the bench just for this .

Shine a light down in there , you'll see what I'm talking about .
Looking into this now! My LHS is about a 50 min drive one way, lol...
Looks like I may need to take a trip sooner rather than later.


Thanks so much for the assist @urumomo !

Looking at my manual, seems Paasche calls it a "Packing Washer" for anyone that stumbles on this later.
#7 here:
PXL_20220208_210526003.jpg

And I will most definitely be replacing every bottle of Vallejo Acrylic with something solvent based as they need to be replaced. Vallejo Acrylic smells a lot less than other options, but it dries and gums so quickly. It's a royal pain to clean out of a brush vs anything that doesn't film, and softens with cleaner/thinner.
 
It's really more a packing " nut " .

Any acrylic should be easily removed with isopropyl alcohol ( 91 % ) . No need to ditch the Vallejo .
I clean the thing after every session . Between each color if applicable .
Break it down including pulling the needle . I drop the spray tip into a small container ( end of a pill bottle ) full of alcohol then pull it out full of alcohol and touch the tip to a paper towel to suck the alcohol out . Repeat as nec .
 
Looking into this now! My LHS is about a 50 min drive one way, lol...
Looks like I may need to take a trip sooner rather than later.


Thanks so much for the assist @urumomo !

Looking at my manual, seems Paasche calls it a "Packing Washer" for anyone that stumbles on this later.
#7 here:
View attachment 90165

And I will most definitely be replacing every bottle of Vallejo Acrylic with something solvent based as they need to be replaced. Vallejo Acrylic smells a lot less than other options, but it dries and gums so quickly. It's a royal pain to clean out of a brush vs anything that doesn't film, and softens with cleaner/thinner.
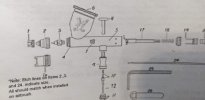
Strangely... I've never had an O-ring (mil-12) on my brush... labeled as #4 in the diagram...
 
It's really more a packing " nut " .

Any acrylic should be easily removed with isopropyl alcohol ( 91 % ) . No need to ditch the Vallejo .
I clean the thing after every session . Between each color if applicable .
Break it down including pulling the needle . I drop the spray tip into a small container ( end of a pill bottle ) full of alcohol then pull it out full of alcohol and touch the tip to a paper towel to suck the alcohol out . Repeat as nec .
I'll have to give that a go, Medea airbrush cleaner, and Iawatta cleaner seem to require "Scrubbing", even with a teardown every session, and at the very least a flush between colors.
It gums while spraying too... could be a lack of humidity problem in my house though.
 
If the threads at the aircap are solid , that O-ring is kinda unnecessary . When those threads see more use you'll get air leaking out there without the O-ring .

What do you mean the Vallejo " gums " while spraying ?
At the tip ?
Dry tip is very common with acrylics . Use a tad more thinner , most incorporate a retarder ( propylene glycol ) .
Since I've never had the O-Ring... I can't honestly say just by the line-art. But I'd wager it goes between the shell and the air cap. I'll add that to the list for when I make a drive to pick up a new packing washer. I bet I'll be able to figure out where it goes on the brush tip based on size. Maybe that will make some noticeable differences, maybe it'll just be a couple of dollars needlessly thrown at the hobby, lol (I think one of those rings is less than $2).

(My Badger 105 Patriot definitely has an O ring between the cap and shell, It's looking like this is where MIL-12 should go on the Paasche Talon)


And yes, sorry, it gums at the tip. I will likely run out of thinner before I run out of more than a jar or two of paint, I'll give that AB thinner a go too. Currently using the Testor's Universal water based acrylic thinner.
And I'm a fan of how Vallejo Acrylic's lay down, it's just not a good workflow having to wipe my tip with brush cleaner every 5-10 seconds. While my current thinner works, specialty thinner will definitely work better.

Do you normally add retarder in when mixing, or just add a couple drops into the AB cup?
 
I never add retarder by itself . I only use retarder occasionally when brush painting .
That Vallejo AB thinner has retarder in it .

We evidently own the same 2 airbrushes .
I have a Badger Patriot also , but I prefer the Talon . Having that adjustable needle-stop is a big advantage .

That O-ring you're pondering definitely goes between the air-cap and the body .

The needle gasket , or gland , or whatever they want to call it , will last a good while .
It probably just needs to be tightened slightly if this AB is fairly new . Like a quarter turn .

When you set up a new one , you need to tighten it in very small increments . Install the needle , see how much resistance there is in needle movement and repeat the process until it's tight but not too tight .
You can overtighten it and if too much it will deform it and then it must be replaced .
 
Last edited:
I never add retarder by it's self . I only use retarder occasionally when brush painting .
That Vallejo AB thinner has retarder in it .

We evidently own the same 2 airbrushes .
I have a Badger Patriot also , but I prefer the Talon . Having that adjustable needle-stop is a big advantage .

That O-ring you're pondering definitely goes between the air-cap and the body .

The needle gasket , or gland , or whatever they want to call it , will last a good while .
It probably just needs to be tightened slightly if this AB is fairly new . Like a quarter turn .

When you set up a new one , you need to tighten it in very small increments . Install the needle , see how much resistance there is in needle movement and repeat the process until it's tight but not too tight .
You can overtighten it and if too much it will deform it and then it must be replaced .
Perfect info, I've removed the packing washer, and I'll start by cleaning and reinserting it to see how it acts.
Hopefully that will do it for me. I still may pick up another if it's not expensive, just to have one in my parts bin so I can push on instead of needing to wait when it does go out.

That is funny we have the same two brushes. I prefer the Talon too, that's the one I bought.
I had a coworker offer to sell me a hood and compressor for $70 one day, so I said "Sure!", after work he tossed a tupperware tote in my car and said "Can I just have that tupperware back? Again "Sure!"

I got home and found ~50 jars of Vallejo paint, a Badger air brush, 4 Gundam models (1 MG, 1 RG, and 2 HG) and a bunch of filters and accessories in the tote along with the hood and compressor that I was expecting.

It was like winning a mini lottery!
 
Dang - that's a really great deal indeed .
Those Gundam kits alone are worth the coin .

I order AB parts online .
I think it was a site called " Spray Gunner " ( spraygunner.com) was the last company I ordered from .But there's plenty to choose from.
 
Dang - that's a really great deal indeed .
Those Gundam kits alone are worth the coin .

I order AB parts online .
I think it was a site called " Spray Gunner " ( spraygunner.com) was the last company I ordered from .But there's plenty to choose from.
So first. Thanks again for all the info, with the brush stripped down, 91% Isopropyl cleans WAY more effectively than any branded AB cleaner I've used (Medea, Iwatta, & Vallejo).
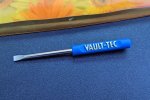
Snugging the packing assembly back in now, luckily I had a tiny Vault-Tec screw driver... I couldn't find anything else in my house to work, lol. (my standard jeweler's driver set is... somewhere?)
PXL_20220209_150459538.jpg
I'll check spray gunner. I like to give the business to the brick and mortar store if possible. I haven't found a product on their shelves they haven't been able to answer questions or give some insight on yet!

I haven't tested yet, but I feel there is a chance I ruined my packing washer by reaming it to hard with a Tamiya xs triangular cotton swab... Thanks to you NOW I know I can pull it apart to clean it more delicately, lol.
 
ANND Spray gunner just informed me that the O-Ring I'm missing is the same as the one that goes on the handle assembly... So I'm just going to hop it from there to the cap for now, and still pick up a couple spares.
Lol, thanks again!
 
ANND Spray gunner just informed me that the O-Ring I'm missing is the same as the one that goes on the handle assembly... So I'm just going to hop it from there to the cap for now, and still pick up a couple spares.
Lol, thanks again!
Ha ha - yes , I should have mentioned that .
The O-ring at the handle end serves zero purpose . Maybe it's storage area for spares ? :D

You might need to remove the air valve to clean it of dried paint if a lot has blown by the needle gland - you don't need to disassemble the valve ( usually ) , just clean around the top of it with alcohol until it depresses smoothly , or fully disassemble it to clean it completely .
You can see the joint where it screws into the handle ( body ) . It's on there pretty tight so I used pliers to loosen it .
If that shiny chrome is important to you you might want to wrap it with tape first to protect the finish .
I just grabbed it with the jaws of the pliers since I really don't care about the appearance of the AB - only it's operation .
 
Ha ha - yes , I should have mentioned that .
The O-ring at the handle end serves zero purpose . Maybe it's storage area for spares ? :D
I think it lets you tighten it down, and adjust it to the angle of your hand... ? Maybe?
Still wouldn't call that a purpose as much as a waste of an O-ring, lol.
 
I haven't had one there in years .. and years .
I think it's just a " finesse " thing . A piece of trim .
Without it , the tailpiece rotates a bit further till it seats with the openings oriented a further 90 degrees ; top and bottom - or something close to that .

I stripped those threads out a long time ago ( somehow ) , so I just secure it with a strip of tape .
That strip of Tamiya 10mm tape can be reused forever until I replace it . And it's actually faster than screwing it back in ;)
 
The LHS has both the packing assembly and o-ring in stock and set aside for me.
I'll have them in hand this weekend!
 

Latest posts

Back
Top