Metal Finish Paint Job

Scale Model Addict - Model Tips, Guides, Tools & Tech, Tutorials, and Community

Help Support Scale Model Addict:

Jantk14

Well-Known Member
Joined
Aug 13, 2025
Messages
412
City & State/Province
New Jersey USA
I'm looking to add a P51 to my collection. I've done one before and I used Tamiya flat aluminum and then a gloss varnish to get that bare metal look. It looked ok, but I've seen better. What is the best way to get that "metal" look?
 
Thanks. Reading the description the stuff looks to be all kinds of toxic. What do I use to clean my airbrush after? All I have is Tamiya airbrush cleaner.
 
Nah , it's nitrocellulose lacquer .
I use acetone for cleanup , but the Tamiya AB cleaner works fine -- it's the same as their regular solvent cement ( 1/2 butyl acetate , 1/2 acetone )
 
As an Amazon Associate we earn from qualifying purchases. Product prices and availability are accurate as of the date/time indicated and are subject to change.
Are you after the look of an aircraft that has been painted with a metallic paint, or one that's actual bare aluminium? Probably the latter, if you're painting a Mustang.

Metallic paint is easy: just use an appropriate silver or aluminium paint that you don't need to buff up or similar. With these, you're not aiming for a realistic metal finish but for one that looks like metallic paint :)

Bare metal is harder, and IMHO one of the main things to consider is not soo much exactly what paint to use, but to vary the shades on different panels. If you look at photos of real unpainted aircraft, you'll see different shades of metal all over the plane, and adding those — rather than painting the whole model a single colour — will make it look much more realistic. Another thing here is that I've noticed that these shades are often symmetrical between the left and right sides of the plane. That is: if a certain wing panel is a darker shade on the left wing, it will usually also be on the right wing.

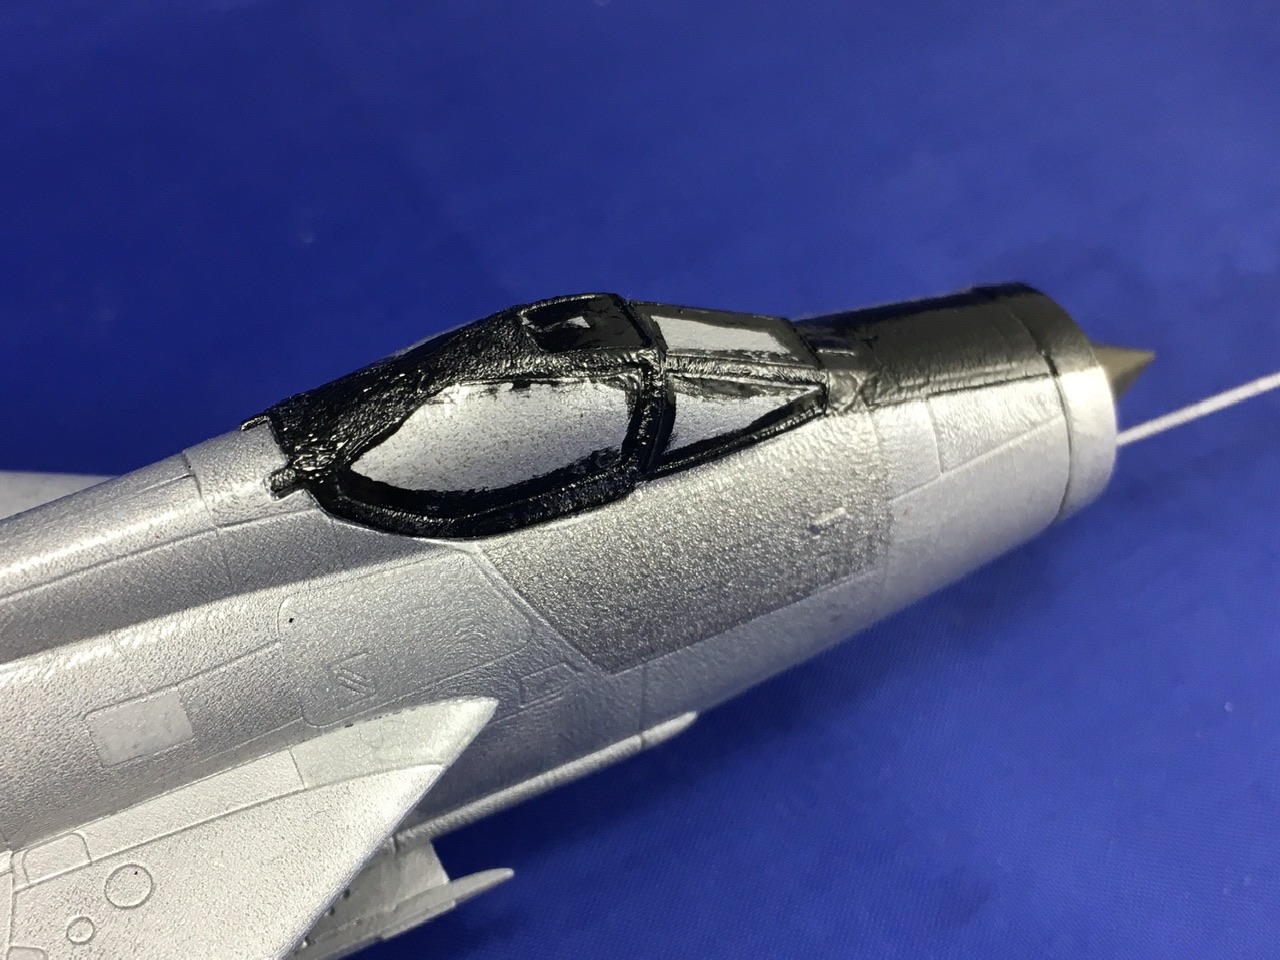
I won't claim to be a great aircraft modeller, but here's an example of what I mean on this BAE Lightning I made some years ago:

fullsizeoutput_1924.jpeg


The panel under the canopy is clearly darker than the ones around it, but there are also more subtle differences in colour visible on other panels in this picture.

I did these by spraying the model in one light metallic colour first, and then brush-painting panels in that same colour with small amounts of other colours mixed in.
 
Are you after the look of an aircraft that has been painted with a metallic paint, or one that's actual bare aluminium? Probably the latter, if you're painting a Mustang.

Metallic paint is easy: just use an appropriate silver or aluminium paint that you don't need to buff up or similar. With these, you're not aiming for a realistic metal finish but for one that looks like metallic paint :)

Bare metal is harder, and IMHO one of the main things to consider is not soo much exactly what paint to use, but to vary the shades on different panels. If you look at photos of real unpainted aircraft, you'll see different shades of metal all over the plane, and adding those — rather than painting the whole model a single colour — will make it look much more realistic. Another thing here is that I've noticed that these shades are often symmetrical between the left and right sides of the plane. That is: if a certain wing panel is a darker shade on the left wing, it will usually also be on the right wing.

I won't claim to be a great aircraft modeller, but here's an example of what I mean on this BAE Lightning I made some years ago:

View attachment 172893

The panel under the canopy is clearly darker than the ones around it, but there are also more subtle differences in colour visible on other panels in this picture.

I did these by spraying the model in one light metallic colour first, and then brush-painting panels in that same colour with small amounts of other colours mixed in.
I'll take it one step further: The color of individual panels may change subtly from the interior to the edge, especially with time.
 
Yea I want the bare metal look and I am going for a realistic look. One technique I did know was to darken some of the panels so they are all not uniform. But the correct paint is also a concern. I was thinking not do any pre shading, paint the metal color and then add some dark paint to the metal paint, mask off some of the panels and paint them the darker shade.
 
Yea I want the bare metal look and I am going for a realistic look. One technique I did know was to darken some of the panels so they are all not uniform. But the correct paint is also a concern. I was thinking not do any pre shading, paint the metal color and then add some dark paint to the metal paint, mask off some of the panels and paint them the darker shade.
maybe , it's difficult to control , but you can experiment on scrap .
Better to use a filter -- I like inks in clearcoat or watercolor in clear ; you can vary the opacity by minute amounts .
You can get a lot of modulation relying only on primer variations , though . and no worries building too much coating depth in relation to the surrounding areas .
 
I agree with urumomo on the use of filters. One thing you might want to try (on scrap!) is a thin wash applied to the panel lines after the first light coat of metallics. Subsequent coats of metallic paints will be darkened along panel lines, but you want the effect to be subtle—using different tones of the metallic color will be enough to differentiate panels, but done properly, this will add to the effect without becoming too prominent to the human, or camera, eye. As he implies, getting metallic paint jobs right is a matter of subtlety. As he says, experiment on scrap—this pays HUGE dividends. Find the method that works for you. Scale modeling metallic finishes is more art than craft.
 
Yea I want the bare metal look and I am going for a realistic look. One technique I did know was to darken some of the panels so they are all not uniform. But the correct paint is also a concern. I was thinking not do any pre shading, paint the metal color and then add some dark paint to the metal paint, mask off some of the panels and paint them the darker shade.
I primarily build jet aircraft, so this is a common challenge. If you are looking for a polished aluminum finish (airshow warbird), Alclad is probably the easiest way to get there. A more realistic finish will show some oxidation, so you have more paint choices. I like MRP lacquer, but you need ventilation. I work with the full set of their metal colors. Paint the entire aircraft in the lightest/brightest color and then start masking off. It's not always "darker" that you are looking for. Sometimes, you need to use or mix in a bit of anodized color to yellow the panel. Depending on the specific location and purpose, some panels will be made of different alloys. Then there's also the issue of panels that get replaced during the life of the aircraft being entirely different than the opposite side. One final thing: It is my understanding that the wings on many P-51s were actually painted silver, so wouldn't have the polished look.
 
"Anodizing" is a process whereby color is chemically bonded (for lack of a better term) to an aluminum surface. It can be any color.
Yes, but aircraft generally don't have pink or purple anodizing like a water bottle. In fact, the colors we are trying to duplicate probably aren't anodized at all, but rather a different alloy, stained or heat affected. The yellowish color from MRP seems to achieve that illusion fairly well.
 
In fact, the colors we are trying to duplicate probably aren't anodized at all, but rather a different alloy, stained or heat affected.
Then they shouldn't call it anodized. Probably a disconnect between the technical folks and marketing. It would not surprise me to learn that the formulator named it "Stained Aluminum," but the ad wonks decided that name wasn't "sexy" enough.
 
Then they shouldn't call it anodized. Probably a disconnect between the technical folks and marketing. It would not surprise me to learn that the formulator named it "Stained Aluminum," but the ad wonks decided that name wasn't "sexy" enough.
For gosh sakes! We all know that model color names are arbitrary. Combine that with a paint that is made in Eastern Europe and sold in America, you can add a bit of translation error.
 
Yea I want the bare metal look and I am going for a realistic look. One technique I did know was to darken some of the panels so they are all not uniform. But the correct paint is also a concern. I was thinking not do any pre shading, paint the metal color and then add some dark paint to the metal paint, mask off some of the panels and paint them the darker shade.
I have been using AK Interactive extreme metal "lacquers" and find that they look good but are very fragile even after days of curing. I used their back filler primer first, then their metallic line black base . Tamiya masking tape can pull it up in little bits, making the masking of panels very hard. I also tried it with and without their metal line thinner, and you don't really want to thin it, it is air brush ready. One other thing- brush painting it over airbrushed layer, or dripping it on the airbrushed layer by mistake, causes it to re-activate. When I wiped off the drip it went down to the black primer.
Also kit was older kitty hawk F-86D and had a ton of fit issues so lots lots lots of filler, and it has too be perfectly sanded but then easy to lose panel lines and rivets. All in all a very frustrating build.
 
Lots of good advice in this thread. Bare metal aircraft finishes are among the hardest paintjobs out there.
  • Use black gloss primer (I find Alclad's gloss black lacquer takes weeks to cure, looking for alternatives)
  • Alclad and AK extreme metal both work great and have many subtle shades.
  • Careful with masking tape, consider post-it notes instead. Even if the tape does not pull paint up, it can change the finish.
  • Smooth surface is PARAMOUNT, any flaws, even sanding marks invisible to the eye will show with metallics.
  • You can polish the paint with a soft cloth and even buff up some areas for interest.
Experiment! I've had more than one bare-metal finish turn south on me and I ended up painting camo on top.
 

Latest posts

Back
Top