Gloss coating a gloss paint ? Is this recommended?

nickparys

New Member
Joined
Oct 5, 2023
Messages
7
Hey everyone, I’m going to start a new project . I’m recreating my Dale Earnhardt sr 2001 Chevy Monte Carlo that I built a long time ago . The car body is gloss black . My question is , do I paint the body with gloss black even though im going to use a 2k to clear it ? Or do I paint it a semi gloss black then clear coat it ? Thanks in advance .

-Nick
 
If you're going gloss , the more gloss the better .
gloss black overtopped with gloss clear .
although the end result between the 2 approaches will be negligible .
 
If you're talking about a Nascar recreation, keep in mind the paint job wasn't show quality.
Those cars didn't have no polished gloss finish!
In fact, back in the day, most were quite quickly painted and then covered in decals.

If its a street car, factory finish, the finish would still not be "show" winning.
Even though factory paint jobs can be nice, you still need to "cut and polish" to improve the look.
Cut and polish means to sand (usually wet sand) and then polish with various grades of compounds to create a smoother finish.
The smoother, the glossier.

But its all about depth.
If you want to create that kind of show car finish, multiple layers of clear coat is the thing.
And each layer is wet sanded in between applications, with the final layer being properly cut and polished.
(I knew a guy who's custom van was clearcoated more than 30 times to achieve unbelievable depth over some candy apple red!
It looked wet, like you could sink your finger into it. The polishing took weeks.)


Whatever your clearcoat is going over, gloss or dull doesn't matter, the underlying surface MUST be sanded (wet or dry) first to smooth it as much possible
and to create that 'tooth' for the next layer to adhere properly. Sand until all gloss is gone.
I prefer 800grit no-fil adalox premium coated paper, a nice dry sand paper.

[sorry about that...Dave's endless verbage is over...go about your business]
 
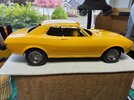
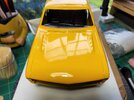
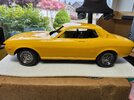
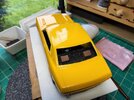
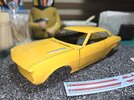
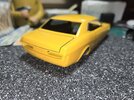
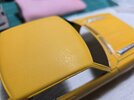
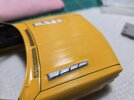
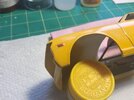
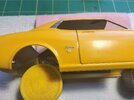
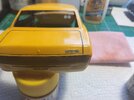
This is what I'm working with. There are just a couple little flecks and a nice overspray drip on the right front fender. Overall though not bad.

20240415_125349.jpg

20240415_125400.jpg

20240415_125416.jpg

20240415_125435.jpg
I'm scared to sand it down.
 
I am far from an expert, but if it were my model, I would leave it as is. I think it looks great! I am not one to make extra work in model building. Do what makes you happy, it is your model. I never worry what others think, I build for my satisfaction.
 
FWIW, I have never done what Airdave talked about. I've done a few glossy car models in my time and I only wetsand to get rid of dust particles that have landed in the paint job. I have no problem getting a clear coat to stick to a gloss paint, but then again I only do cars in lacquer paints. Your result as it is in the photos is fantastic, but aren't there decals? You should want to clear coat to cover the decals.
 
I usually build muscle cars and I’ll shoot a coat or two of gloss - I never wet sand. Most of them aren’t really showroom shiny. Low riders… they tend to be shiny glossy like mirror because they like it shiny - especially to bring out the candy metallic colors.
 
In this age of YouTube, there are useful tutorials on how to achieve a nice gloss finish for a car body. Just light dusting coats, going over the whole car, making sure to get the underside as that is often overlooked. At first it is tacky, just wait a few moments for it to air dry, then slowly build it up with misting coats until the shine comes. If you try to speed it up because you're a spaz (like I am), then you will deal with overspray that will droop and cover up panel lines, etc.
 
While I agree, the finish is not bad....and certainly better than some models I have painted,
the finish does have a lot of orange-peel which can easily be fixed at this stage
... if the glass isn't fixed, and the body not attached to the chassis.
If it is beyond that stage, then I say "great job" and I wish my current GT40 had this few issues.

Wet sanding with the paper I mentioned earlier can level out the paint and then with a coat of clear,
it will have a finish that better mimics a real car finish. With more work, it could even rival a show car finish.

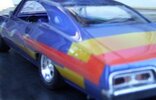
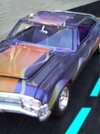
This 1/24 Impala was painted with water based acrylics, then dusted with rattle can clear.
Then wet sanded smooth and cleared final with automotive clear.
(sorry I don't have bigger pics, these are old scans from 4x6 prints)

While being a bit too glossy to be realistic, the finish was almost dead smooth!
Cutting and polishing with compound would have perfected it, but I wasn't into that much effort with such a small scale paint job.
Lowrider2.JPG

Lowrider3.JPG

Lowrider1.JPG
 
Last edited:
On another note, I find that with molded plastic parts like this Toyota body, there is a risk of destroying small details with sanding and over painting.
Like the little Celica nameplates on the side of the body.
And I would definitely think twice about going any further or listening to the advice of some old fart like me. LOL.

The other guys are correct in saying the paint job is pretty good.
And good enough to say "don't mess with a good thing".

It wasn't my intention to insult.
I hope you don't mind me offering an alternative that you have every right to ignore.
You guys are great! I can just throw up a pic and let you folks go at it (in a good way) and I just sit back and wait for the dust to clear. :D
 
Since I have your attention...

So I had some issues with the panel lines and made a mess. I just cant get that capillary action I want. Maybe I could have re-scribed the lines after color :rolleyes: . I cleaned it the best I could and put on a clear coat to seal. But I neglected the decals.

20240418_224514.jpg

20240418_224539.jpg
 
risk of destroying small details with sanding and over painting.
Like the little Celica nameplates on the side of the body.
Yup. Fortunately the kit comes with PE emblems. I'm still a little shaky with these. I used a dab of super glue and it melted the paint a bit. There are no clear parts for the marker lights, so I made do.

20240422_135051.jpg

20240422_135125.jpg

20240422_135144.jpg
 
I've seen this many times before: painting panel lines with black paint.
But I look at my own car...and nobody painted the edges of my doors or inside the cracks with black paint.

If it was me, I would mix a diluted water based paint.
Use the same colour as the car, with some black added to darken and dirty it.
Then brush it on and wipe it off.
Do it again, if you want it darker.
if you are painting over gloss or well cured paint, it should wipe right off. Do it quick.
Whatever is left behind in the panel line can dry to be a shadow in the panel gap.

Not your fault for trying something thats been done before.
And not your fault that it doesn't look good.
But it just ain't right is it?

I like the silver details on the bonnet. Nice.
Makes me want one of these cars again!
I loved these when I was in high school.
 
I've attached PE parts to car bodies for years using Future floor wax. Never had any issues. I generally clear coat over it all when finished.
 

Latest posts

Back
Top