Titanic 1:1200 Revell Sinking, Breaking Up and Lighted

Barsprojects

Member
Joined
May 27, 2013
Messages
84
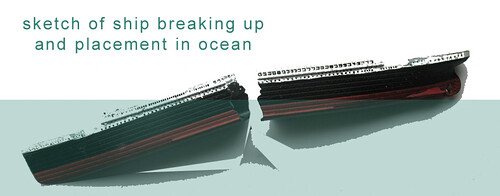
Hi there! This is my first ever SMA post. I have a little bit of modelbuilding experience but very little with painting, do love working with LED's. Never did something with an environment, so here's something that sounds quite ambitious to me: a 1/1200 scale Titanic, broken up and sinking with lights on in a near clear epoxy ocean. The idea is that you can sea the ocean from above and from the sides, so you can see the lighted sinking Titanic under water and above. No idea if this will work. All I have done so far is cut the model in half and started scratchbuilding some exposed decks (at the broken up section) and trying out some fiber optics on the decks. Hope you enjoy!

Barry

8859067532_48a2595760.jpg

8858460523_494a93e472.jpg
8858461179_6759310e86.jpg


[attachment deleted by admin]
 
That's a great idea for a diorama. I have the 1:1200 Revell Titanic and never would have thought of modeling it this way. I can't wait to see your progress.
 
Thanks. To be honest, I'm also working on an 1/48 X-wing, cutting that up as well, well, cut away is more precise, but that's such an amount of work I needed something different (small and cheap) to keep busy with.
Main problem now is will all the LED's and FO fit and light leakage issues. I also wonder what happens if I put the model in epoxy/resin, bubbles might be an issue. For now still making those broken up decks and adding fibers. Thanks for watching. You have your Titanic on SMA? Somewhere to view?
 
My in actually on my shelf. I haven't gotten around to building it yet. I will be sure to post pictures of it when I do though! Unfortunately, I don't have any advice on your light leakage issue, as I haven't lit up a model.....yet.
 
SHould prove a challenging build. I look forward to seeing where you go with it
 
I'm beginning to realise the daunting task I have embarked on :) Tricky thing I did now was drill a hole through the front section of the ship and insert a brass tube, this will both serve as a means to keep the ship in the proper angle (note the tilt towards portside) and will run the wires for the led's. I suddenly realized it could have been really awesome if I would make the epoxy ocean really deep, have the front of the ship on the bottom and the top still on the surface. But I'm not gonna do that cause I'm trying to use whatever epoxy I have left and a new batch is expensive. That's why the angle is quite shallow now. The ocean will also just cover the ship, so a little bit wider than the ship itself. Still have to make a test for colouring the epoxy, want some transparency but also a hint of seawater (blue greenish?). Also next up some lighting tests, I'm using some FO for the decks that will work like spotlights (to illuminate the deck and the smoke stacks) but for the millions of portholes haven't figured something out (nasty light leakage in case of just sticking in an led in the hull), might have to build some boxes on the insides. Well, hope you enjoyed sofar.

Cheers

8869278729_772be241f3_o.jpg

8869892028_a7c19b2c47_o.jpg
 
First a top tip: when hooking LED's up to a 6 Volt transformer check the voltage with a voltage meter :9 Turned out it was putting out 9 volts, bye bye LED's.
The good news is that with 2 LED's and about 15 fiber optics, it looks amazing, better than I expected. Remember, this will be the part that will be submerged (maybe a shame). The decks are illuminated, the smoke stacks, mast, might add some more fibers, some parts are a bit dark. And the spill from the leds is lighting up all the lower portholes on the hull sides, nice unexpected bonus :)
Look at the lighter next to the ship, this half a ship is only 4 inches long.

Really pleased with this result sofar.

Cheers

8871403140_8f7f167ec1.jpg
8870793481_e0278a25f3.jpg
8871402536_caab3c4703.jpg
8870795361_ce4bb1c826.jpg
8871404530_d77390d545.jpg
 
great idea !

looking forward to seeing this come together


nice work !
 
Thanks guys,

Still very pleased with result sofar. I'm sure it will get hairy when I'm actually going to pour epoxy around and on the model when all is done. Worst case scenario, lights don't work when it's set in epoxy ocean, or huge bubbles forming from epoxy entering the boat (just thought of that!).
Next up is probably the other half of the ship. Also thinking if I should get into the rigging of cables you see on this ship, from mast to mast and around the smoke stacks. Doesn't sound very appealing to do. Not really going for the realistic look but I'll see about that. I did actually break the ship in half based on a National Geographic article. For the ocean I should probably make like a fishtank out of acrylic, if I'm correct acrylic doesn't stick to epoxy? Anyone?
Thanks for watching!
 
Got some work done today, installed about 35 fiber optic cables in the rear of the ship.
8916035965_da721753e6_o.jpg
Added the LED's and wiring.
8916652726_be4f05578e_o.jpg
Ran the wires through the brass tube and installed the decks to see how it looks!
8916652154_f8e2a94bd5_o.jpg
8916036513_f354f26723_o.jpg
 
Barsprojects said:
Thanks Longlance! If you need any lighting on your Bismarck let me know :)


thanks mate, I dont know if I would be brave enough to attempt to light her, but that's a very good idea, a Guadalcanal naval dio springs to mind, having the Imperial and US fleet fighting it out in the dark, may prove for some interesting lighting opportunities ;)
 
Started some test piece of creating water with clear sealer, looks good but takes ages to dry. NOt sure if this will work in a larger volume. Also made a base for the Titanic of wood. Pics coming soon.

Barry
 
Here's the primed base (notice the tube that holds up the fron of the ship and will feed wiring). Now you can see what area will be filled with resin to simulate the ocean, right up to the deck. Back of the ship will float on the ocean when all is done.
8959302928_36b194d9e7_o.jpg
8958104029_3c89646c81_o.jpg
And tried out that sealer trick but probably won't use it as I need quite some volume.
8958122269_b1103ea81a_o.jpg
Next up, painting the ship and adding some details.

Barry
 
I've been painting (not my best skill) and should have all the details on the ship soon. Ordered some casting resin cause I don't have enough regular boat building epoxy to cast the water, and also, casting epoxy won't generate that much heat, which might be a good thing. This is a one chance only thing, If I screw up the casting of the resin, the model is gone. Oh and I cut some scratches and holes on the starboard side, that's ofcourse why she sank in the first place :) Might use the clear sealer to cover that hole so no resin can come in.

Barry
 
Thanks, me too, can't wait till the resin part is done! I got the resin today, maybe will do a test tonight, mainly curious if it sticks to plexi glass or not and if I can color the resin and how much paint I should use.

Have a good weekend.

Barry
 

Latest posts

Back
Top