The adversaries face off....

Castle building is fun!! It is a nice break from what I have been doing so far. I did quite a bit with it yesterday, got the base colors down. But in one place on the base, I messed up and got the paint a touch too thick. I will get that fixed pretty fast. Just a light touch of sand paper.

From what I can see it is very much like the buildings you would buy for a train set. I am going a bit nuts with the base, but it will look great when I am done. I can already see that. You will just have to wait for the video to see what I am doing to it.

The mouths are all assembled, so pretty much they will stay the way that they are.

Thanks Norm, for taking the time to do this. Unfortunately, life got in the way today so I have done almost nothing on my build. I did get my molds made last night and I will see if I have time tonight to try and mix up some aves. At the very least I think I will be using a bit of a hybrid of your technique. Your mold idea with Aves. If that won't work, it is off to buy some resin. Thanks again!!

I do think it will work better than what I have been doing. I am also going to make a few test objects with Aves and see if it can be deformed with hot water. I bet it can. It is much like resin, just not a liquid to start, but more like a paste. It also has the feel of resin when it is cured. I will let you know what the results are as soon as I get a chance to post something. Life might get in the way tomorrow again!

Thanks again!!
 
John, everything is coming together nicely. I am enjoying watching your videos of your build. Thanks for taking the time to produce these and sharing your ideas. I know there is a lot of work involved making them. Keep up the great work!!! 8) 8) 8)

Karl ( a.k.a Tanker52 )
 
Karl,

Thank you for the kind words. I am a teacher by profession, so this just comes naturally...

Norm,

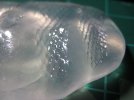
Here are the peliminary results of your tutorial on "skins"

The mold I made with the Oyumaru:

20110518_2.jpg

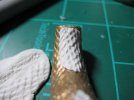
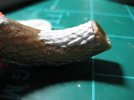
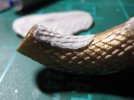
I put a thin layer of Aves down in the mold and let it cure for 3 hours. Then pulled it out, cut to shape and glued it down to the part:

20110518_9.jpg20110518_10.jpg20110518_11.jpg

It is a bit rough, but with practice and if I actually take my time, I think this will work. I still have four other "cast" to play with. But I am going to let them cure fully before I pull them from the mold. But as a proof of concept it seems to work!!

I did make a video of the process, and that will come up later with more details.

Thanks again Norm!
 
No problem John! Seems like you have it under control !

The nice thing about your monster skin.... Is, you can cut away! Along the edge of some
Scales..... And be able to marry it better that way!

Remember to keep it as thin as you possibly can...... Or it will look like a hump!

I like your test runs! Very cool! To see it work on someone else model!

Later!
 
Epic thread is epic. ;D

Lots of good stuff in here John, vids are way cool also. Keep it up.
 
Thank Ken, Patrick, Military and Norm! I will get back to King Gidrah's seams later this week, right now I am plugging ahead with the castle. Video for it is still in the camera, but here we have one of the last Godzilla videos before paint.

Finishing up the seams....
 
starting to come together - good work Grendels

with the Mr Surfacer you were using on the Godzilla body - which one were you using ? 500 or 1000 ?
 
Quaralane: Primer is the next step for Gojira. I should get to that today.

Schweinhund227: LOL, I am on schedule to finish this in time. I am doing detail painting on the castle, Godzilla needs primer and well I still haven't touched King Gidrah. That is on the schedule for today.

Haggistom: It does work that way, I am back to the seams on the King today.

Speaking of updates, this is the last one before Godzilla gets primer. The end of this video is exactly where I am with the big G.

Godzilla: Arms and legs....
 
Way to go G!!!!! really enjoying watching this come together! Keep it coming! ;D
 
I finally had time to sit down and watch the video! Nice progress on Big G !

Your handy work on the feet and seam are paying off !!!


cant wait to see it in the painting stage...... hope you give it a Mr. Surfacer 500 primer to give it that
extra gritty look !!!


See you around !


Norm.

PS glad you liked the video on the sinsengumi Decals... any part are usefull


Write your reply...

Latest posts

Back
Top