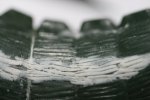
The adversaries face off....

Grendels said:
Thanks to all!! I didn't get a thing done on the big G today, but yesterday I got all of the sub assemblies done on Gidrah. So the two kits are at the same stage, seam filling. The good part is I made headway on those seams yesterday. Started to figure out what to do to fix them. A mixture of Aves apoxie sculpt and Mr. surfacer with a fine tipped paint brush......

Sub assemblies are always a good sign.

Mr. Surfacer is what I will normally used to give a cast texture to some armor stuff. You can also get texture by using that Ambroid Proweld right there (or any M.E.K. based liquid glue), put some on the surface area and as it softens the plastic, you can stipple it with a short, stiff bristled brush to get texture. Than just lightly sand if needed to smooth out the highest spots.

;D
 
This is a bit different !! have'nt seen Godzilla in years !!!!!! :), Hope ya get sorted with the seams ,Im looking forward to seeing this ;D

Chris.
 
Ken: First I want to thank you for the advice. I took some photos tonight to show all of you what I am doing and what I am facing.

I am using a 100mm macro lens on my camera to take these photos. What that means is I can extreme close ups of what I am trying to get a photo of. To show you what I mean:
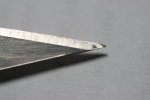
20110411_34.jpg

That is a photo of my exacto knife and its current blade. It is almost like having a micro scope on the end of my camera.

The next photo shows you what the textures are like on this model. I don't think you can really see them in the videos I am taking:
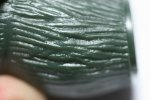
20110411_37.jpg

As you can see quite a bit of texture!! I need to somewhat duplicate that, or it just won't look right. I don't think Mr. Surfacer will work here, nor will using the the pro weld. What I have been doing is using a very thin layer of Aves Apoxie sculpt to fill in the gap and then carve the details back in.

This image has the rough layer of Aves on it:
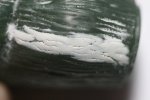
20110411_41.jpg

This image has a few of the preliminary carvings:
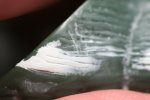
20110411_26.jpg

And this one is closer to done:

20110411_27.jpg

For the main body, this won't work, so here I am going to try using Mr. Surfacer to bring back the detail:
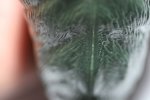
20110411_49.jpg

In this photo I was trying some Bondo putty and I didn't like the results so I quit. Although it wasn't that bad, it was filling in the surface details which I will have to fix:
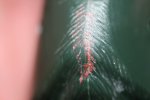
20110411_50.jpg


So now all of you can see what I am working with and what I am trying to do to fix it. Let me know what you think!!

PS: The surface details on King Gidrah are much different, they are scales.......But I have those handled. I have a few tools for working with clay that have the exact same size and shape head as the scale pattern does. So I am more worried about Godzilla than the King.

Also I want to let everyone know, updates will be slow this week, I am working 12 hour days between now and Sunday.....It is the busy time of year for my business.
 
Exception detail....scribing and camera! Looking great! ;D Good luck with the 1/2 days (12 hr) ::)
 
Hi Grendels , Have you tried using Milliput ? it can be shaped with a wet brush while still soft ? much easier to blend in that way rather than trying to sand and carve !, If you do it right you wont even need to sand any of it ;)

Chris.
 
Thanks TRM and Quaralane

Chris: I haven't, but after watching some of Scott's videos. I have stayed away from it. (I seem to remember that during his xwing build he had trouble with it.) From your description, it is pretty similar to Aves Apoxie sculpt. This is my first real effort at using Aves, and it is just taking me a bit to get use to it.

Aves is a two part epoxy putty. You can shape it with water, and it has about a three to four hour working time. But at four hours it starts to get pretty stiff, and I don't want to mess with it much. It does dry a little brittle, but that is perfect for what I am doing. I am not trying to carve anything regular into this seam filler. I want it to look organic. So the occasional breaks in the dried Aves is just perfect. Gives it a random look. Which is what something like this would have. I do have to be careful to not over do it though. There is one or two spots where I have to go back and fix where a little too much came off. But overall it is not a bad process. I will detail the process in a future video. But it does work really well, and I have pretty good control over where the aves goes and where it doesn't. With the long working time, I can just fix what I don't like, or start over.

For the curious I found a couple of threads where a few people compare Milliput and Aves:

http://www.hobbyfanatics.com/index.php?/topic/19661-trying-out-some-milliput/

http://www.starshipmodeler.net/talk/viewtopic.php?t=36204&sid=534edfa6fb4d0a5cb89d3601f363c1e9

And one more:
http://wyrd-games.net/forum/archive/index.php/t-6048.html

But I did almost pick up some Milliput today when I was at my local hobby store getting paint for Godzilla's tongue and mouth.

Thank you for the suggestion Chris!

Jingles: I did make a few texture stamps last week. (Again in a future video!) I decided to not use them. The textures on this model vary greatly from one spot to the next. I would have to make a different texture stamp for each 3 cm of the model. Just not worth it. (On the legs and arms that is for each .5 cm!) Great idea and if the texture work was horrible, I would defiantly resort to that.
 
Your really doing good with those seams John - quite a trick to get em right but it's looking great.
 
I see now the exact texture you mean, it's pretty difficult looking but I think you've got it figured out. 8)
 
Just coming from the descussion on the Quaralane's post - that's LOT of scribing indeed!
But keep up on that excellent work You are doing - nothing makes the first impression from the figure or monster kit as the absence of seams.
 
No problem buddy ,just a suggestion as its my prefered filler for doing figures etc , but for the cars and armour I'd use Squadron green thinned with plastic cement ;D. Im sure this is going to look sweet when you get it done ,which ever method you stick too :)

Chris.
 
Chris: I was curious about Milliput, and you got me to get out and take a look, that is never a bad thing. Thank you.

Scott, Ken, and Solander: Thank you. If you guys think I am doing a good job, then I know I am. These seams were the part of this build that had me the most worried. If I can get them done right, then the rest of this is cake. I love doing ground work on Dioramas, so that part of the build I am looking forward to. I am even thinking of putting in a waterfall. That means I will get to experiment with different water techniques!! I have three different ones to try out.

If time permits, I will have the next video up late tomorrow night, Thursday by the latest.
 
Thanks Java! That is actually pretty close to one of my ideas. Since this is a 1/350 scale, the water fall will be tiny.
 
Maybe you should try this:
http://www.hlj.com/product/TAM87076
I just found out that when you use alcohol 98% you can remove excess (with a little practice of course).
Cheers and I'm waiting for next video.
Lukasz
P.S. I almost forgot that I also have a Godzilla kit (well sort of) ;)
 
Biskup: I talked to my local hobby shop about this and they would have to order it, no telling how long it will take to get here, so for now I am going to use the Aves. It seems to be working fairly well, but in the future I will track some of that down.

Well here is the next update. It is a little bit older than the photos. Little work has been done this week, work was the priority. But next week, I should have some time to get a building...

Godzilla build log part 2
 
Coming along nicely. At least some of the seams on the tail are placed on areas that have a natural line anyway.

For the stippling thing with a brush, that proweld should be hot enough. Maybe practice on Mothra (if your not using it) or something else first. Put some on, let it sit for a bit, put a little more on and then poke at it.

You don't need to use anything too stiff, like steel or brass bristles. I just use cheapo brushes from the store or those old white plastic Testors brushes to create texture and they work fine.

Thanks for keeping us updated with the videos.
 
Seamwork's looking pretty good.
A note on the "footprints," though. You'll also likely need to make a tail track as well
 
Ken: Thank you for the advice! I will give it a try on some scrap styrene I have lying around. I have my first day off in 13 days tomorrow and I am itching to get at this thing. You actually gave me ideas and I want to try a few of them out. It will be in a future video.....

Quaralane: Thank you, I haven't thought of that yet (Tail tracks). I am going to just go ahead and try to cast the feet. Again I don't need perfect just something close. I will probably make them out of plaster, since that is easy to work with and cheap.

I also need to get started on making trees. I will need quite a few of them.
 
If you want to make simple and quick molds for some casting I would recommend this:
http://shop.ebay.com/i.html?_nkw=oyumaru
You throw it in to boiling water which makes it very plastic. Then you pres it against the detail you want and after that you can pure resin, plaster or something like that to make a cast from it. The best thing is that you can reuse it by simply throwing it back in to the boiling water.
Regards
Lukasz


Write your reply...
Back
Top