Revell - Maquis Fighter

Igard

New Member
Joined
May 16, 2011
Messages
2,004
Hey folks. This build is going to be a bit of an excercise in weathering. It's certainly the most detailed kit that I've built so far, but I'm not worried about putting her together. I'm really mostly concerned about painting her.

I'm not going to be doing any lighting. Nor am I going to do a base. I know those 2 things are something that I've had success with, so it's time to concentrate on improving other skills.

At just over 13 inches in length, it's a good size to get some proper experience of some painting techniques I haven't tried yet, like washing.

Pics :-

20072011251.jpg


20072011252.jpg


Raised panel lines :-

17072011249.jpg


No more raised panel lines :-

20072011250.jpg


Still making one or two mistakes with the scriber. Nothing big, but it feels like I'm getting more used to it.

More soon...
 
So cool to see this kit being built! It is one of the starship models barely highlighted in web, but still a very, very nice one. And lying in my stash for a loooong time - it would be quite interesting for me to see this ship being brough to life.
Nice start on it, keep the updates coming, and good luck with this one ;)
 
I also have this one in the stash and have been thinking about build it up. Keep the updates coming!
 
Of course I'll keep you all updated! ;D

And don't congratulate me yet, Q. I'm only about half way with the panel lines. Think I'm getting the hang of it though. Bought a scriber which makes a huge difference. I did the USS Spitfire's panels with my exacto blade!

Not much to update you with, just sanded off the grills from the nose. They don't look like they were on the original, and I think they looked kind of out of place.

Still to polish them :-

22072011255.jpg
 
Never seen this kit built. I'll be checking this out for sure. Looking forward to the updates.
 
You're a better scriber than i am! but i do have alot of know how on weathering and paint and the supplies needed for starship finishing. A step i do love. if you have any questions or technique advice IGARD , just PM me.
 
CTspeedshop, yes it seems most people don't post much on this model, which is a shame. It's nice kit as far as I can tell. It is only my 4th model build.

PpigP, thankyou. I'll probably be looking for some advice on the weathering, but we'll cross that bridge when we come to it.

From what I've learned about scribing so far. First of all, I don't presume to be an expert who's learned all there is to know. This is just what I've gathered from my 2 experiences of scribing panel lines.

  • - Purchase a good scribe tool. I got a Bare Metal panel scriber, which is designed for panel lines. It has a 90 degree bend at the end and a sharp tip. Looks like a dentists tool.
  • - Get a small steel ruler. I use a 6 inch steel ruler. It's only about 2cm width. This will let you get into most nooks and crannies.
  • - For straight panel lines, use the ruler to guide you.
  • - If you're using the panel scriber. Make your first line very lightly, just enough to scratch the plastic. Then you can start being more heavy to make the indentation. Pull the scriber down the plastic, towards you. Work the scriber left and right only to clean up the burrs and smooth out the line.
  • - At the edges of the panel, put the ruler down and use a finger on your other hand (I usually use the nail of my thumb) to act as a blocker. When you pull down on the scriber, you want it to stop and not continue. Obviously don't allow the point of the scriber to cut you. Your finger should only block the shaft of the scriber from moving further, the tip should be no where near your skin.
  • - For curved lines, it would be best to get a steel circle template. I don't have one, so I've been using either free hand (slowly and gently scribing the line) or the curved end of my steel ruler.

I know, I should do a youtube video. It would be easier to understand. Just thought I'd share with you what I'm doing. If it helps anyone, that's great. If anyone has anything to add to it, that would be very much appreciated. I'll probably copy all this down and put it on my website or something. :)

EDIT: Aww, the list tool doesn't seem to work.
 
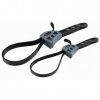
For curved panel lines I use one of two things. I have a plumbers strap wrench.

image_10518.jpg

This will allow you to have a good guide to scribe with

Or I use Dyno tape, the hard plastic tape for labeling machines.
 
ive heard to use dyno tape. im gonna get some. i have a sribing ruler but it always wants to move and sometimes make my lines "walk".
 
Interesting Grendels, thank you. The dyno tape sounds like the best solution since you can easily replace it since the scriber inevitably will knock chunks out of it.

Luckily there are barely any curved panels on this ship.
 
This ship should look excellent when she's done. Admittedly, I haven't really seen one since I built mine way back when they first issued the original version of the kit
 
Thank you Ace.

Quaralane said:
This ship should look excellent when she's done. Admittedly, I haven't really seen one since I built mine way back when they first issued the original version of the kit

Interesting thing about that original kit (at least I assume it was the original).

Copied from memory Alpha. (I do a good bit of research before I build) :-

"The design was seen once more, albeit fleetingly, as a display model in Teero Anaydis's office in "Repression". This was a last minute addition of the art department and Anthony Fredrickson was tasked to build it overnight. Fredrickson used a Revell-Monogram model kit, No. 3605 and mounted it on a plant stand. To give the model the look of an "object of veneration", he adorned the stand with unusual looking earrings of his wife Penny Juday. In recognition of her contribution the raider was designated Ju'day class by the art department, on one of the posters on the wall in Teero's office, though that can not be discerned on screen. (Star Trek: The Magazine Volume 2, Issue 4, p. 112) "


s_raider_display_model_in_Teero_Anaydis%27s_office.jpg

"Repression" was a Voyager episode.

So this model kit was actually used in an episode. I think that kind of adds to its cool-factor.
 
looking good so far. I have this kit also. Have one half built and one still untouched. If offers alot of detail for a star trek kit, and is something different than the standard federation stuff. Watch when gluing the halves together as there will be seams to fill.
 
Thanks for that noc5659. Seams filling just means more much needed practice for me. I've got some magic sculp which I hear is similar to Aves and certainly much better than the squadron white putty I was using.
 
Not got much to show for this week. Had a few days where I couldn't get near it.

Got all the panel scribing done. Some of it's not great (to be expected), but overall I'm happy with it.

I've decided to light her now. For a couple of reasons. First because I've develpoed a new found appreciation for the design (usually this happens when I'm building) and second, because I just thought it'd be more good practice. Also, I'm going to do a little Chakotay and Tuvok to sit inside. Never done anything like that before so it should be fun.

Problem putting the front window in. None of the windows seem to really fit that well, but the large front window is the worst. Here you can see that it's slightly offset.

30072011259.jpg


Any suggestions? I really don't like the thought of cutting the clear part. I've already tried cutting out some of the frame to make it more centred.
 
You might try replacing the kit window with a small piece of clear sheet that covers both sections
 
i'd scrap the kit's windows as well. I'd go with that clear plastic that you get when you buy electroncs, etc...the kind thats immpossible to open. cut it out to shape and CA it in. Ive done it before and it works great.
 

Latest posts

Back
Top