"Reinforcing" small delicate parts that are partially broken

Scale Model Addict - Model Tips, Guides, Tools & Tech, Tutorials, and Community

Help Support Scale Model Addict:

Rich97

Active Member
Joined
Jun 28, 2025
Messages
39
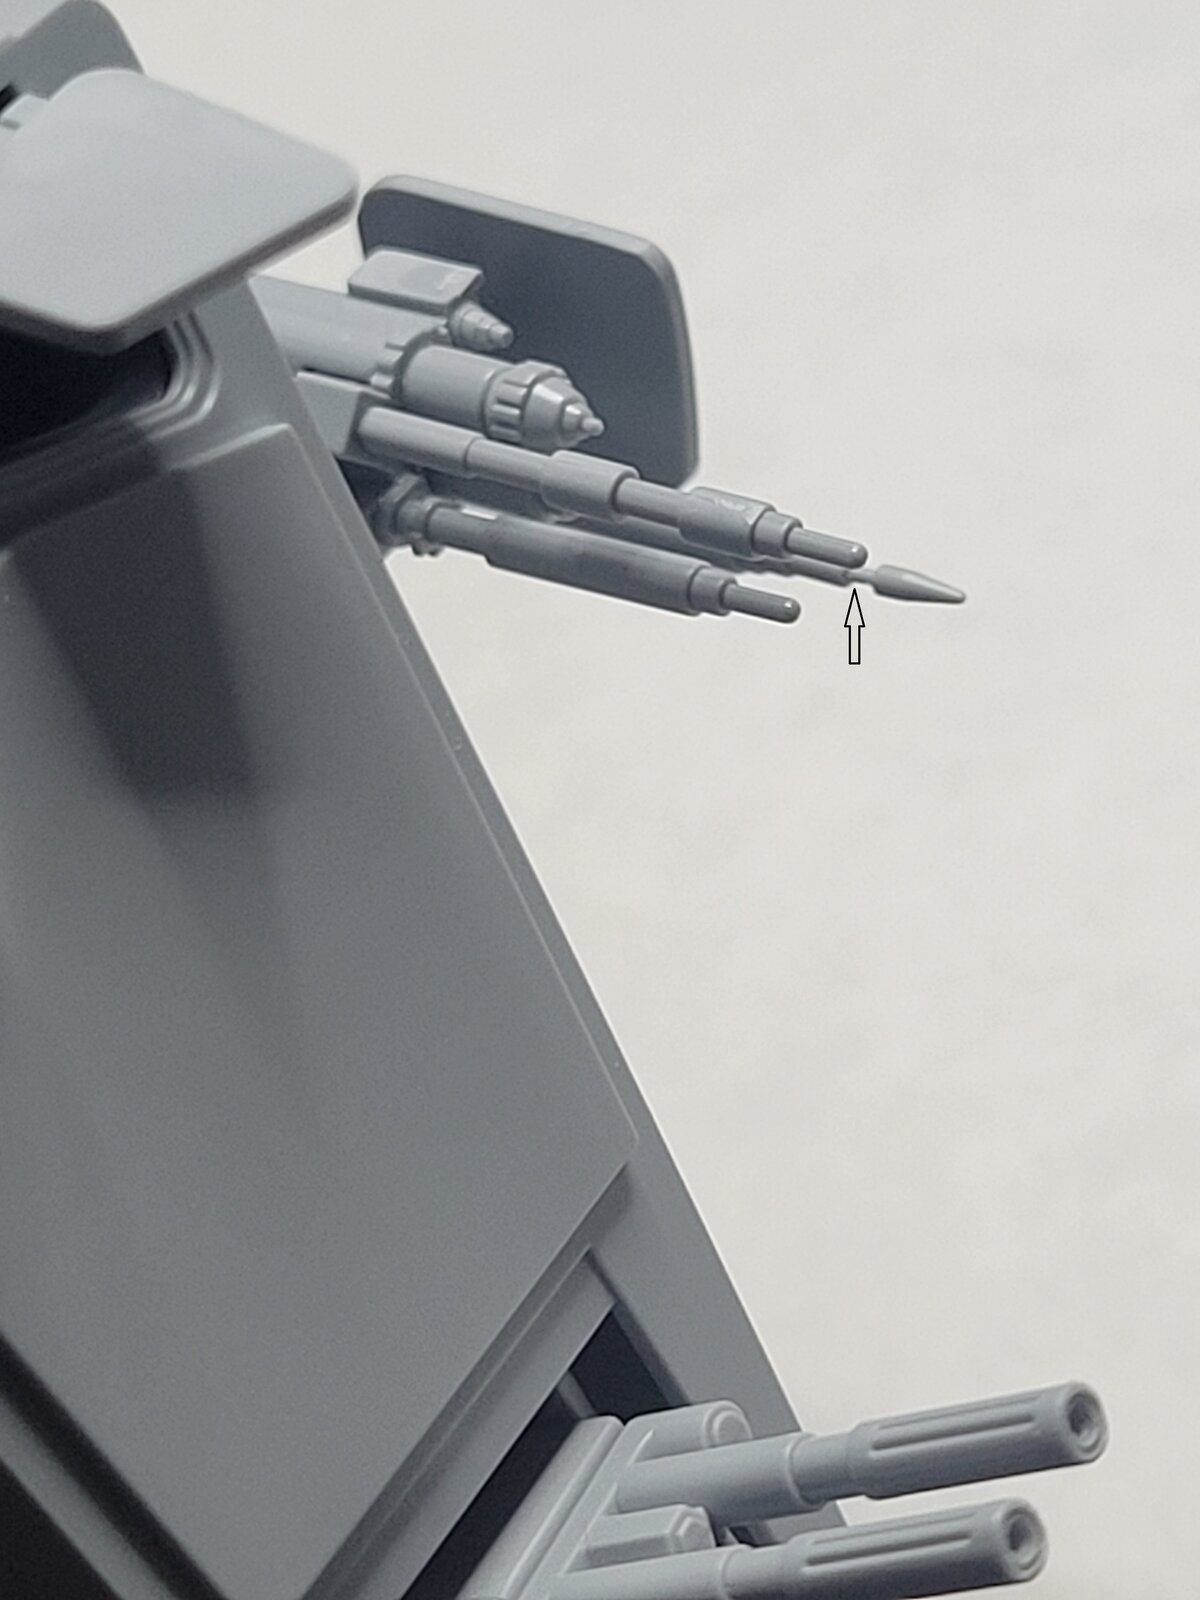
Hello, this is my first post. I'm new to this hobby and have completed building a Star Wars 1/44 scale AT-ST. One of the guns on the side is rather delicate and has partially broken. Is there a proven, reliable way to reinforce it so that it won't break off at the slightest bump? Please see the attached photo; the arrow is pointing at the spot where it's partially detached. Any chance the eventual varnish coat will reinforce it? I've brushed some extra thin cement onto it but it is still moving at the slightest touch.

Thanks in advance.

I look forward to browsing this forum in the near future. I'm currently in possession of an 1980 MPC snowspeeder, an 1989 MPC AT-AT, MPC R2-D2, MPC C-3PO, 2 Bandai X-Wings, 2 A-Wings, 2 AT-ATs, a Y-Wing, a TIE Advanced X1, and a perfect grade Millennium Falcon, so it's time to get to work!

AT-ST broken gun.jpg
 
HI THERE well thats what i do if possible like eagle1 says if its not to thin to drill into to fit a tiny steel pin then thats your best course of action as i may have this problem when im fittin my 4 bilgle keels on my hornet good luck
to you
chrisb
 
I would drill it and insert a metal pin.
You beat me to it :) The part pointed to by the arrow is just asking to break, really — a glued joint is not going to be as strong as before it (partially) broke, so the only real way to make it durable is to cut it off, drill out both ends and replace the thin plastic by metal. You could even get different sizes of tubing that neatly fit inside each other and rebuild the whole thing — I'm betting that's exactly how the original was made, too.
 
As an Amazon Associate we earn from qualifying purchases. Product prices and availability are accurate as of the date/time indicated and are subject to change.
Thanks. I do have the tools to do it, but not the courage as yet!

Oh pish-tosh!

If you've got the tools, which would be a pin vise and a straight pin, you've already thought about this kinda job before.

You're already over the thought of destroying the model. Anybody that picks up something like the "tools" to do this certainly understood the damage that can be done with them. Think about how satisfied you'll feel in the unlikely event that this goes exactly right.

Remember to post pictures.

;)

Rob.
 
One thing you can try is applying a very thin coating of cyano super glue over the junction and surrounding area.
I've used very "runny" cyano super glue to apply a thin coat to "encase" the joint to reinforce it.
This is fairly easy to do using a small drop of glue on the tip of a toothpick or wire end or with a super glue applicator.
Touch the tip of the drop to the part and the glue should flow onto the part through capillary action.
You may need to do this in a few other areas depending on large the part junction is to get full coverage.
Allow the glue to air dry using no accelerator in order to preserve the smooth surface of the original part.
The goal is to create a very thin "layer" of cured glue to encase the joint to provide a reinforcing "sleeve" around the part joint/junction.
Cured (dried) cyano super glue is rigid and forms a thin reinforcing casing/sleeve around parts and their joints to make them more rugged.
I do this around the roots of propellers at the hub junction during the assembly process to make props more rugged and less prone to breaking off.
 
but not the courage
Then there is the obvious:
"Rich...use the Force!"

I have tried all of the above suggestions, single pin, pin in tube, CA glazing. Each have their use for sure!
In this situation, where the unsuported part could be subject to sideways leverage with a glancing blow, I'd be less confident about the CA, which though strong as a protective coating, I suspect would be susceptible to shear at the base.

Dunno about your experience level with sort of thing, so will assume first time.

If you decide on the drill and pin, brass rod from your HLS is relatively cheap, easy to work with and resilient. Make sure to measure the plastic you are replacing, to get the right size.

...and practice a few drill holes on similar sized sprues if you've never done it before. Sanding the tip surface flat and scoring a small, centered divet might make it easier to drill without skating away. Slowly, with progressively larger bits does it, avoiding splitting and bursting the part you are drilling.

Cheers, and welcome to the forum!
 
...and practice a few drill holes on similar sized sprues if you've never done it before. Sanding the tip surface flat and scoring a small, centered divet might make it easier to drill without skating away. Slowly, with progressively larger bits does it, avoiding splitting and bursting the part you are drilling.
Good Idea about the practice.
 
Update:

I blew it. Quite literally, as the end of the part broke off and I was in the middle of fixing it:

I was micro-drilling into the part, and as I was cleaning my work area, I blew the part off of my desk, never to be seen again.

I also broke two micro drill bits in the process.

You live and learn! It's provided me an opportunity to try out Bandai's free replacement parts program. I have two other parts that I need to replace in this kit anyway. Another part broke, and I also used resin to craft another part, but if I can get a replacement, I will.
 
How about not FIXING the skinny part, but replacing it?

Cut off the pointy end, cut off the skinny shaft, drill into the thicker barrel section and the pointy bit, and put everything back together. Use a metal rod instead of plastic.

You might end up with that being the only thing that survives the fall from a shelf.

That, or just make new out of polyrazzmatazz.
 
Update:

I blew it. Quite literally, as the end of the part broke off and I was in the middle of fixing it:

I was micro-drilling into the part, and as I was cleaning my work area, I blew the part off of my desk, never to be seen again.

I also broke two micro drill bits in the process.

You live and learn! It's provided me an opportunity to try out Bandai's free replacement parts program. I have two other parts that I need to replace in this kit anyway. Another part broke, and I also used resin to craft another part, but if I can get a replacement, I will.
OH no!

Micro drill bits take a delicate touch. Going slow is necessary here. Chucking the bits up in your drill or Dremel is a recipe for disaster.

Hopefully Bandai can help you out with replacement parts.
 
OH no!

Micro drill bits take a delicate touch. Going slow is necessary here. Chucking the bits up in your drill or Dremel is a recipe for disaster.

Hopefully Bandai can help you out with replacement parts.
I prefer to always use a hand-held tool for the small bits. You can make one out of a pin vise, they are also available online.
 
Just an update, I sent two replacement requests to Bandai, one on June 30 and one on July 6 for another kit, and they acknowledged both on July 11, so we will see how this goes and how long it takes.
 
New update if anyone is interested. No further communication thus far. I actually purchased another AT-ST kit and some photo-etch for it as well, the latter arriving today.
I was catching up on some of the threads and I came upon this one.
I am a well practiced "drill and insert metal pin" guy. I now preemptively drill out small parts that will be vulnerable to snapping off (antenna masts, pitot tubes, repairing broken 1/72 scale propellers, etc), and insering a metal pin between the two parts. Then I cement them together with CA glue.
Regarding the drill bits, I found a local specialty electronics parts store that sells the tiny drill bits for the pin vise hand drill. I'm told by the store owner that the tiny drill bits are used for building circuit boards and other tiny objects for robotic clubs and other electronic building projects. The bits come in 10 packs. I have found that the 4 and 5 mm bits are my most used (and most broken). The bits are reasonably strong along their central axis, but easily snap if any lateral pressure is applied to them (like when putting the pin vise back on the bench, and accidently touching the bit against the xacto knife).
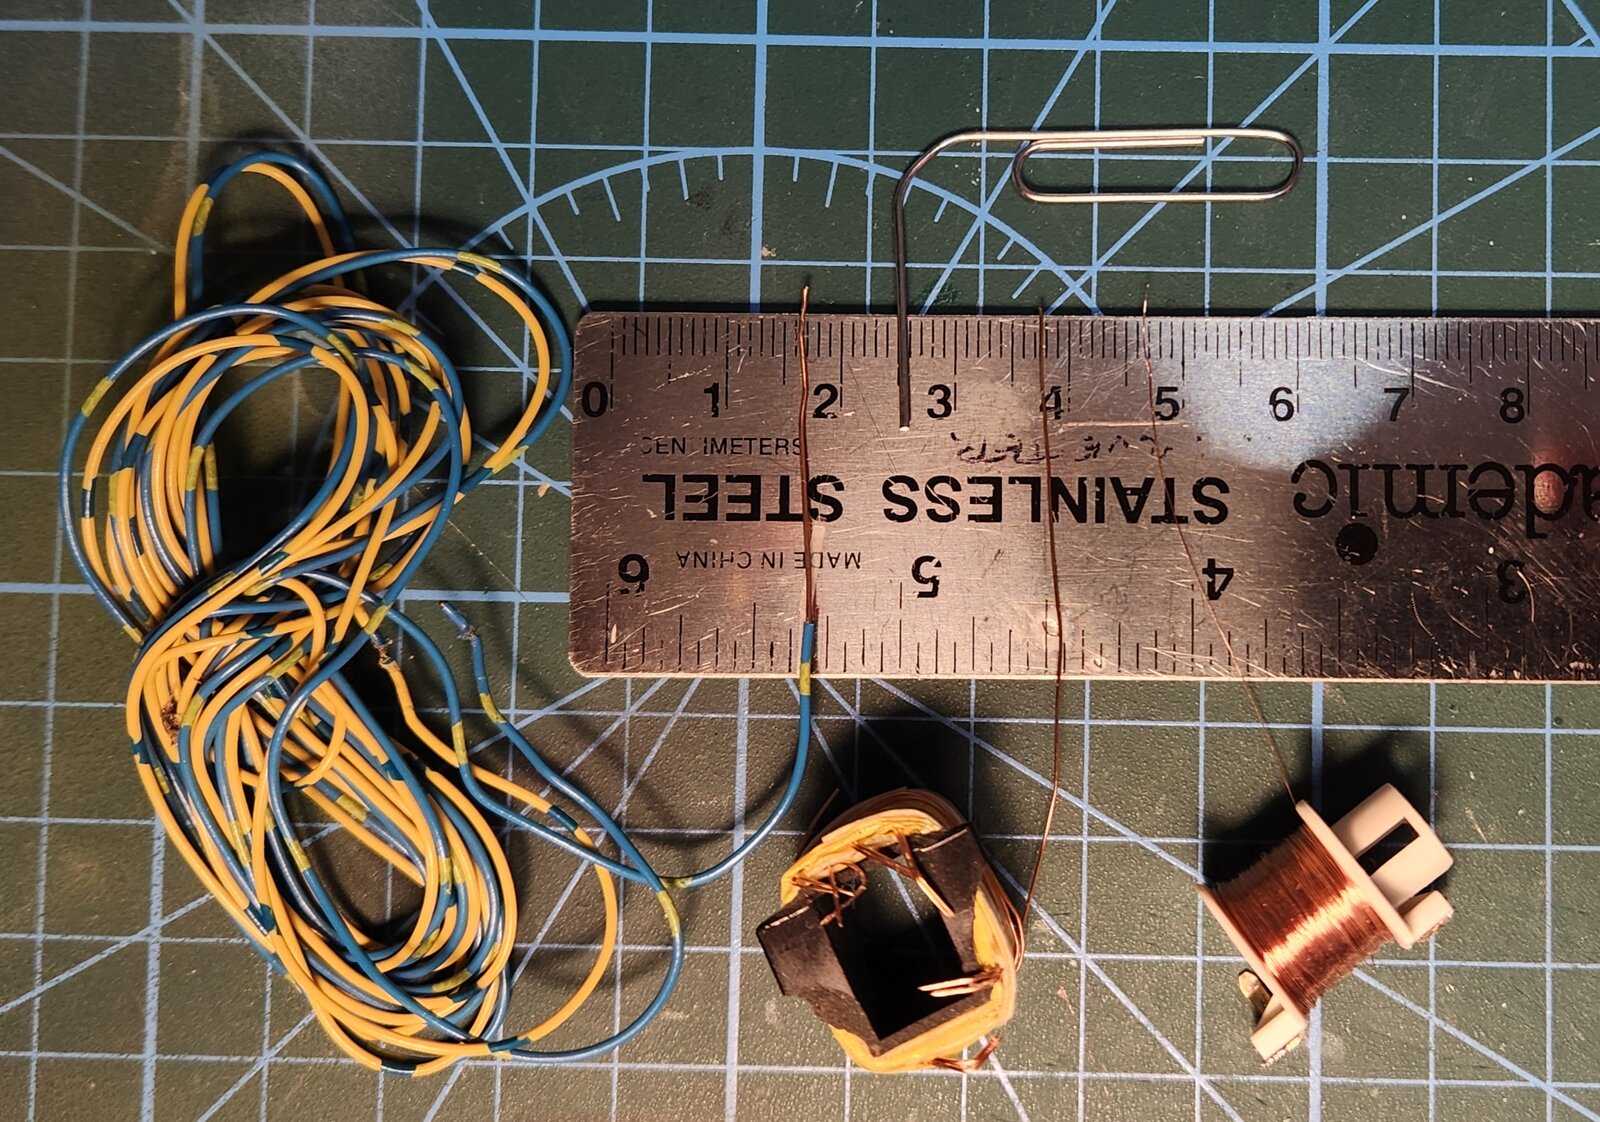
Regarding the wire I use, I find myself always looking at discarded wire. Old phone wiring, blasting wire, wire out if discarded printers (a great source of various diameter wires). My favourite for strength, if the pieces are big enough, is paper clips. They are strong! (See attached photo for salvaged wires sizes)
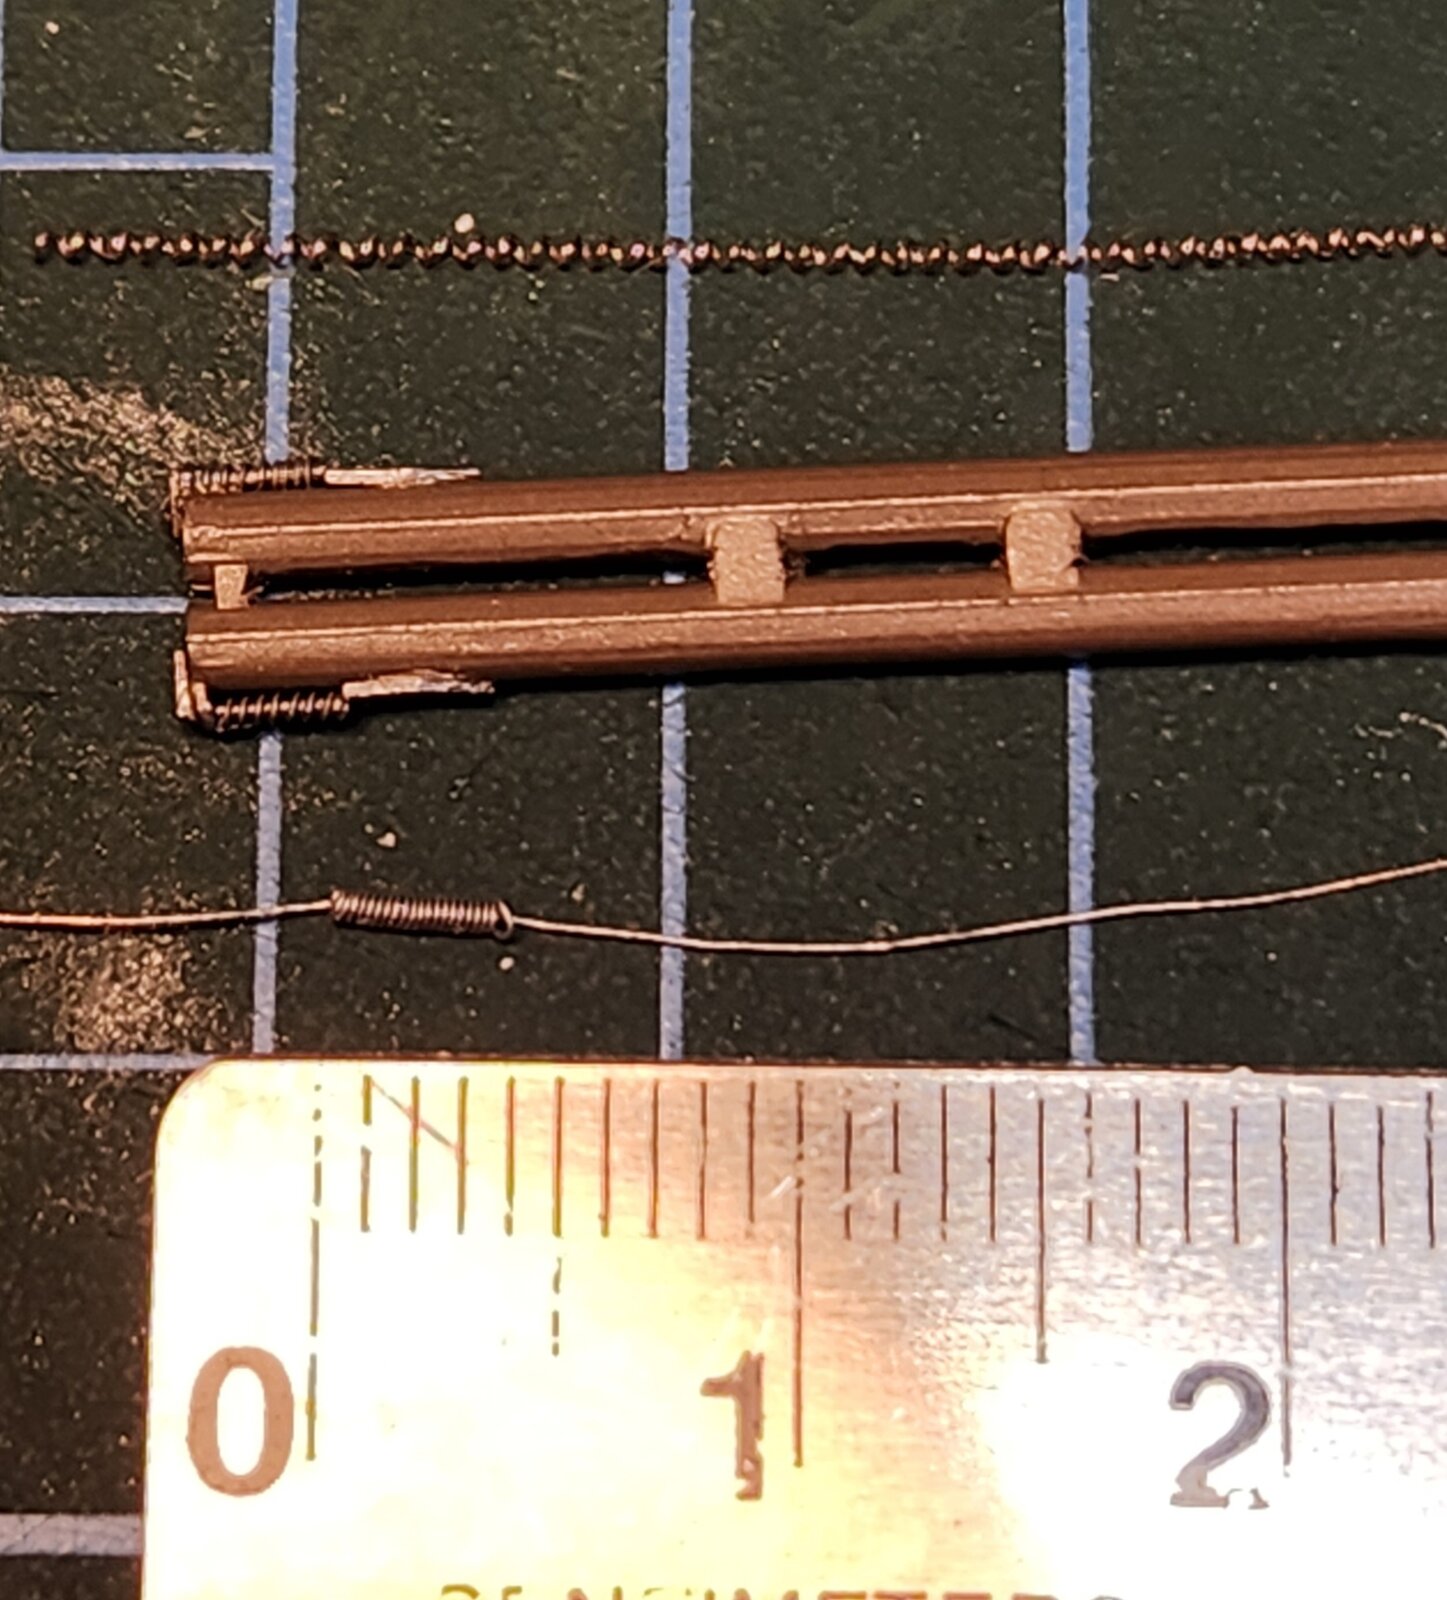
Also, unrelated to wire for reinforcing purposes, the electronic hobby store is also a great source for very small diameter soldering wire! It is difficult to find small diameter soldering wire in short lengths ( i.e. one or two meters). The owner of my local store will usually cut me a meter length from the 25 m spool of the wire from his work bench. Then he charges me about $3 for it. Thats enough to last years! The lead solder is so much easier to work with when replicating wiring and hydraulic lines.
I use the smallest diameter wire to make springs, oxygen tubes and coiled communications cords (i.e. for microphones and helmets/headsets). The attached photo shows a long coiled wire that I have used for various things on a 1/48 Bird Dog I am working on: top of photo is the wiring for the cockpit lights, middle - springs on the rear of the rocket tubes, and bottom - steering linkage spring and cable for the tail wheel.
Hope the above info is useful to someone.

20250906_163704.jpg


20250906_163927.jpg
 
I've bought mini drills here in the UK. but can't find a small enough handle for them or drill grip.
 
I think my problem trying that is a) not breaking thru the side of the fragile piece while drilling and b) holding the tiny piece to drill it. I find any tweezer manipulation of thin delicate pieces will result in breaking said piece or springing the piece to tweezer graveyard.
 
I think my problem trying that is a) not breaking thru the side of the fragile piece while drilling and b) holding the tiny piece to drill it. I find any tweezer manipulation of thin delicate pieces will result in breaking said piece or springing the piece to tweezer graveyard.
Tweezers graveyard! A great term! I love it!
I wonder how much time we all spend on our hands and knees, under the model bench, trying to find "little parts."
I have recently resigned myself, when scratch building, to building more "little parts" than I will need, understanding that some of them are going to take flight. That way, when they do take flight, I just push the next "little part" in to replace it and get back to work.
I could probably construct 80% of a 5th rocket pod if I could find all the little parts that have flown off the cutting board this past week.
 
I find any tweezer manipulation of thin delicate pieces will result in breaking said piece or springing the piece to tweezer graveyard.
When drilling or cutting very small pieces I tape them to a cutting mat or block of wood, sometimes making the cut or drilling through the tape. When I pick them up, I pick up the tape, then use a very fine pointed tweezer to take it off the tape. A swish in an alcohol bath removes any tape adhesive residue.

Investing in high quality jewelers' tweezers is a good idea. When I have to hold a tiny part in something, I use jewelers' cushioned parallel jaw pliers.
 
New update if anyone is interested. No further communication thus far. I actually purchased another AT-ST kit and some photo-etch for it as well, the latter arriving today.
Bandai's replacement program is not free, and it's only for use in Japan AFAIK. I didn't see your message earlier, otherwise I would have offered to try ordering the replacement for you. My local hobby shop is a Bandai Pro Shop affiliate, where I can get parts pretty easily (as long as Bandai has the parts in stock).
 
I submitted a form on a site that states the form is for US and Canada customers only.
Still no update.
 
Back
Top