hoakin1981
New Member
- Joined
- Jan 6, 2024
- Messages
- 19
So the front part of this nice little Type 214 1/350 sub made by Wolfpack is basically a cap that "obviously" would require some work after gluing...
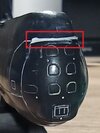
What you see in the photo is the best I have been able to achieve after messing with it for a day. I have filled in the seams/gaps with putty, but the two parts (the "cap" and rest of the sub) still do not match 100%. There is still a small gap between the two which is most pronounced on the upper section (marked in red) but more or less is like this all around the cap like this.
I have tried:
Normally i would drown the gaps in Mr. Surfacer 500 and then sand the section but if i do that here i am confident that all the torpedo tubes (panels) in the front will be gone and I can't have that because there is no way i can bring them back afterwards.
Also I do not have a lot of space to work with here since the height of the front section you are seeing is less than one inch.
Am i doing anything wrong? Should I leave Mr. Surfacer 500 on for longer?
Thanks in advance

What you see in the photo is the best I have been able to achieve after messing with it for a day. I have filled in the seams/gaps with putty, but the two parts (the "cap" and rest of the sub) still do not match 100%. There is still a small gap between the two which is most pronounced on the upper section (marked in red) but more or less is like this all around the cap like this.
I have tried:
- Mr. Surfacer 500
- Mr. Dissolved Putty
- Mr. White Putty R
- Green Putty
- Vallejo Plastic Putty
Normally i would drown the gaps in Mr. Surfacer 500 and then sand the section but if i do that here i am confident that all the torpedo tubes (panels) in the front will be gone and I can't have that because there is no way i can bring them back afterwards.
Also I do not have a lot of space to work with here since the height of the front section you are seeing is less than one inch.
Am i doing anything wrong? Should I leave Mr. Surfacer 500 on for longer?
Thanks in advance


