Pre shading with paint markers

Scale Model Addict - Model Tips, Guides, Tools & Tech, Tutorials, and Community

Help Support Scale Model Addict:

49thStateRT

Well-Known Member
Silver Member
Joined
Oct 14, 2024
Messages
182
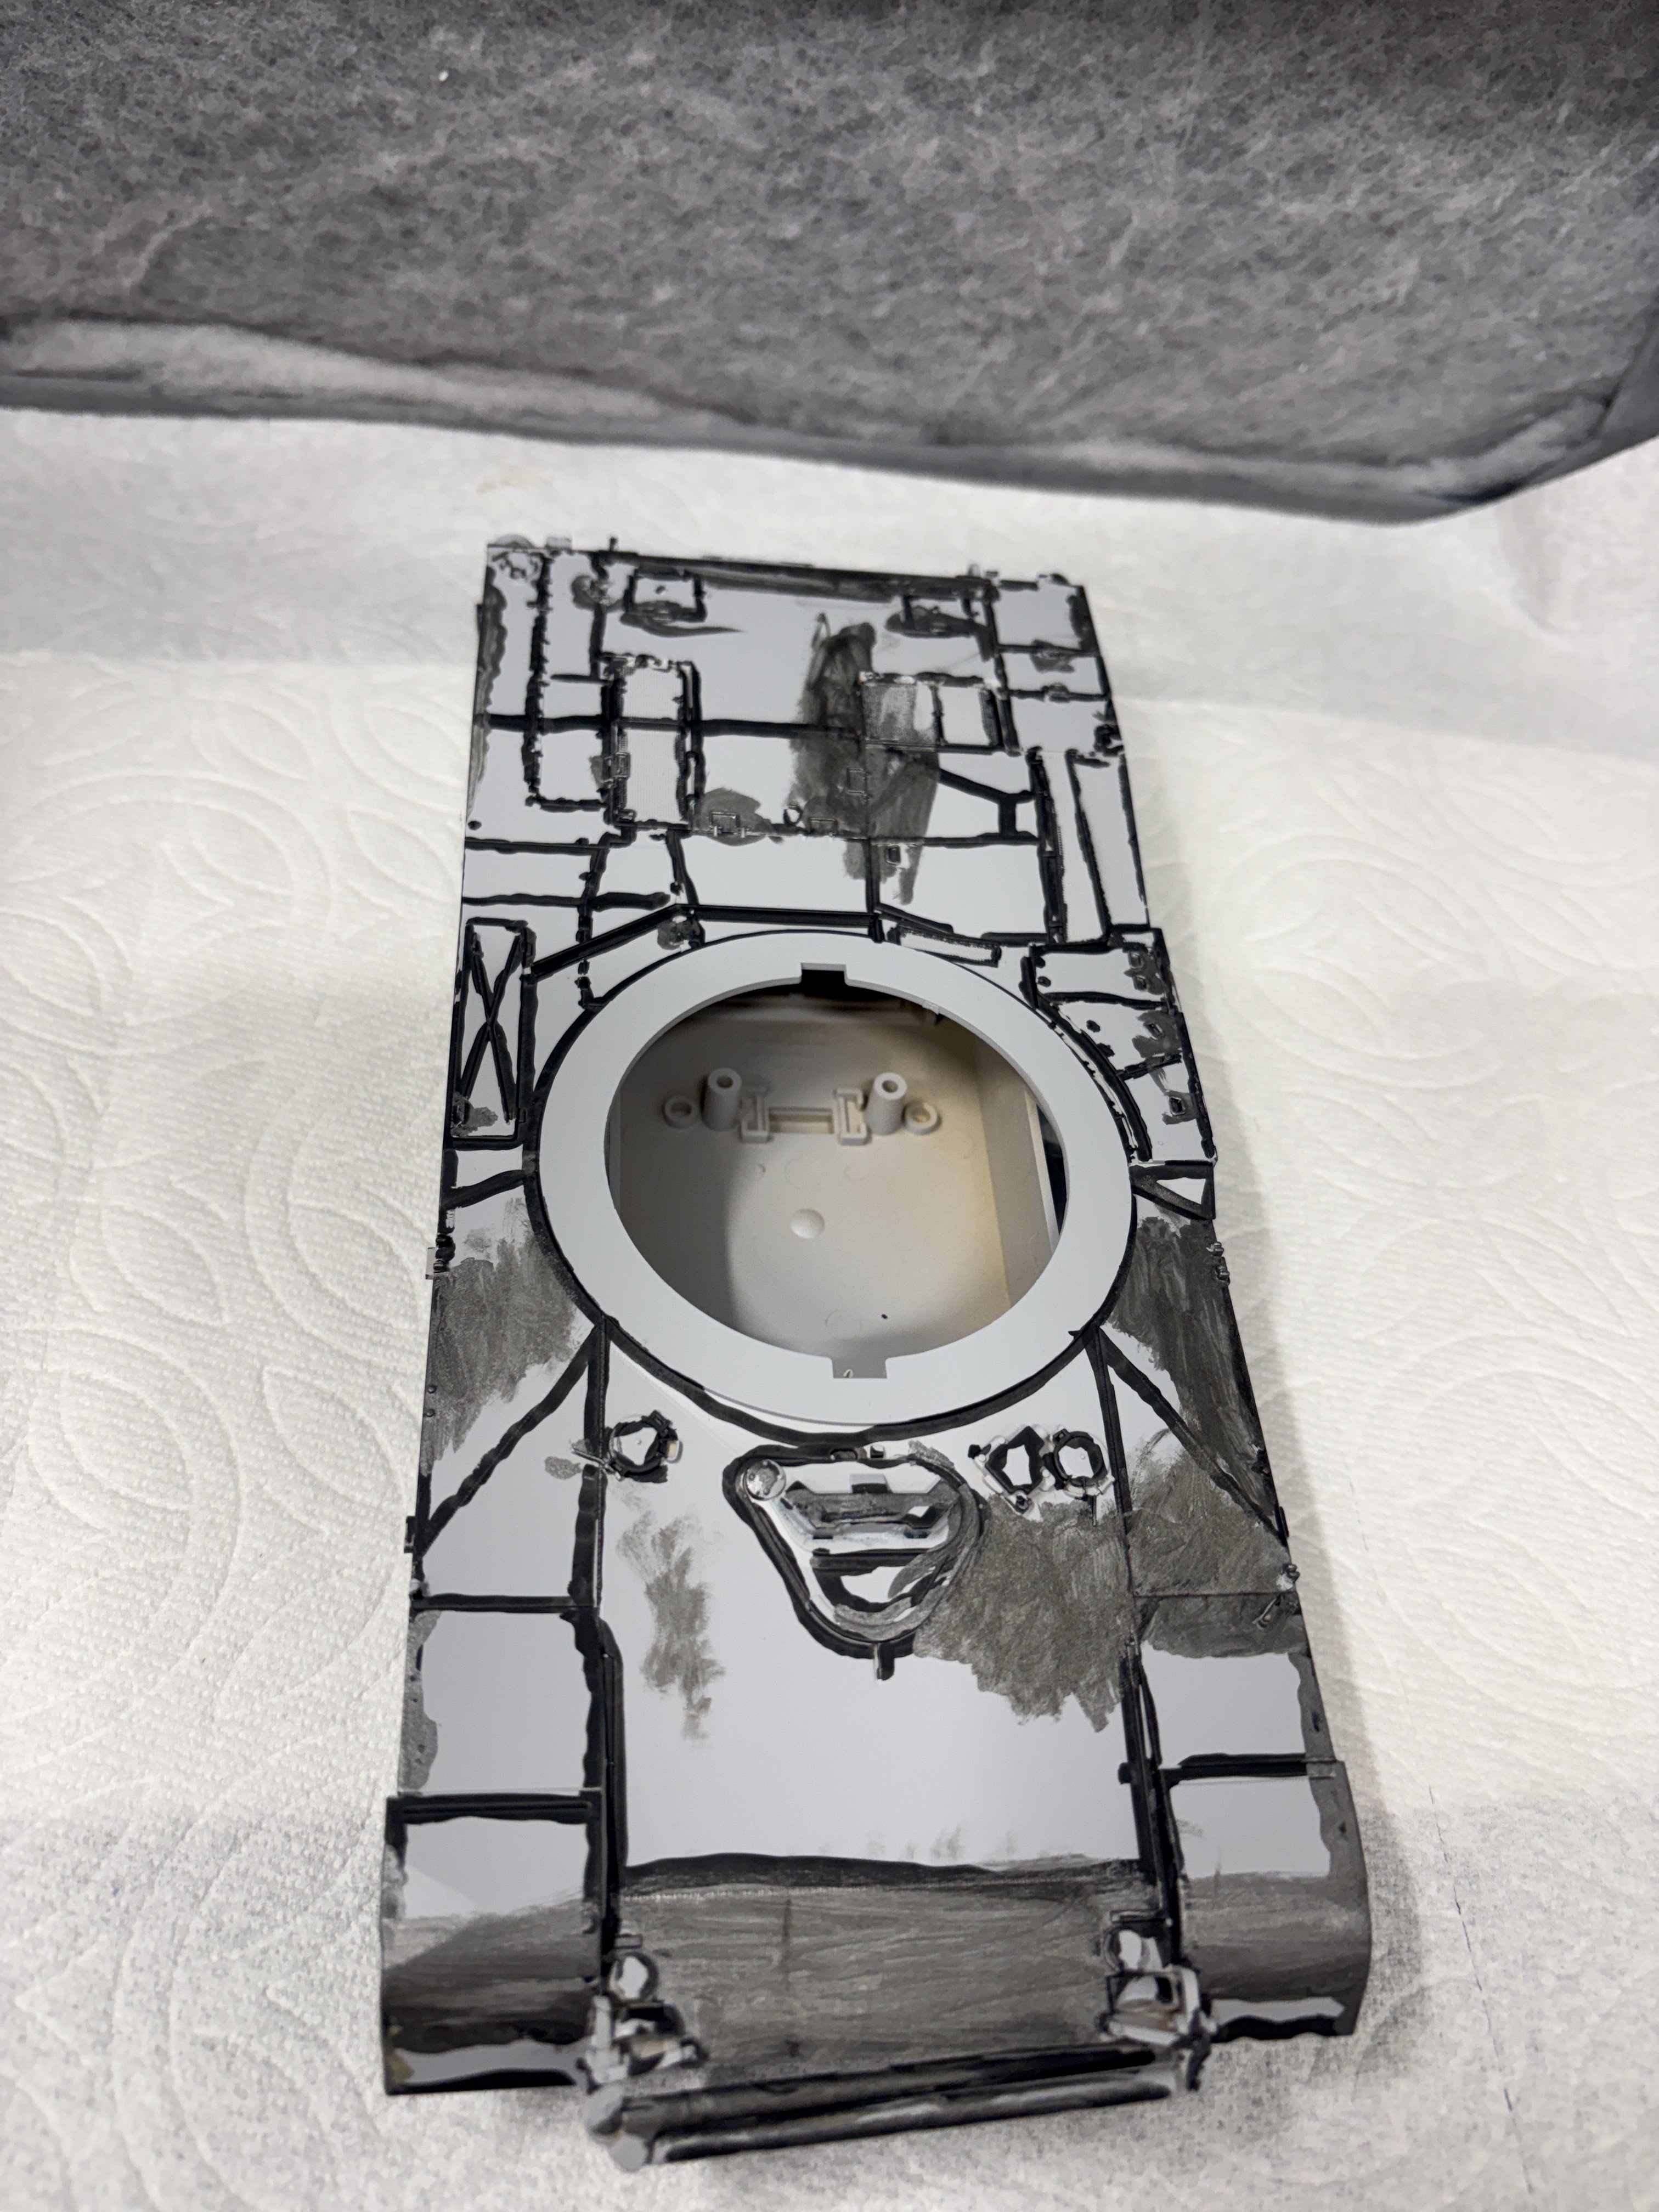
I find trying to air brush preshading lines tedious and hard to be accurate along panel lines. This time I used AK's black acrylic paint marker. I had already primed it with grey Tamiya rattle can fine primer. The markers are not very fine tipped so still has some waviness and variety, but much quicker and easier. Today I sprayed over it with Tamiya XF (mimicking CRAC Tan color so 4:1 buff to dark yellow) and it worked.
 
I find trying to air brush preshading lines tedious and hard to be accurate along panel lines. This time I used AK's black acrylic paint marker. I had already primed it with grey Tamiya rattle can fine primer. The markers are not very fine tipped so still has some waviness and variety, but much quicker and easier. Today I sprayed over it with Tamiya XF (mimicking CRAC Tan color so 4:1 buff to dark yellow) and it worked.
I've also been contemplating that...Think you'll post some pics?
 
I find trying to air brush preshading lines tedious and hard to be accurate along panel lines. This time I used AK's black acrylic paint marker. I had already primed it with grey Tamiya rattle can fine primer. The markers are not very fine tipped so still has some waviness and variety, but much quicker and easier. Today I sprayed over it with Tamiya XF (mimicking CRAC Tan color so 4:1 buff to dark yellow) and it worked.
I did this too and was pretty happy with the results.
 
I've also been contemplating that...Think you'll post some pics?
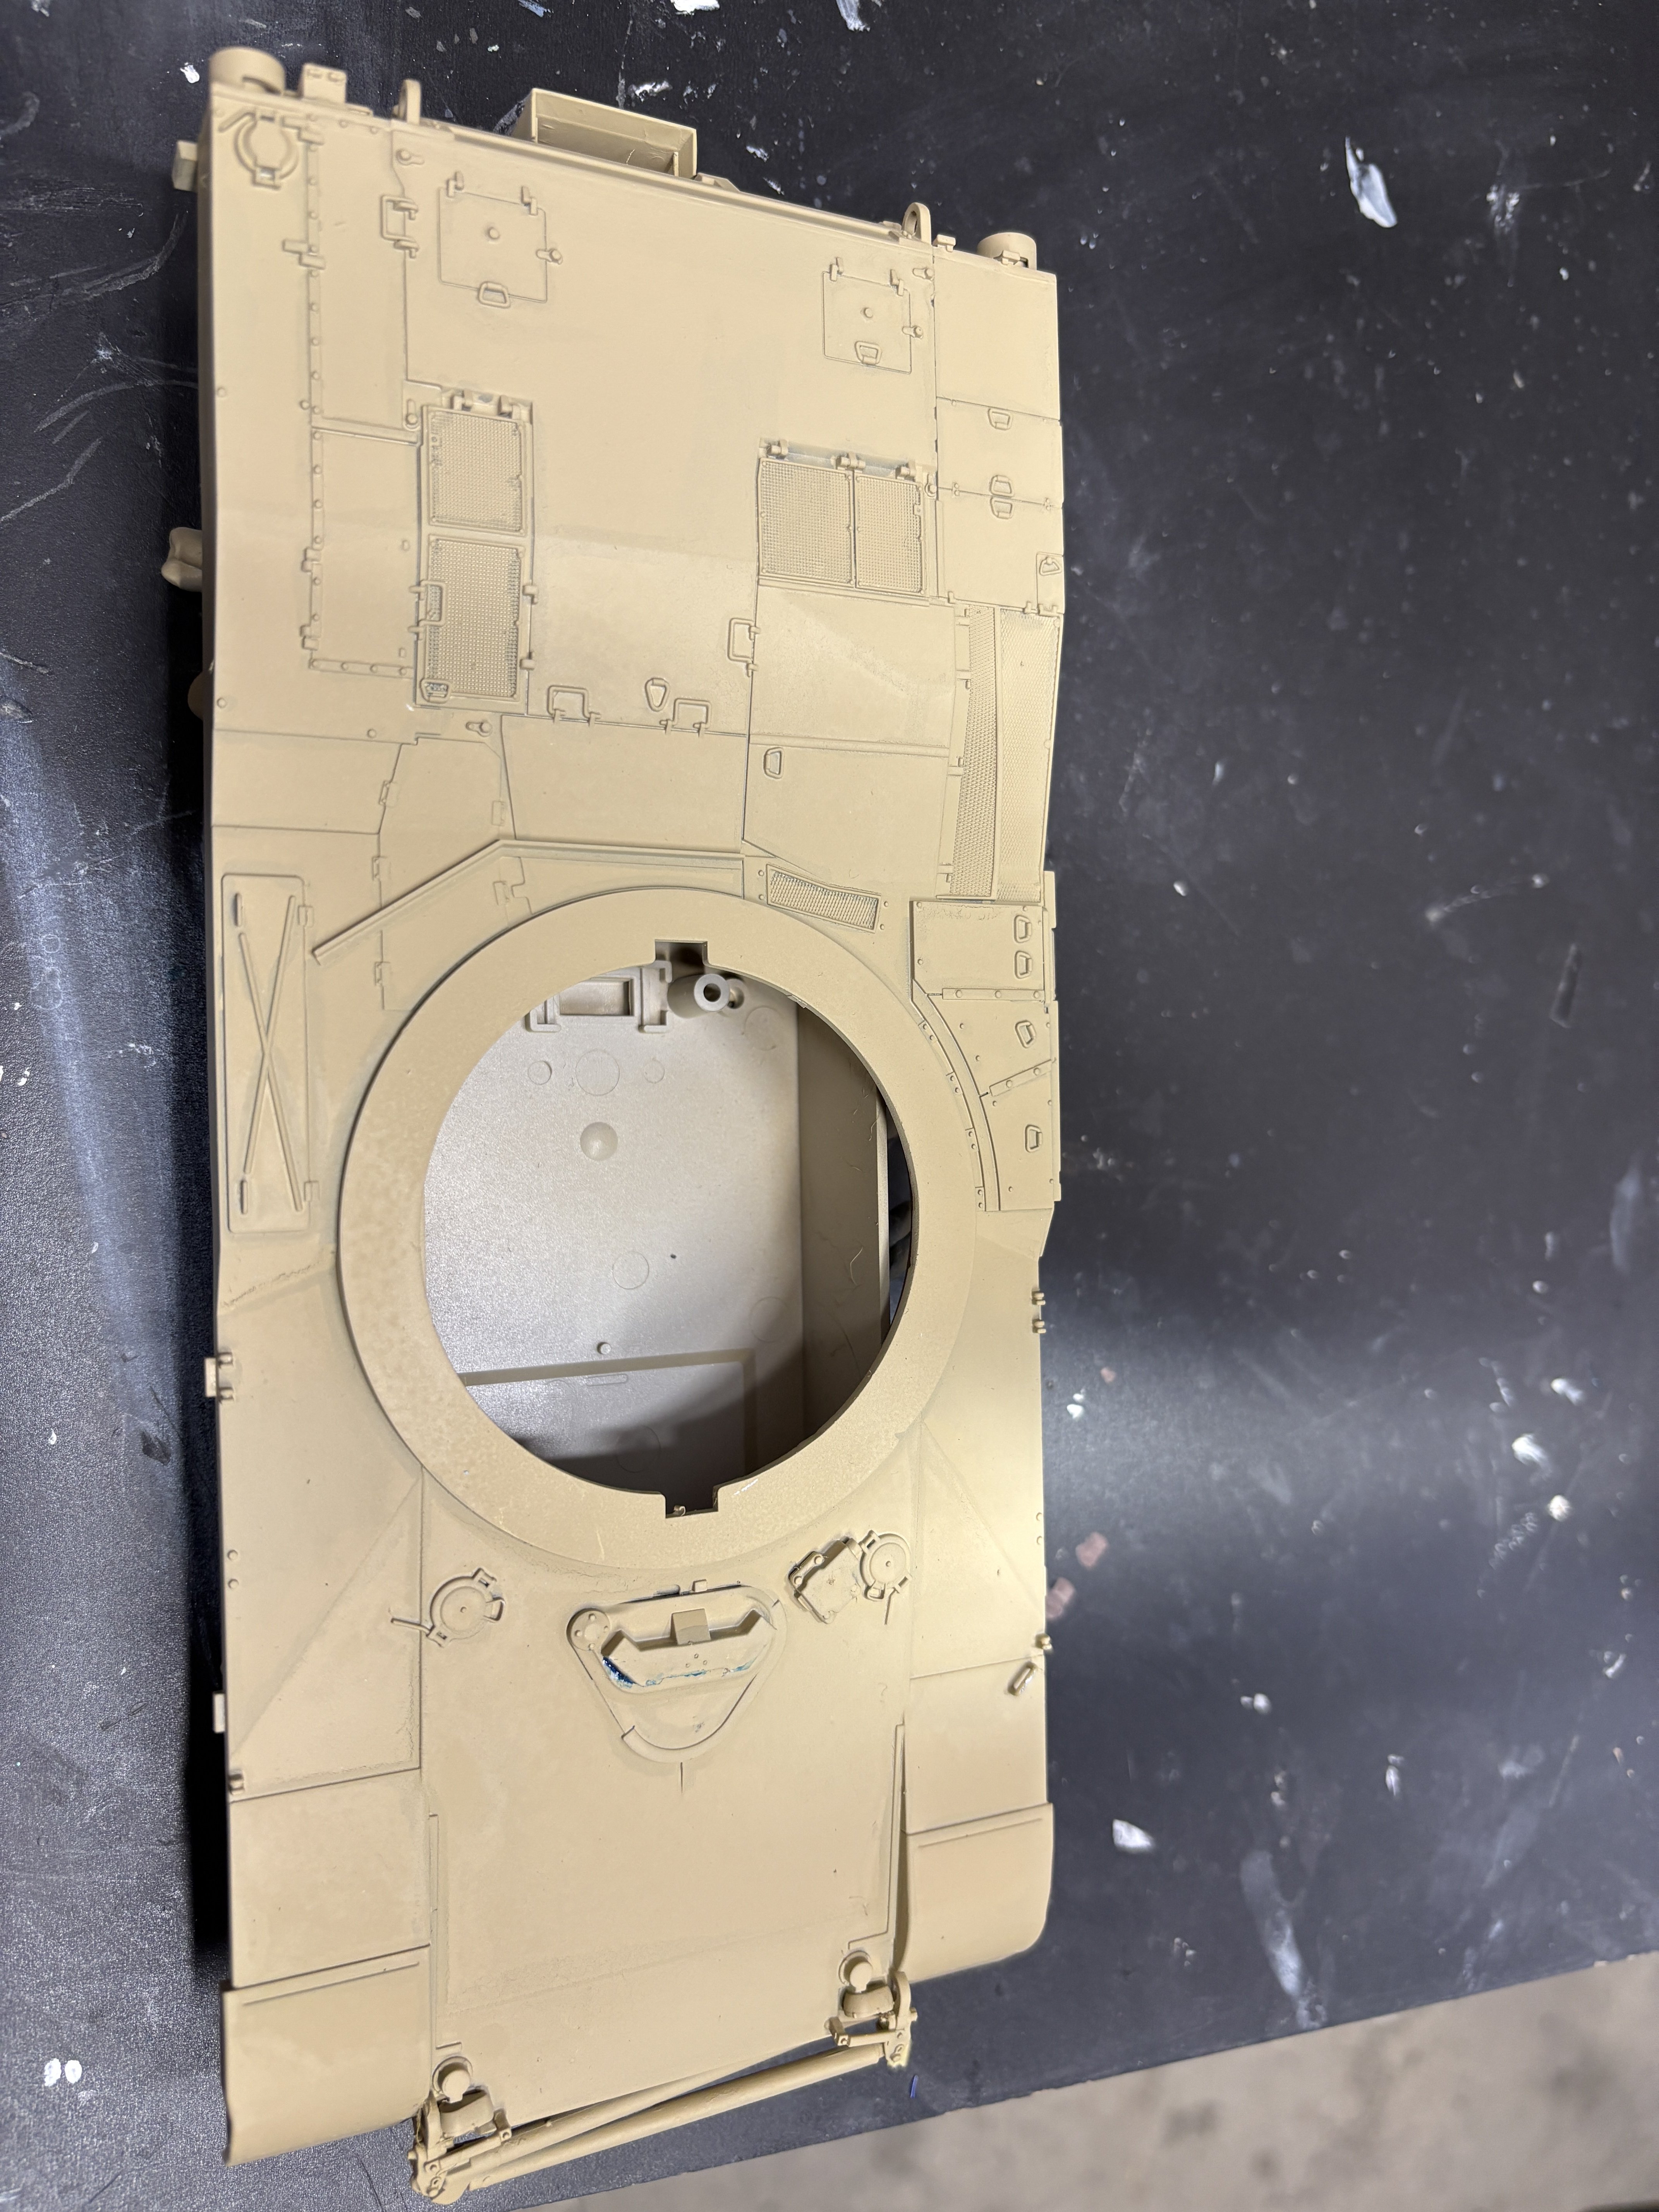
This is pre painting the over coat. The darker grey area are xf mettalic grey as I am also making my first attempt at the hair spray chipping method. Might also get real crazy and try filters. Will post the painted hull later today.
 

Attachments

  • IMG_5475.jpeg
    IMG_5475.jpeg
    1.4 MB
I will say I bought the entire set of AK markers and have barely used them. I use the rubber black a lot. 1) they rub off too easy until clear coated, 2) unless the part is just right size and shape they either produce obvious marker lines, or the tip is too dull to get into fine detailed areas. I thought they would be perfect for getting small molded details in a different color from the background, but way too thick.
 
As an Amazon Associate we earn from qualifying purchases. Product prices and availability are accurate as of the date/time indicated and are subject to change.
I will say I bought the entire set of AK markers and have barely used them. I use the rubber black a lot. 1) they rub off too easy until clear coated, 2) unless the part is just right size and shape they either produce obvious marker lines, or the tip is too dull to get into fine detailed areas. I thought they would be perfect for getting small molded details in a different color from the background, but way too thick.
I use mine. Love them for tires. Basically I'll use them on a small off colored part- like a red handle in a cockpit. They can be good for touch up but I've found they don't match the lacquer line at all.
 
This is pre painting the over coat. The darker grey area are xf mettalic grey as I am also making my first attempt at the hair spray chipping method. Might also get real crazy and try filters. Will post the painted hull later today.
I used hairspray for the first time this week and really like it.
 
This is the result on the hull. For the FS34466. The US Army CARC Desert Tan 686 I used 3 parts XF57 Buff with 1 part XF60 Dark Yellow. I had read 4:1 but it seemed to light to me.
 

Attachments

  • IMG_5481.jpeg
    IMG_5481.jpeg
    2.7 MB
I would give myself an D in chipping. I know I know, always test on mule 1st. Anyway I did not realize using Tamiya acrylic thinner X20A to "chip" thru Tamiya xf top coat, then thru the hairspray layer to get to the cured xf metal areas would show the metal but also would mess up the adjacent top coat paint wherever my q tip rubbed it. or that the q tip would eventually rub thru the metallic layer down to the primer or even the base plastic. From online info it sounds like hairspray chipping works better with the top coat being a water soluble acrylic. I might leave the chipping effect for another model and spray over the messed up patches.j
 
Last edited:
I would give myself an D in chipping. I know I know, always test on mule 1st. Anyway I did not realize using Tamiya acrylic thinner X20A to "chip" thru Tamiya xf top coat, then thru the hairspray layer to get to the cured xf metal areas would show the metal but also would mess up the adjacent top coat paint wherever my q tip rubbed it. or that the q tip would eventually rub thru the metallic layer down to the primer or even the base plastic. From online info it sounds like hairspray chipping works better with the top coat being a water soluble acrylic. I might leave the chipping effect for another model and spray over the messed up patches.j
You're supposed to wet it with water, not thinner, to chip.
 
Yes but that is why it is not recommended with alcohol solvent based acrylics like Tamiya's (I found out) because water does nothing to it. So you have to use an alcohol based solvent/thinner which then is very tricky because it is "hotter" obviously than water. Almost every example I found after I tried it talked about using the hairspray method only with water based acrylics like Vallejo. In which cases you are correct, you use water to chip and it does not act so aggressively on layers below.
 
Yes but that is why it is not recommended with alcohol solvent based acrylics like Tamiya's (I found out) because water does nothing to it. So you have to use an alcohol based solvent/thinner which then is very tricky because it is "hotter" obviously than water. Almost every example I found after I tried it talked about using the hairspray method only with water based acrylics like Vallejo. In which cases you are correct, you use water to chip and it does not act so aggressively on layers below.
I use AK Laq paints, almost exclusively and I chip using water. It works. I just did some chipping this morning. I only let the lacquer paint dry about 30-45 mins. Wet it with water and chip away. I've never heard of anyone using a solvent to chip but I also haven't been doing this 20 years so…
 

Attachments

  • image.jpg
    image.jpg
    1.5 MB
I use AK Laq paints, almost exclusively and I chip using water. It works. I just did some chipping this morning. I only let the lacquer paint dry about 30-45 mins. Wet it with water and chip away. I've never heard of anyone using a solvent to chip but I also haven't been doing this 20 years so…
Thanks. I think I saw that if you act fast with Tamiya also you can chip it with water but I not only waited too long (24 hours) I thought I would use the thinner/ solvent specifically because it was not water based. Live and learn I guess (and yes test test test I know just don't do)
 
Thanks. I think I saw that if you act fast with Tamiya also you can chip it with water but I not only waited too long (24 hours) I thought I would use the thinner/ solvent specifically because it was not water based. Live and learn I guess (and yes test test test I know just don't do)
Haha there's a lot I keep Meaning to do! Such as write down what paints I'm using. Hit me again today when i was doing those exhaust, last time they came out great but I'm guessing as to what process I used!
 
Haha there's a lot I keep Meaning to do! Such as write down what paints I'm using. Hit me again today when i was doing those exhaust, last time they came out great but I'm guessing as to what process I used!
I have taken to writing down the paints I use on the kit's instruction sheets. I then add the instruction sheets to the pile of other instruction sheets.
There has now been more than a few occasions where I have gone back to the former instruction sheets to see what colours I used so that I can achieve the same effect on a different kit.
It's my own analog way of almost being organized.
 
writing down the paints on the instructions
I like it. Good for special effects I would want to reproduce.

Probably because I've been concentrating on desert campaigns, I stopped being too concerned. I try to keep the base colours in the general ballpark, and I find I come to many colours via different routes... Personally, I quite enjoy looking at each build as a bit of a blank canvas, so not great for consistency and historical accuracy, but great for creativity and the joy of spontaneously mixing colours! 😝
 
I like it. Good for special effects I would want to reproduce.

Probably because I've been concentrating on desert campaigns, I stopped being too concerned. I try to keep the base colours in the general ballpark, and I find I come to many colours via different routes... Personally, I quite enjoy looking at each build as a bit of a blank canvas, so not great for consistency and historical accuracy, but great for creativity and the joy of spontaneously mixing colours! 😝
I agree!
I have found that I refer back to the notes on the paints mostly for the paints I used to represent bare metal and aluminum. There are so many of those paints available today. The differences between them can be very large, or very subtle.
I also found that I refer back to colours I seldom use, such as the colour of formation flying lights, the green/blue used for modern aircraft navigation lights, etc.
 
I have taken to writing down the paints I use on the kit's instruction sheets. I then add the instruction sheets to the pile of other instruction sheets.
There has now been more than a few occasions where I have gone back to the former instruction sheets to see what colours I used so that I can achieve the same effect on a different kit.
It's my own analog way of almost being organized.
That's what I am trying to do! Haha. I'm failing on execution tho!
 

Latest posts

Back
Top