Old male armour

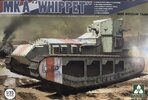
We're about to step way back in time to February 1917 to build our WWI tank.

Looks like we'll have a good group for this build.

I dont know how I missed this post, but I'll order mine soon, I hope.

Thanks PM for the heads up.
 
So January has slipped by..... how about a start date of 10th Feb? That should give everyone a couple of weeks to get ready. Pantherman
Hi, is everyone happy with the start on or around 10th Feb?

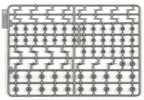
Have to admit I opened the kit last night and I'm loving the details. The flat sprues messed with my brain a little but I'll get over it.

There is alot of nice detailed parts that will unfortunately be covered up but I might have to think of a way to show these maybe.
Pantherman
Should be fine. I may need to get the Airfix the others are a bit too pricy.
 
Hi, is everyone happy with the start on or around 10th Feb?

Have to admit I opened the kit last night and I'm loving the details. The flat sprues messed with my brain a little but I'll get over it.

There is alot of nice detailed parts that will unfortunately be covered up but I might have to think of a way to show these maybe.
Pantherman
I may not be able to start on time. I still have two builds I need to complete.
 
Hi, is everyone happy with the start on or around 10th Feb?

Have to admit I opened the kit last night and I'm loving the details. The flat sprues messed with my brain a little but I'll get over it.

There is alot of nice detailed parts that will unfortunately be covered up but I might have to think of a way to show these maybe.
Pantherman
Having had a good look through the instructions I noticed that when you assemble the main hull there is nothing to say that it has to be the correct shape for the side track pods later.

I suggest that we need to use the inner side pod part as a template to sit the main hull into when gluing together. If not I don't see how we can ensure we have built the hull to the correct shape.

Not sure if the same applies to other manufacturers. Maybe just be careful when you come to building the hull.

Hope this is helpful. Can't wait to get going on it now, it's like waiting for Xmas. Pantherman
That’s a great find. Very helpful. Thank you sir
 
I'm not doing the one from Airfix it would be too small for me to work.
It's hard to find a 1/35 that won't break the bank. :-þ
 
After realizing what I have on my plate already, I won’t be able to participate in this build.
I have two kits in progress and I want to do the LST for my dad.
I will be following this build closely since I have the kit and will be building it at some point.
 
Hi, is everyone happy with the start on or around 10th Feb?

Have to admit I opened the kit last night and I'm loving the details. The flat sprues messed with my brain a little but I'll get over it.

There is alot of nice detailed parts that will unfortunately be covered up but I might have to think of a way to show these maybe.
Pantherman
Just had another look at the instructions. For those who don't like making tank wheels there may be a little problem.

There are 54 wheels, each with 3 parts to make so that's 166 bits to have fun with. Especially when it comes to sanding the sprue cuts and seems . Pantherman
 
Just had another look at the instructions. For those who don't like making tank wheels there may be a little problem.

There are 54 wheels, each with 3 parts to make so that's 166 bits to have fun with. Especially when it comes to sanding the sprue cuts and seems . Pantherman
Looong build
 
I just watched a video review of the 1/35 Takom Mk A Whippet. It showed that there are 52 road wheels for each side and that it would behoove the builder to use a hobby knife over sprue nippers.
Once the wheels are assembled they are engineered to function with the tracks.

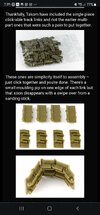
The tracks appear to snap together, which is something I have never used. I have only assembled one set of track, they are metal tracks with a pin that held them together while all of the other tracks are the rubber-band type.

There will be several new  firsts for me with this build.
And it feel this build will force me to slow down and really experience the joy of possibly feeding my Carpet Monster! he does get hungry, from time to time.

13 - Takom 2025 Whippet build pic 03.jpg

Screenshot_20240204_190957_Chrome.jpg

6009759_1 (1).jpg
 
I just watched a video review of the 1/35 Takom Mk A Whippet. It showed that there are 52 road wheels for each side and that it would behoove the builder to use a hobby knife over sprue nippers.
Once the wheels are assembled they are engineered to function with the tracks.

The tracks appear to snap together, which is something I have never used. I have only assembled one set of track, they are metal tracks with a pin that held them together while all of the other tracks are the rubber-band type.

There will be several new  firsts for me with this build.
And it feel this build will force me to slow down and really experience the joy of possibly feeding my Carpet Monster! he does get hungry, from time to time.

View attachment 113265

View attachment 113266

View attachment 113273
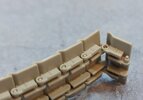
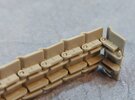
I had a look at the tracks and once you have the technique, it's fairly easy to get them together.

Clip them at 90' to each other, locating the bottom pin first, then snapping the top pin in place.

It's very therapeutic, so much so, that I have actually fitted both 90 link sets together all ready. Pantherman
20240204_181658.jpg20240204_181640.jpg
 

Latest posts

Back
Top