Phil57
Active Member
- Joined
- Oct 19, 2022
- Messages
- 140
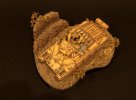
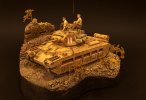
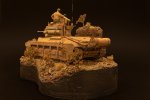
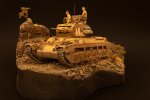
Here is the Matilda I posted a week or so ago now sitting on a base. It is supposed to represent some rocky terrain in Libya 1942. I did study a few colour images of landscape around Libya and whilst the colours vary from dark grey to almost bluff colour, I am still not sure I got the colours of the landscape in my vignette correct, but it will do.
I prefer to do my vignette's in an irregular shape to suit what I want to put into the display rather than the standard square shape. I got this idea from this forum actually when I happened by chance onto a guys vignette from a few years back of an AFV on a simple irregular shaped base that had no dead ground in it whatsoever. I really liked it and decided that was for me. That said however, this is my first go using styrene foam as my starting point. I wanted to create some sloping ground and that is impossible with just a bit of clay on a flat wooden base. I also wanted to add a structure with height in the base as I have read this adds to the overall theme hence the rock face beside the tank.
I did encounter a major issue and one that I have yet to solve. I could not obtain a smooth edge on the styrene foam block. I tried plastering over it and that seemed to work but when I tried sanding it to smooth out the lumps and bumps, a lot of it chipped off as you can see by the images. I am thinking next time I might purchase some very thin and thus flexible, plastic card for my next project as the plaster chipping is to me unsightly and spoils what I think is a reasonable job. Any ideas or thoughts most welcome.