How to paint hood a Mach 1 hood stripe?

RocketFoot

Member
Joined
Sep 7, 2023
Messages
42
Anyone have any good tips on painting the hood stripe on a 71 Mustang AMT kit? I saw a video somewhere but stupid me forgot to bookmark it! I'm trying to get a plan together to mask and paint the black stripe onto the yellow hood but I'm not sure how to use the included template. Maybe I can lay out some painters tape on wax paper and cut the inlay out and then use the outside pieces to mask the sides of the hood.

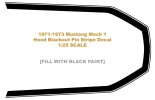
Here is a full size example of the center hood stripe and surrounding pin stripe (which is included with the water slide decal sheet)
8f971a7a70d554d3e98be738fa9e21f0.jpg
 
Anyone have any good tips on painting the hood stripe on a 71 Mustang AMT kit? I saw a video somewhere but stupid me forgot to bookmark it! I'm trying to get a plan together to mask and paint the black stripe onto the yellow hood but I'm not sure how to use the included template. Maybe I can lay out some painters tape on wax paper and cut the inlay out and then use the outside pieces to mask the sides of the hood.

Here is a full size example of the center hood stripe and surrounding pin stripe (which is included with the water slide decal sheet)

View attachment 105612
Sounds like a good idea to me. Pantherman
 
I haven't done this specific paint job, but generally, I'd paint the stripe color first, then mask and paint the remaining color.

An example from my own experience is aerial recognition stripes or markings. Like USAAF markings used in Europe in WWII. White stripes on the wings, horizontal and vertical stabilizers were one. So, after priming, I lay down white where the stripes go. Then I'll mask the stripes, and lay down the finish colors, eg olive drab and neutral gray.

RAF and Japanese had yellow stripes or bands along the leading edge of the wings, from the fuselage out to a specific length. I'll paint the yellow first, then mask the strip and paint the finish colors.

In this, I'd do the same. Lay down the black, the mask the pinstripe and the header cover, then lay down the yellow.

That's how I'd do it, anyway. Hope that helps!
I thought about doing it this way because the instructions include a template for the center part... but I was worried about the yellow covering the black and maybe being a shade off? Not an issue or would you lay down a coat of primer first?
 
I would definitely prime first. I always use a primer coat to promote better adhesion. As light as possible but covered as well as possible, too. My primer of choice is Tamiya's Fine Surface Primer.
 
I would definitely prime first. I always use a primer coat to promote better adhesion. As light as possible but covered as well as possible, too. My primer of choice is Tamiya's Fine Surface Primer.
I'm definitely loading up on Tamiya paint and supplies! I've been doing a lot of research and asking a lot of questions (sorry guys!) and Tamiya seems to be the go to source!
 
I'm definitely loading up on Tamiya paint and supplies! I've been doing a lot of research and asking a lot of questions (sorry guys!) and Tamiya seems to be the go to source!
I was always a vallego man when I started but have switched to tamiya for airbrushing and vallego for hand brushing.

The main thing is finding what works for you so try everything. It's all a learning curve. Enjoy finding your way. Pantherman
 
I've never used Vallejo's primer, so I can't comment on its quality. But if it's applied with an airbrush, that's the reason I haven't used it. I prefer to use rattlecans for priming; no cleanup afterwards. I like Tamiya Fine Surface Primer for its coverage, which is fine indeed. And a can might be relatively expensive, but I find that it goes a long way, too. I use it on styrene, resin, and white metal.
I used to use Rustoleum, and Walmart's house brand, which were good, too. They were a little rougher than Tamiya's finish, when dried/cured, but I often sand a little, or use a piece of coffee filter, to smooth the surface if necessary. I stopped using those products because they both changed the design of the nozzle and neck of their cans, and I kept getting clogging that I couldn't clear. Recently, though, Rustoleum changed the nozzle design again, so I'm going to try a can and see. But for my airplanes, I'll use Tamiya's primer.
 
One trick for painting yellow over a color like black, is to first do a layer of a reddish brown or ochre, or even white before going with the yellow. It will help the yellow cover better as well as prevent it from getting a greenish tint where the layers are thinner and show the base coat through

I know with brush painting yellow often requires several layers (similar with Red), but you can cut down on the layers needed if you use a intermediate color that has better coverage
 
Yeah, I use white as an undercoat for yellow, for white, and for red, too. If possible, I'll use a light primer, too, then the white undercoat, then the finish color.
Another color that I have read that some use, as an undercoat for red, is pink. I have not tried that myself, since white works just fine for me.
 
Yellow is a very hard color to paint. So is red. My advice is spray in several light coats and build up until you achieve the desired coverage to your liking. Go slow and let dry between coat. Pinstripes is doable but very hard to do. You can get bleeds under your tape too if you’re not careful.
 
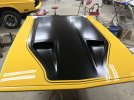
I think I figured out how to get the proper pin stripe around the blackout design on the Mach 1...I need to find a Mach 1 pin stripe decal in 1/25 scale, lay it down on the hood after the yellow paint base and then just fill in the inside with black! Simple (or so it seems anyway! LOL) My new Revell kit does not have this pin stripe option so I need to find one out in the wild!

MACH1_BLACKOUT.jpg
 
Make yourown decal and print it out and see how it fits. I don’t think there’s really a huge difference between 1/24 and 1/25 scale.
The worse case scenario is you might have to trim/cut to fit the hood. Doesn’t hurt to try.
 

Latest posts

Back
Top