Face painting with oils 'How to'

Chris S

Its a bit like being handcuffed to a lunatic !
Joined
Feb 14, 2011
Messages
4,573
Hi folks ,

Welcome to my guide on how to paint faces using oil paints . Throughout this guide we'll look at everything from the tools,paints ,preperation ,priming,painting and details .Although this is based on painting faces the techniques used are also used for painting the rest of a figure,which we can also look at later on if there is interest .

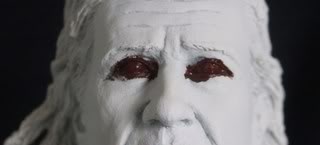
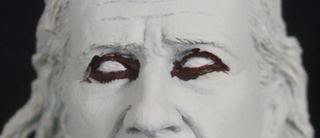
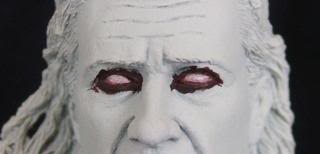
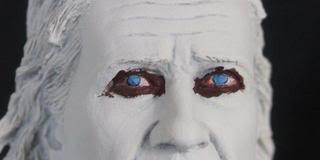
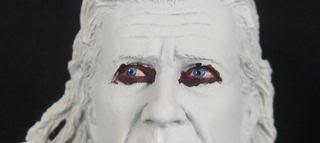
For this guide I will be painting a 1/10th scale bust as its a good size to photograph and big enough to show all the work involved .Its a nice piece from Nocturna called 'The Scottish Freeman' and is quite clearly based on Mel Gibsons role in Braveheart (William Wallace ). Its quite a simple bust with few parts so it should be easy to follow .

DSCF3071.jpg

Although this is 1/10th scale ,the same techniques are used for all scales ,with the exception being the eyes ,because at smaller scales the eye's will be more simplified , again ,we can look at that along the way should anyone wish to do so .

So ....Thats the heads up fella's ,I'll be back later with the first installment ,which will include a look at brushes , preperation & priming.

Thanks for looking ,and please feel free to ask ,or comment at any stage.And ,if you have a better way of doing things ...please... let me know :)

Chris.
 
Ok ...So we're off . ;D

For the first part we'll have a look at preperation & priming .

I was going to look at brushes here too ,but I think I will leave that until we get to the painting. So I will get straight into getting the figure ready for paint . Resin figures as most of you know come with pouring stubs attached and sometimes a few seams ,both of which need removed .
BUT....Please be sure to wear a mask while doing this as resin dust is nasty stuff ,not good for you at all !
Below is a few pics of the bust as it comes in the box .....

DSCF3082.jpg
DSCF3083.jpg
DSCF3084.jpg

You can see in the pics the stubs are on the underside of this bust ,and there is some flash to remove especially from the hair parts . there are several ways to remove the stubs ...razor saw ,mulitool ,modelling knife ,it just depends on how heavy the stubs are . In this case they are'nt too bad ,so I'll remove them with a sharp blade and lightly sand down to finish .I will do the same with the flash ,a quick scrape with the blade and finish with fine wet & dry.

And this is the result....
DSCF3085.jpg
DSCF3086.jpg

Looks clean enough to me ;D
I left the smaller parts of the hair on the spue for ease of painting ,the larger piece has been fitted to the back of his head.

After making sure all unwanted bits have been removed the next thing to do is give the piece a good wash .This is an important part of the procces because there could still be residue of the releasing agent used on the piece and the primer will not adhere to this and will result in a bit of a mess !!
So take a few minutes and use some warm soapy water and an old toothbrush to make sure its clean .

Once the piece is dry its time to move on to the priming . I've mounted this bust on a wooden dowel so I can hold it in my vice for painting . As far as primers go ,everybody has their own favourite. My choice is an auto primer holts acrylic I find it sprays very fine and the tin has a good pressure. A few Light coats is all thats required.

DSCF3087.jpg

So , with a couple of coats of primer its looking quite good is'nt it ?.....Well actually there is a few blemishes have shown up ,This is one reason why priming is a good idea !
Take a closer look at the face .....

DSCF3088.jpg

You can see he has an extra hole in his nose and chin ! and also the top lip needs a bit of tidying up .Things like that would show up really bad under paint and spoil a nicely painted face . I shall fix these blemishes and re prime ,Then in the next stage we can start looking at the paint ;D


Thanks for looking. All questions & comments welcome.

Chris.
 
Thought that was a pimple ;D ;D ;D ;D

Looks mighty fine there Chris. Very tempted to get me a fig sometime very soon.

scratchmod
 
Okay i`ll take up me seat at the front being as i`m the first in.................good work so far bro, think i might be ok up till the next bit...........LOL!!!................like i said, purely out of curiosity :p ;D....
Great start so far bud...........

`Boots`
 
Going to be watching this with interest. Always ready to learn new techniques
 
Rock-On Teacher,

I brought My paints & brushes ( which , I sorely need to replace some ). I'm ready. I'm lookin forward to this & at times, may pick your Brain .....
 
Hi fella's ...Nice to have you all along . ..Boots ,we'll get ya ;)

Erik ....pick a way buddy ;D....There's not much there ! ((lol))

Ok ,moving right along .....

I fixed the holes on his nose & chin with a spot of thinned down Squadron Green ,also claened up the top lip a bit with a sharp blade ,then I just touched them in with a spot of white rather than re prime the whole thing .

So now we'll move on to putting the eyes in ;D.
For painting the eyes I use Vallejo Model Colour acrylics .
I have inserted a series of step by step pictures here ,and following them I shall explain the proccess.

DSCF3089.jpg

DSCF3092.jpg

DSCF3094.jpg

DSCF3095.jpg

DSCF3097.jpg

DSCF3098.jpg


Starting with the first pic , I like to paint the whole eye area with a dark red mix ,this is just Red with a touch of black ,making sure I paint over the edges of the eye lid .This will eventually create the fine dark line on the edge of the lid . Next the eyeball is painted in ,I've used pure white this time and a 10/0 brush .The reason I went for white is in the third pic ,you can see I added a very thin wash of Dark Red ,I done this to create a sort of tired bloodshot eye ,Dont over do it here ,keep the wash very thin and mostly to the corners .
Picture four , I have painted in the Iris ,this is the base colour ,I want a Blue eye so I used Prussian Blue for the base. You need to keep a steady hand here and draw in the shape of the iris nice and round but with the top and bottom disappearing under the lids .
Next thing is to put the colour and highlight on the Iris,for the colour I lightened the Prussian Blue with white to get a nice pale colour .Thin the mix out so that its pretty much a glaze and carefully paint onto the Iris ,but try to leave a thin dark line of the base colour showing around the edge,This helps define the Iris from the white of the eye.When the colour is on ,thin out a drop of white and apply it to the Iris like a wash ,this gives the effect of light hitting the Iris.(highlight)
Now comes the fun bit ...Placing the pupil. For this you wont be needing your brush ! I place the pupils using a toothpick,this will give you a nice round pupil and not the cats eye effect you some times see on figures. You may need to sharpen the toothpick depending on the size of spot you need ,simply dip the toothpick in black paint and spot it onto paper a few times until you're happy with the size .When ready and again with a steady hand spot the pupil in the centre of the Iris, then with a toothpick again ,spot in the light catch with some white ,keep this to one side of the eye ,dont put it in the middle of the pupil or the eyes will look like they're staring .Also always set the eyes looking to the left or right ,it adds a bit of interest and again you wont get the thousand yard stare !.

So by now I should have a pair of nice Blue eyes ,the last thing to do is apply a coat of clear on the eye ,this adds a bit of life . You can see in the pic below I have done this ,I also put a thin coat of basic flesh on so you can see the eyes better . The dark line around the eye will mostly disappear once the face painting starts.

DSCF3099.jpg

So I think thats enough for now ,In the next bit we will look at brushes ,basecoating the flesh and setting up the oil paints.

Thanks for looking ,and please feel free to ask ;D

Chris.
 
Remarkable stuff Chris, gonna have to put this SBS somewhere safe.....................just ib case i ever need it of course ;D, those eyes look superb.....................frightenend the life out of me when i first opened the page....................looked like some demonised being at first!!...LOL

`Boots`
 
CHRIS,

Just wanted to add a note so I don't forget it :
At the End of this Tutorial, can We post Figure pix & you critique them ? A little Q & A session if you will . We'll tell ya what We did & you give some incite ? or something like that ??

I'll be back ... Imma go read this next installment !!! ;D ;D
 
Remarkable Chris! Thank you for taking the time to run this little tutorial! I cannot wait for your next post on this! ;)
 
Thanks for all the comments fella's ...It makes it all worthwhile ;D

Erik ...Please feel free to jump in at any time with questions ,or to throw up some pics of what you are doing ,Thats what the thread is for . No need to wait until the end ;)

Chris.
 
Chris S said:
Thanks for all the comments fella's ...It makes it all worthwhile ;D

Erik ...Please feel free to jump in at any time with questions ,or to throw up some pics of what you are doing ,Thats what the thread is for . No need to wait until the end ;)

Chris.

O.K. Chris, I just didn't want to be rude & interrupt the flow of the Tutorial, or High-Jack it .

WoW ! Great so far Chris !! Awesome Job on th Eyes. I keep reminding Myself that it's bigger than 1/35th. But just being th person that I am , I may try this on a 1/35th scale figure. I've, in th past just done a black spot for the eyes. Even in My most recent 120mm figure. I've never tried to go in for a colored Eye. I will now !!

I eagerly look forward to th next installment !!
 
Hi Biskup, update ..inbound ;D

Erik ,please buddy ,you fire away when you're ready fella ;)

Rob ((lol)))....We call them 'Robbos'....Ask Robbo about it ;D,get them on and lets go buddy !!!.

Brushes . Paints & Palette .

As with everything these days ,you get what you pay for !...Brushes are no different . The biggest tip I can give you is ....Buy the best you can afford , My preference is either Kolinsky sable or Daler Rowney series brushes ,I find both makes excellent quality and with proper care ,they hold their shape for a long time ,I still have brushes which are 5-6 years old .

This is just a small selection of my weapons ....
DSCF3080.jpg

When painting faces I use a range of brushes from 00 to 10/0 Also a soft flat brush will be needed .


Ok ...So lets move on to paints and the palette !.
Again ,Like the brushes its better to buy the best you can afford.Dont be tempted by some of the very cheap oils they just dont work the same as a quality brand.The difference is in the pigments ,in the cheaper brands the pigment can be very grainy or gritty ,which is fine if you are painting on a canvas ,but not when you're trying to achieve a nice smooth blend on a face .
My choice of oils are the Winsor Newton series or the newer range of Mig Productions oils .The Mig oils are designed for the model painter and as such the pigment its very fine and can result in a very smooth blend and finish .

The Palette...
When setting out your palette it is important that you put your paint on a pourous surface ,something like greaseproff paper ,or as I use ...a piece of card .The reason for this is simple , the oil paint straight out of the tube has a lot of ...well ...oil in it and you want to get rid of a lot of this before trying to paint a figure with it otherwise you will find that you end up pushing a greasy mess of paint around which will end up going mucky .
The cardboard or paper soaks a lot of the oil out as pictured below . Just set your colours out and let the palette stand for around 20 minutes or so .
DSCF3103.jpg


Stay tuned and I'll be right back ,when I will set my palette and start painting ;D

Chris.
 

Latest posts

Back
Top