Tacos anyone? Tamiya 1/48 F-16C Block 30 NM ANG...

Carsenault

New Member
Joined
May 7, 2009
Messages
845
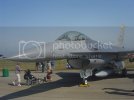
Taking a short break from my group build entries and decided I needed a sanity build, something that would get me back into the model building spirit. What better choice than any recent Tamiya Kit? I recently aquired a Tamiya 1/48 F-16C/N kit trough a private sale over at ARC, that has got to be one of the best series of modern aircraft kits ever, great detail, well engineered, superb fit (mostly). I just wish they had included the turned metal pitot tubes and pe structural re-inforcement plates in the kit instead of in a seperate accessory kit. Oh well, thats what the aftermarket is for. I saw my first up close F-16C at the 2006 Nova Scotia International Air Show and got to talk to the pilot a bit. These were 2 F-16C Block 30 Fighting Falcons from the New Mexico Air National Guard. I decided right there that I would have to obneday build one of these. A few years later, Afterburner Decals released a set of decals featuring 11 aircraft from that very same squadron including both jets that were present at the Airshow.
DSC01523.jpg

DSC01524.jpg


Sorry for the poor picture quality, I was in a hurry to take these and didnt properly set the white balance. I was having so much fun with this one, I forgot to snap some pics of the cockpit tub before I placed it in the fuselage. The cockpit in the kit is really nice, a resin set would not be much of an improvement.
075.jpg

077.jpg

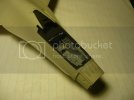
The main gear bay under construction. Still a few structural elements to be placed, then I will do a wash to bring out all the great detail.
078.jpg

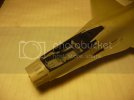
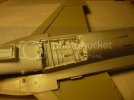
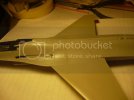
The only real trouble spot so far was the seam running accross the spine. In retrospect, I should have joined the upper fwd and upper aft sections together before attaching them to the lower fuselage. I'll know better next time.
080.jpg
 
that seam can be taken care of by that Putty Clean up Tip someone posted here...

I heard ! but not tested it... that some Thinners will wipe smooth freshly applied Putty to a
smooth (almost no sending required) finish !

like Tamiya Laquer thinner or Nail polish remover...

do some test... I heard it doesn't harm the Styrene...

but don't test it on your New model... plz!


Take care and best of luck with that Seam !

Norm

OUT !
 
I've had really great success with Bondo and Acetone based fingernail polish remover (FNPR). A really thin coat of Bondo and a FNPR wet Qtip.
 
I think Grendels uses nail polish remover to smooth out and thin squadron putty.
 
Looks awesome Charlie!! Thanks for sharing the pics of the 1:1 version!
 
Thanks Guys.

Im actually not too concerned with that seam as of yet, its not as noticeable in real life as it is in the photo. Ill shoot some Mr Surfacer on it before I decide if Ill blend it in or not. The filler/acetone trick works well, I have tried both Squadron White putty and Tamiya Grey putty smoothed with Cutex nail polish remover. I havent perfected the technique yet, but it has helped alot with the seams on my CC-177.

Right now Im torn between which markings to use, either doing 87-0304 as it appeared at the airshow in 2006, or with the artwork applied during its deployment in Iraq in 2008 (9-11-01 Never Forget) http://www.flickr.com/photos/hampton_s/3198000865/# or another jet from the same squadron called "Lethal Injection" which has artwork of a sexy nurse riding a precision guided bomb. http://www.flickr.com/photos/hampton_s/3198000947/#
 
JMac got it right. I use squadron white putty and acetone based fingernail polish remover to both thin it and to smooth it out. Once I work that as far as it will go, I hit it with Mr. Surfacer 500 to fine tune the seam.
 
Wow, for a Tamiya kit, this sure isnt a Shake'n'bake kit. The fit has been good, but not great. I guess Ill be practicing my seam filling techniques a bit.

On the plus side, I sorted out the whit ebalance on my DSC. The next batch of pictures should be more better.
 
Charlie, when I was building my Tamiya Viper, I test fitted the joint across the back at it fit great until I put glue to it. The small amount of glue made it have a small ridge. I light sanded and it settled down nice.
 
WayneBt said:
Charlie, when I was building my Tamiya Viper, I test fitted the joint across the back at it fit great until I put glue to it. The small amount of glue made it have a small ridge. I light sanded and it settled down nice.

Next time I do one, I will join the upper fuselage pieces first. I to have a slight step at the seam but it falls on a natural panel line and im hoping it wont show once I get some primer on it. I was able to fill the other gaps using the cutex/squadron putty method, I even filled all the extra panels and hatches too.

I discovered that Tamiya instructions can be followed to the word. I tried to skip a few steps and assemble the intake trunking completely, then had a heck of a time shoe-horning the outer intake parts in place afterwards. you really have to follow the assembly sequence with this one.
 
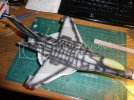
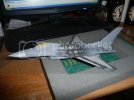
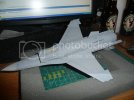
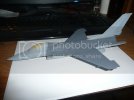
Major painting is almost done, the Tacos jet I'm doing features the simplified USAF F-16 camo of gunship grey ( fs 36118) over neutral grey (fs 36270). I can't do things simple though so I've pre-shaded the panel lines with some flat black, and Ill be post shading the panels with lighter greys. So far I have the neutral grey applied and post shaded with dark ghost grey (fs 36320) and the gunship grey was added on last night. For the camo colors I've used only MM enamels so far, with Alclad and MM Metalizers for the metalic colors, and Tamiya white for the wheel wells, landing gear and intakes. The radomes on the real F-16s vary greatly in color. The USAF ones are not painted normally, the color is the natural color of the composite material they are made from and usually darken with age and exposure. I have only preshaded the radome on my model, just trying to decide on the proper color to use for the color coat.

P1020468.jpg

P1020470.jpg

P1020471.jpg

P1020472.jpg
 
Looking great Charlie. Nice steady hand preshading that.

That 2nd pic really shows the awesome lines of this machine - really great design. Can't wait to see this in plastic at CAMS.
 

Latest posts

Back
Top