Help with Romulan Warbird

Kila2000

New Member
Joined
Aug 13, 2012
Messages
34
Hi all
Kinda new here but was hoping someone could help me out.
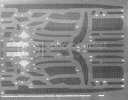
I have an old Romulan Warbird, the one from the 3 piece adversary set from ERTL that Round 2 has re-released on its own. What I'm hoping for is if someone who has the new release could kindly scan and send me a copy of the window decals. I want to light up my kit using a copy of the decals as a drilling template. Already asked Round 2 and strangely got no reply from them.
Anyone able to help out?

Cheers
Wil
 
Ahhh, thanks guys, but not quite what I was hoping for. All I need is a scan of the window decals. I'm not going to use them as decals at, just as a position guide for the drilling of the windows. I did the same thing on a D7 I built not long ago.
Thanks for your help anyway ;D
 
Good point, Just Mike.

I ran that image through an image edit app and inverted it to reveal the dots as black.

Kila2000, try this image and scale it on a copy machine to accuracy:

inverted_decal.jpg
 
Thanks Just Mike and Ohm. Thats exactly what I was after.

Didn't realise there was THAT many windows on the decals though, lol. Thanks guys.
 
Cool, glad it was helpful. Just jam your favorite tunes then grab a drill driver with the appropriate size bit...
 
;D thats the plan. Need a few bits though, they pretty small and I broke half a dozen on my DS9.
Thanks again
 
Ohm said:
Cool, glad it was helpful. Just jam your favorite tunes then grab a drill driver with the appropriate size bit...

I've got the old model kit, just sitting waiting for me to do just that.
 
Are you going for fibre optics or just holes drilled with the inside lit up?
I'd like to do it with fibre but I think'll it'll be way too crowded inside, especially the tail section.
 
I'm not sure yet whether I'll use fibre optics on this kit. Haven't decided exactly what to do yet, I'm still some way off starting.

Like you said, the tail is going to be very difficult to fit FO, so I might just line the insides with aluminium tape and place a couple of LEDs in there. The tape should help spread the light evenly around the windows.

I did this with my Vorch'a model and I was very happy with the effect of the light spread.

2011-11-15_04-10-19_180.jpg


2012-01-28_00-44-34_522.jpg


2012-01-28_00-53-46_375.jpg


It's especially noticable in this photo. That little command section on the top is lit with only 1 LED in the middle.

2012-01-28_00-49-33_141.jpg


However it should be noted that this made it twice as hard to drill out the windows as I was also drilling through the aluminium tape. It was tricky to get the tape nice and clean on the inside where my drill punched a hole.
 
Thanks Kila! :)

I made a slight mistake with the windows. I was experimenting and trying things out.

What I did was; Before I sealed up the model, I went around the inside of it with some 15 minute clear epoxy resin. I placed scotch clear tape on the outside of the model so that the resin would sit in the window and not run onto the outside. I could then glue the model together with all the windows already in place.

What that meant was; I had to mask off each window with masking fluid. This wasn't ideal as it's pretty much impossible to get a nice clean mask, so after I painted, I had to go round each window and touch it up. That wasn't too much work, but still the method was not sound.

In the future, I'm going to simply use some Micro Kristal Klear after painting. Applying it with a cocktail stick and since it's similar to white glue, it cleans off pretty easily if you make any mess.
 
The results look great and finally worth the effort :)
 
Instead of masking the windows I wonder how scraping the paint off would work. It seemed to work really well for Trekworks on his Ent D
 
I guess that would be another way to do it. The only problem I can think of with that is that the windows we're talking about here are much smaller. Less than 0.5mm in some cases. It might not be as clean an edge. Then again, with a bit of care anything's possible. :)
 
Then a similar option could be to lightly drill the windows, just enough to remove the paint. It'll leave a small indent but once lit I don't imagine it'll be seen at all.
Alternatively, if the smallest fibres, the 0.25mm stuff is used, it might just be doable. I have my Warbird sitting next to me and it looks like with some careful manipulation the windows can be strung with fibre with the ends going into the wing assemblies. The head looks to be fine too as the neck is quite large inside. I'm gonna play around with the fibre I have as its in the 64 strand black cable form. If I roughly figure out the number of windows I should be able to see if the cable will run though the neck. If not, can just have the head full of LED light cans.
I've been building and lighting a DS9 kit and I've jammed around 30 LEDs into so far so I'm fairly proficient with fibre optics.
 

Latest posts

Back
Top