Foxbody Fever! 88GT and 90LX kit-bash build

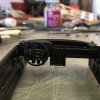
After a ton of tedious tasks, delicately completed, got the engine bay and interior completed. I just threw a couple wires through the firewall, If I had more colors I would do more, this is the first time i've done anything custom to a kit outside of simple kit bashing, so i'm going to quit while I'm ahead... also it wasn't until I uploaded these pics I realized the brake cap decal needs to switch places with the oil cap. I couldn't tell them apart on the sheet! I probably also have the serpentine route decal upside down:D By the time i fought the body onto the chassis for a test fit, the whole thing was falling apart, so I'm leaving it together.:mad:

I forgot to snap any pics of the interior. It's all black, and I didn't fight over the details too much. I cut away the plastic shifter and added a chrome barred whiteball shifter over the factory boot, for a pop of color and shine in the otherwise pitch black interior. I've seen a lot of Hurst style shifters retain the factory boot, especially in these foxes.

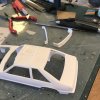
For the exterior, I need to install glass, lights and decals. I'm going to rework the front wheels so they sit inside the fenderwells better. I cut back the deep hub mounting and heated up the out-of-box metal axle pins and pushed them into the wheels securing them. It worked really well, so I'm confident I can go a little further and get the fronts to sit perfect. I kind of like the rears to stick out a tad, and I'm happy with the stance. For only having a small saw and xacto's I'm thrilled with the overall outcome. I'll get some final photos, and a video showing it off, once it's all corrected and complete.
-Art.
+hllIsM9TKCjRriI0WQzbA.jpgAKNQ1tbgTgKPTYkxb7sRzQ.jpg14Ccav3gRFa%CqoCIVJCZA.jpgZjAG3okQRS2vjGTmm01hDQ.jpgwVNYujHnRB+bE9Wsd1B6tA.jpg%vwZq2CZTFmDyiCBV55nUQ.jpg
 
and with only a small saw and Xacto !
Excellent work .

Off the internet , but this is about what the car I had looked like . Same color . All factory :
fpgvxfl11jadmpl2rkzy.jpg
 
Off the internet , but this is about what the car I had looked like . Same color . All factory :

These were the slickest 5.0's out there. The notchback w/police package is the ultimate fox to obtain. Aside from the all the Fury's and Monaco's this is my favorite vehicle to be commissioned by the government for service.
 
They were about to release the new '93 models when I was in the showroom , so they gave me a " deal ' for the car being the '92 .
I loved the thing ,, other than all the tickets !

q4UbVNf.jpg
 
Reworked the wheels and realized the tail light chrome has to be installed from the inside...:oops: I'm not much for following instruction and that bit me once again, so I'll have to fight this thing apart one more time and hopefully not destroy it. Here it is before I throw it in the trash or successfully deconstruct to finish the last details. Got the stance and wheel offset nailed. I bought a cheap rotary tool, thanks to @urumomo for the recommendation (bought the $30 Amazon WEN job and it works perfect). I was able to quickly grind away the hub bore and reset the axle pins.
-Art.RFK7WBhLToeO5+8H7Ij3Lg.jpg
 
Last edited:
good luck with the chrome -- is there any way to modify the chrome parts to fit without disassembly of what's there ?
 
Thanks. Perhaps if i had more skill. Patience is not my forte, but that's why I keep at this. Discipline LOL

I'll take my chances with my psyche following the recommended assembly from Revell....
 
Got it apart but not without some casualty. Took advantage of the opportunity to photograph the interior. My shot nerves really come out in the details. can't hold my hand steady to save my life. lol. I buttoned it up after this. lights, glass and all that. I posted the final product on a separate thread. I will be building the 88 GT on this thread. Thanks for following along. Always open for tips, suggestions on making better stuff. T3kAhV2aRWOB6hvvTw+V0g.jpg
You can see my rickety old slop job real well with the flash
CXgBPqj3QJGM36uF6ayM2Q.jpg
Hard Parked.
 

Attachments

  • wSNkrR0rQNiN1Dway3snmw.jpg
    wSNkrR0rQNiN1Dway3snmw.jpg
    794.7 KB · Views: 2
Started into the 88 GT today. Right away, I remember liking a Monogram or Revell Kit much more than others. AMT kits have such fine lines and delicate parts, but getting a proper fit is impossible. I'm relying heavily on contour putty to hide some of the kit lines and hopefully create a realistic piece. The front bumper is already giving me a coronary.

I'm going to chop in the T-tops, I can't think of a better way to celebrate the dumpster-fire this car was born in. I'll be doing my best to fit the racing goodies I left out of the LX kit. A t-top car is the worst base for a drag car and that's why I'm doing it. So many of these cars meet their fate in the hands of extraordinarily unskilled, untrained and careless folks who's last regard is purpose. As long as it's loud, pisses off the EPA and doesn't pop a head gasket before you get paid again, you're waxing Civics and Subies all day.
DGC64wrQSfmuxYDHcL5pLg.jpgvF0GiHmhTr6228QGEnngTA.jpg

I was able to blend the bottom of the rear bumper in nicely. A little more cleanup, but I think some primer will disguise everything. I am removing some of the rubber moldings as I imagine a car of this caliber has experienced some issues with exterior adhesives .
zxl1edXMTtC2lDlD5Q973g.jpg

Driver fender is going to be a crash replacement. it's devoid of the GT moldings and rubber moulding trim. The fog lights are missing of course, and the airdam is chewed up from a life of rough driving
wveR7QIRSOeEhc1j9sVVAg.jpg

Passenger door will be rippled and dented. Just going to clean up some things, add a little more destruction, and get some Primer shot.FdcQ417ASOWJGPPRsXs86Q.jpg

-Art.
 

Attachments

  • Ryavc6oLQ1KvY7Ftp8XVgw.jpg
    Ryavc6oLQ1KvY7Ftp8XVgw.jpg
    982.6 KB · Views: 0
  • QeDLxNJATKyMub2nlTYjaw.jpg
    QeDLxNJATKyMub2nlTYjaw.jpg
    1 MB · Views: 0
Took a little break from building, realizing I built 3 kits in the last couple months. I want to slow down and really pour into the details on this current project. I acquired a decent little airbrush setup over the weekend and I'm stoked as it will be my first time actually using an airbrush. I hope to be able to expand my weathering and detail skills. Came with a compressor that provides air on demand. It looks like it was a $400 setup 20+ years ago, but for 80 bones, I figured I've thrown better money at worse Ideas. I will be upgrading this to a tank/compressor combo in the future, but I figured it should allow me to start figuring out airbrushing fairly cheaply. I'm sure I'll get sick with this and have to start hiding the receipts, from the wife, just like I have to with the hotrod accoutrement... :rolleyes:
-Art.
IMG_0008.JPG
 
I have that Paasche, and it has never failed me in over 10 years, you can put some fairly viscous stuff through that one
What compressor are you pairing it with?
 
I have that Paasche, and it has never failed me in over 10 years, you can put some fairly viscous stuff through that one
What compressor are you pairing it with?
It came with a small (on demand) pump. I just picked up an older 1hp electric compressor with good sized tank. I need to find the right couplings to make everything compatible. The Paasche seems to have it's own size apart from the no name AB I bought to have a gravity feed...
 
Holy Smokes! Finally able to get back to it...

I am starting to test fit and pre-assemble the rest of the car for primer. Hope to get something shot by this time tomorrow. I cut the front clip off like how the 1:1 is actually built, removed all the casting lines and added some body lines that weren't molded, such as where the fenders meet the cowl. I cut out the passenger door handle and drilled out the lock and drilled out the hatch lock as well. I went a little further with the body damage. I am making it a Targa Roof because I didn't leave myself enough material to make the T's look good, so I cut it back out and sanded it smooth. -Art.
IMG_0337.JPG IMG_0338.JPG
 
Got some color shot today, did some weathering. Salt over base coats of primer, steel and rust, went back and dry brushed some of the same over the whole car to take down the gloss a bit. Lots of dents, scrapes and scratches. still a ways to go, but I am taking my time with this one...IMG_0564.JPG
IMG_0568.JPGIMG_0567.JPG
 
Details Details Details! Digging into the details. This is going to be a track tech's nightmare. See you at the strip! IMG_0585.JPGIMG_0587.JPG
 

Latest posts

Back
Top