F4U-5 Corsair

f2k

New Member
Joined
Apr 2, 2011
Messages
301
Well, I suppose it’s about time I got going on this build...

I eventually settled on doing a simple Revell 1/72 scale F4U-5 Corsair from the Korean War. Should provide a nice and easy way to get back into modelling after some truly hellish months...


Looking at the box the models seems to be a cannon and rocket armed Corsair from the early fifties in the typical dark blue paint scheme with yellow details and black anti-glare paint. On opening the box, however, I found that things weren’t quite as easy as that.

The box contains the instructions, a warning label, decals for two different aircrafts and a plastic bag with three sprues.

The instructions are typical cheap Revell instructions – a loose bundled of papers, folded along the top, with the basic instructions. On looking through them I must admit that I was less than impressed. Sometimes colours are shown to be applied without marking what colour should be used. Details come and go, sometimes shown, sometimes not. The icon for “glue” and “do not glue” is shown to be the same in the beginning of the instructions while it’s later shown, at least in some cases, to be different. All in all a quite unimpressive manual.

The decal-paper does seem to be a bit thick and other reviews that I’ve read suggests that they can be somewhat difficult to get affixed. But I’ll deal with that when I get to it.


The sprues are fairly simple with 62 pieces in all. They’re moulded in a dark blue hard plastic which is, in places, thin enough to let light shine through.
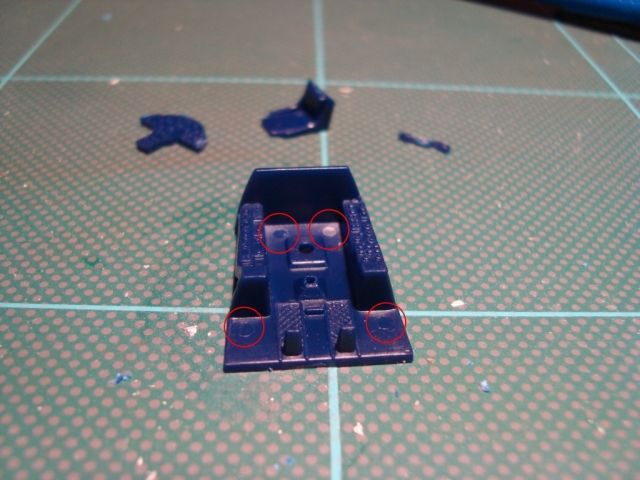
There’s not much flash but some of the pieces are marred by having ejector holes in some very obvious places. These will have to be filled and sanded as the aircraft is assembled.


So... What does this kit represent, then?

Truth to be told, I’m not really sure...

According to internet rumours this kit is, in fact, a repackaged Italeri F4U-5N which, in turn, shares a lot of parts with the Italeri F4U-4b. As a consequence this kit is a strange mishmash of various components. The cockpit seems to be somewhat okay for a F4U-5 but the hull itself is from a F4U-4, meaning that it’s somewhat short for a F4U-5. The wings are the metal covered wings from a F4U-5 but with elevators from a F4U-4. And there seems to be some details from the F4U-5N such as glare shielding on the exhausts and cannons.

In addition, while there are pylons for the rockets there are neither rockets, nor bombs for the centre-mounts included in the kit. And the pilot seems to be AWOL...

All in all, not a particularly good kit. But then again, it’s quite cheap...

I’ve seen examples of people fixing this kit with parts from other kits and aftermarket parts. However, I think I’ll just build it as it is. I simply don’t have the time or energy to collect aftermarket parts and scratch build the front hull. And, let’s be honest, unless you’re really in to this kind of things you probably won’t notice anything amiss.

Now I’ll only need to figure out exactly what colour it should be painted in. The instructions call for a mix of Lufthansa Blue and Anthracite Grey – neither of which seems to have an equivalent Vallejo colour...
 
Good luck with this.
It does seem to be fairly well detailed for the size, accuracy not withstanding.
 
Thanks... :)

It does have some nice detail with lots of engraved panels. The engine is a bit naff, to be honest, but apart from that...

Not looking forward to pin-washing all those panel-lines though...

Should get started on the cockpit tomorrow if all goes to plan. Been trying to get a list of paints ready today so I can drop by the local hobby store on Tuesday to pick up whatever I might need. Quite a bit of work, I must say. Half of the recommended Revell colours do not seem to have a Vallejo equivalent...
 
Have to play a best guess with the colors then.
You might be able to get close with some of them
 
Yeah, I’ll probably just wind up winging it... Get it? Winging... ;D

Ahhh, sorry... Bad Pun...

Right now it looks like an undercoat with Dark Prussian Blue with a bit of panel-highlighting with Dark Sea Blue might be the way to go. I’ve seen both mentioned as replacements for Lufthansa Blue so it shouldn’t be too far away.
 
Hey F2k,

Cool.
As a side note I started the what looks like the same kit this weekend. But mine is a French corsair from the Suez crisis and the plastic was box as a Italeri release. Watch out with the fit of the wings to the fuselage, mine had large(ish) gaps.

JMac
 
Hey f2k, shouldn't be too bad a kit. From 1945 to about the mid to late 50', US navy aircraft where painted dark sea blue, Just offering some info,can't wait too see it come together!
 
Well, event the best plans can go wrong. Real life intervened and I haven’t been able to work on the bird until today.

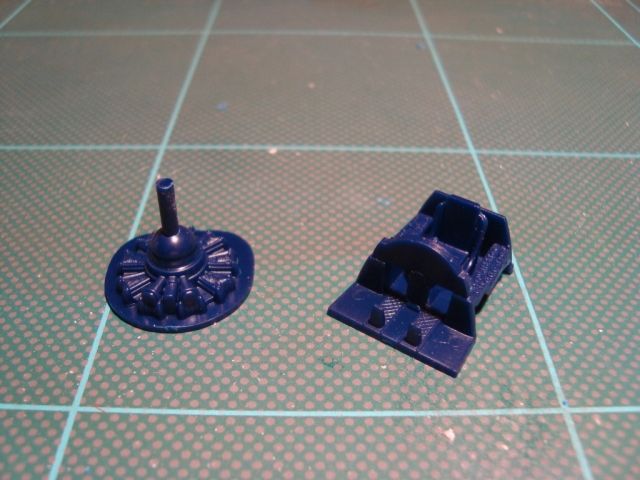
Got the cockpit, engine, and droptank assembled. And ran into a few problems along the way...

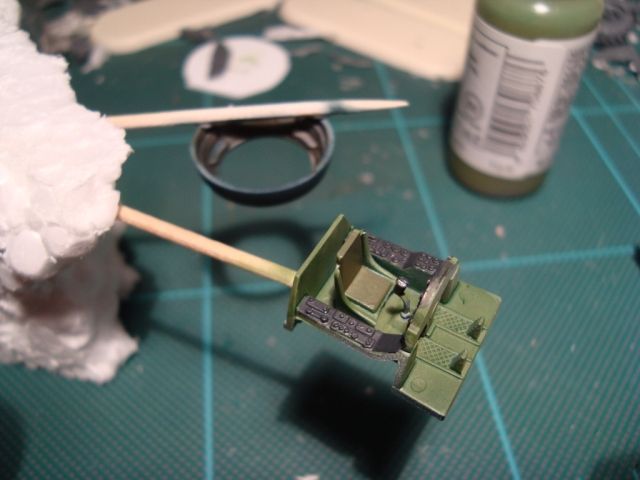
As I mentioned in the first post there are some unfortunate ejector marks around the aircraft – the cockpit floor is one of those places. However, once the cockpit has been assembled and mounted in the aircraft they hopefully won’t be visible. ‘Cause I just couldn’t be bothered to try and sand them away in that confined space...


But apart from that both the cockpit and the engine went together without a hitch. I did wonder, for a brief moment, if I should paint the cockpit before assembly. But I think I can get away with painting it later.


The droptank nearly turned into a disaster. The first problem was cleaning up some flash on the strange flange that runs right around the tank. The second was assembling it. I tried to be very careful with the glue but unfortunately ended up getting a tiny drop on my finger – which promptly ate into the plastic, leaving a nice fingerprint-indention. Man, did that plastic melt quickly!

So I’ve now covered that area in plastic-putty. There’s gonna be a fair bit of sanding to do once that’s dry...


Note to self: do not take pictures of models laying on a piece of white tissue-paper – it does some really wonky things with the colour-balance...

Once all of this is completed it’s time for some dry-fitting of the wings and fuselage. I hope gaps won’t be a problem but I’ll keep a sharp eye on the wings, just in case...
 
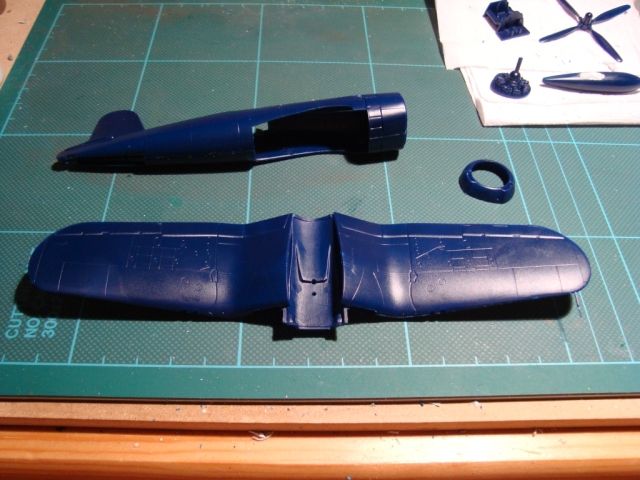
Ok, so I decided to forge ahead and start the wings while the rest was drying. “Might as well get ‘em done”, I though...

And more problems popped up...

Most severely, there are some really bad misalignments around the air intakes in the wing-roots. These will need filling with plastic-putty and grinding.

Another issue, which might turn out to be just as severe, is the fact that the antenna (or whatever it is) on the left wing wasn’t properly protected by the sprue and so have become rather bend. I managed to straighten it out but it’s very weak now (in the picture you can actually see the change in colour on the spots where it was bend). I’m trying to save it, but I might be forced to cut it off at some point if it keeps bending.


I also started on the fuselage, cutting it off the sprue and preparing the holes that must be drilled. As with the cockpit floor, the fuselage has some ejectormarks. These, however, will have to be sanded down as they prevent the parts from coming properly together. Shouldn’t be too much work but it’s a bit annoying nonetheless...


Oh well, it’s not all bad news. Dry-fitting the fuselage and wings I could see no major gaps. That’s a good thing.

So, so far so good. I do miss my old Humbrol plastic glue with the brush on the lid though. I found it quite difficult to control where I apply glue with my current steel-tipped Revell glue.

And that’s truly it for tonight. The wing needs to dry thoroughly before I start sanding and filling...
 
:D I can vouch for the 1/48 scale version of this... a very nice kit !
but that little 72nd one... not sure ! but hard to tell with all that Dark blue plastic...

I am pretty sure the 1/48 is not a True Revell Kit .... maybe that's why its so nice !

Good luck with this small Bird ! should be a quick build ?

it seems to have some nice recess panel lines !!! which is a plus !

Take care !

Norm.
 
Good luck with that one! I've done a 1/72 scale of that bird before..., I just painted the cockpit black and stuck it in there. Couldn't even see it when it was completed.
 
Hey F2k, how's the corsair build going? Just wondering.
 
JMac said:
Hey F2k, how's the corsair build going? Just wondering.

Not very well, I’m afraid...

I’ve had one hell of a December. First I went down with the flu. Then I went down again with another round of flu. Then I went down a third time – only, this time it was down a flight of stairs which my right hand (and especially thump) didn’t really like. And now I’m fighting through a slight cold...

So basically, I haven’t gotten much done over the last month. My right wrist and thump just can’t take the strain of painting. Airbrushing goes sorta okay, but painting with a brush has the pain level in my thump going from a dull thumping (ha, ha, bad pun...) to outright agony within some 10 to 15 minutes.

So the Corsair is grounded for the moment. I’m hoping that I can slowly get back to painting over the next couple of weeks but...
 
Sorry to hear about the flu(s) and the fall. We had a flu run through our house over Christmas, everyone got sick over the holiday. Hope you're feeling better soon.
 
So, one month gone by, the groupbuild almost over, and finally I’ve gotten back to working on my models.

Hopefully, one major push this weekend will set me up for a nice sprint to the finish next weekend. That, at least, is the plan. But we know what happens to even the best laid plans, right...?

Anyway, on to the build itself...


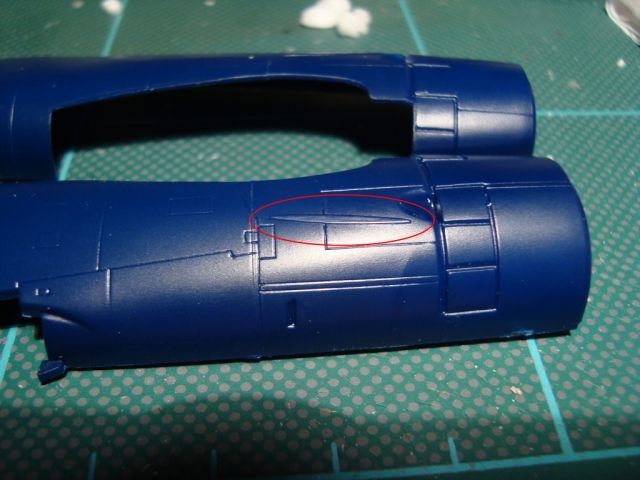
The first thing to get done was to get rid of the glare shielding mounting as this isn’t a night fighter. Not much of a problem, really. I simply shaved the plastic of with my trusty hobby knife, sanded the area down, and rescribed the panel lines.


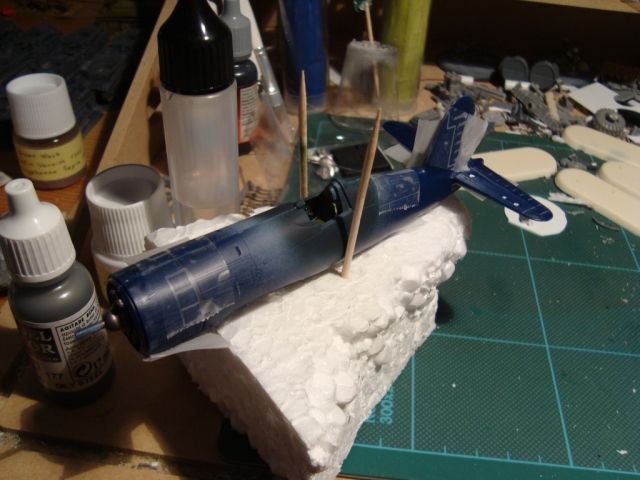
I then airbrushed a white undercoat, followed by a layer of Dark Sea Blue around the cockpit area. The plan is to assemble the fuselage (with the cockpit internals inside, of course) and then seal the area before painting the rest of the rest of the fuselage – but more on that later in the post...

To be honest, having laid down the paint I did have a bit of a WFT!!? moment. The colour ended up being very darkish grey rather than the far more radian blue show on the box.
Acording to what I could find on the internet Dark Sea Blue is a fitting colour for US navy planes from that era. But it really doesn’t look right...

Not that that’s going to matter much – more on that too later in the post...


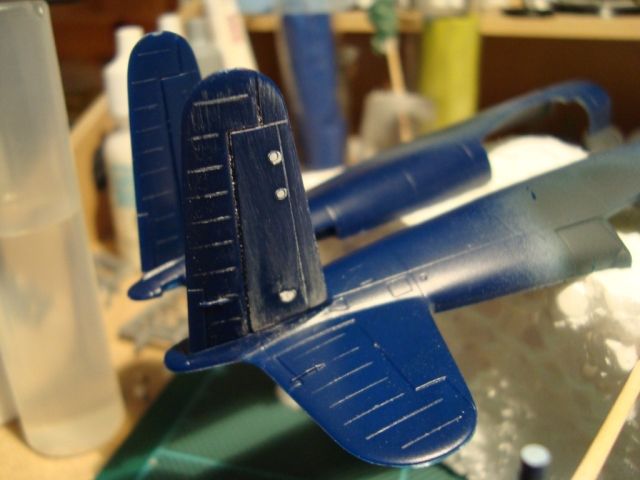
You might have noticed some white blobs on the left elevator. That’s because these elevator have four engraved circles in them – supposedly representing access doors to the internal cables in the elevator. Only problem is that these doors were not present on this version of the Corsair so I filled them with plastic putty and sanded the whole thing down.
Why’s there only three white areas, you might ask. Well, the fourth was so shallow that it disappeared when I sanded the area so there’s only three remaining visible...


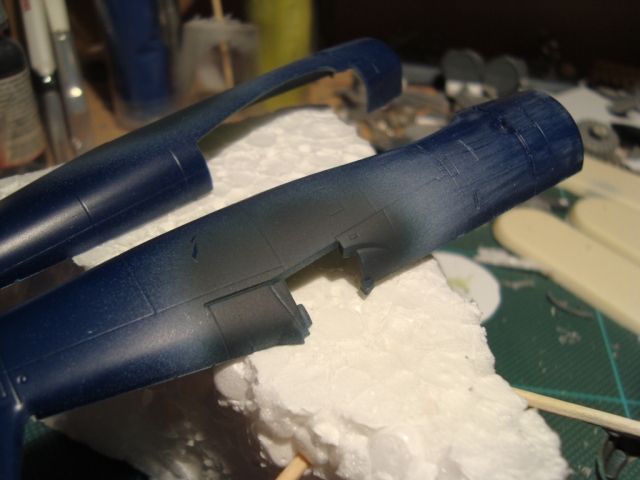
This is a closer look at the paint around the cockpit. It might just be me, but it looks very grey compared to what I was expecting.
Also, notice, to the left of the painted area, how a bit of paint has been scratched of. This was a problem I also had with my Jagdpanzer E 100 – the paint simply refuses to stick to the plastic. Really weird. Really annoying...

I’m now really doubtful as to my ability to mask of the cockpit. If the paint won’t stick to the plastic then I might pull it off when I remove the masking tape. I might just try to carefully airbrush around the cockpit area instead. Not the best plan but hey, I’ve got to work with what I’ve got...


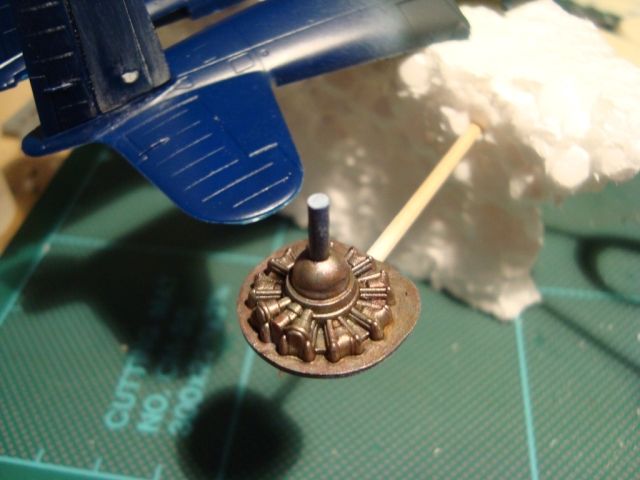
A closer look at the engine. I was going for an old and rusty look so it’s been painted in simple dark metallic and then washed with red and brown washes.


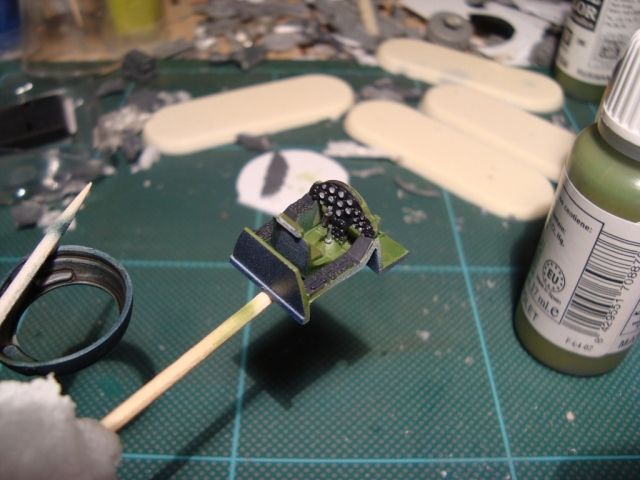
And a close-up of the cockpit. Now, next time I do an aircraft I’ll remember to paint it before assembly...

Anyway, it’s a fairly simply job with a few colours. Too few, in my opinion, but perhaps Americans don’t like lots of colours? ‘Cause this is the paint scheme the manual called for...

Not the best job I’ve ever done, but soon that won’t matter...


Finally, here’s a shot of the assembled fuselage. The two halves were slightly warped so I’m keeping them securely taped together until the glue has dried.


So, why am I so careless about all these small details?

Well, firstly because I’m trying to force myself to just get things done without constantly worrying about getting every little detail right. Yes, I really am a bit of a perfectionist – and sometimes way to perfectionist for my own good...

Secondly because I’ve decided to try something very different with this build. I was googling for images of corsairs, trying to figure out if the paint scheme I was suing really was correct or if I should get a more bluish colour for the fuselage.

Then I came across this picture...

swamp631[1].jpg


Of course I forgot to save the URL I got the picture from (stupid, I know...), but it was apparently from somewhere in the pacific where an American bomber was being recovered from a swamp.

I thought that might be interesting to try so I’ll be weathering my Corsair with a very pale greyish blue hue as if it had been laying out in the sun for a few years and the submerge it in swamp water , trying to get an effect like the one on the picture.

I probably won’t get it exactly right, but I’ll give it a try...
 
Cool to see you back no this one F2K. Sprint man, SPRINT! lol just joking. No rush.
 
Thanks... :)

I’ll do my best to get across the finish line before the deadline is up...

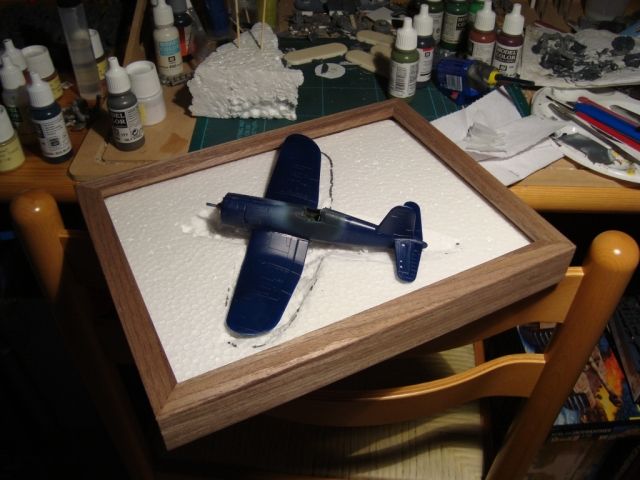
I thought I’d just put up a picture of what I’ve been doing this afternoon. The wings are now in place and the base is almost done.


I bought a cheap wooden photo frame, pulled out the back plate and the metal spikes holding it in place before glueing a 20 mm. polystyrene plate into the rear of the frame. I’ve made a rough cut-out where the plane can sit and, once the plane is painted, I’ll place it there and then cover the polystyrene with a thin layer of thinned down wallfiller with some blackish brown paint mixed in. Once that has been allowed to flow into the cut-out hole and has dried completely it should have formed a nice level bottom for my swamp and, as an added bonus, glued the plane firmly in place. I hope so, anyway...
 

Latest posts

Back
Top