Bronco's 5t "Diana"

Tony lee

New Member
Joined
Mar 10, 2011
Messages
869
100_0978.jpg
I was going to built this out of the box but after reading Terry Ashley's review at PMMS.com I decided to follow his suggestions and fix a couple of major errors. These are easy to fix so don't let them turn you off,it's a great kit otherwise.

There were nine of these built for use in North Africa and were still used on the front line right to the end of the campaign.

Terry suggest that you add 4mm to the front axle so the wheels are under the fenders in a more correct position.
100_0974.jpg
I cut the axle on each side between the wishbone and the spindle,closer to the spindle than the wishbone and added a 2mm long section of sprue from the kit since it's the right diameter. You'll also need to extend the cross over tie rod the same 4mm. For that I used Evergreen rod stock.
100_0975.jpg

Correcting the frame height came next and here is the picture the PMMS review supplies for a guide.
cb35038d46.jpg

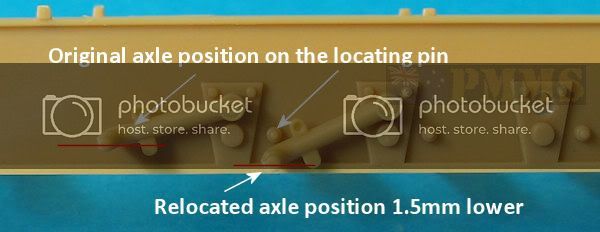
The kit was designed from a Diana that had collapsed torsion bars I guess and this correction gets the frame back up where it belongs.

After that I jumped ahead and built and installed the engine,fuel tanks,btw the tanks need to be reversed Bronco has them backward,and the air tanks.
100_0981.jpg
The front axle fix was well worth the extra effort I think.

Time for some body work. Nothing is glued down just yet and you can see how well the parts fit.
100_0985.jpg
100_0986.jpg
100_0987.jpg
100_0988.jpg
To get that little tank to fit under the right side of the dash I had to sand off the tank straps on the backside where it glues to the firewall.

The Russian 7.62cm gun assembled and sitting in place.
100_0991.jpg
100_0990.jpg
100_0992.jpg
100_0993.jpg
You have to cut the trailing arms to length so be sure to measure twice and cut once.

The underside of the gun platform.
100_0989.jpg

Checking the fit of the fighting compartment.
100_0994.jpg
Startin to look like the box top art work.

The storage bin in the back has a section for personal gear (top), 32 rounds of ammo (center) and tools on the bottom.
100_0995.jpg
Being a registered redneck I found it to be some what dull. It needed a Gnome or some Christmas lights to give it some interest but a picture I found on the net showing a partial shot of the rear interior gave me an idea. This is what I came up with.
100_0998.jpg
I bought the Bronco Russian 7.62cm ammo kit and a little foil liner from a cigarette pack did the trick.

When I put the storage bin in the casement to see how it would look I found this eye sore.
100_1000-1.jpg
The open side of the bin stuck up above the door seal. I'm going to leave the door open so I closed the gap up with a strip of plastic yard sale sign,problem solved.
100_1001.jpg

That's it for now boys and girls
Tony lee
 
ive taught about getting one of these kits. be interesting to see how you do yours.
 
Oh No Thumbs not the usual two halves it's done with a slide mold and one piece with very faint seams to smooth up.

Compared to the older Bronco kits this is a much improved product. I hear the "Archer" and "Bishop" are even better. You think they're after my money? ;D

Thanks folks it goes faster when parts fit as they should.
Tony lee :)
 
TONY,

Great lookin' stuff !! Awesome job on that Curtain for the Ammo Bin !! :eek:

I've had My eye on this kit since it showed up on th Market ... Lookin' Good Bro !
 
Looks like this will be a clean, sharp build! Can't wait to see it finished!!!!!!!!!!!!!!! ;D
 
That's looking real nice like the scrap build with the ammo keep it coming

Geegad
 
Hi Tony! Told ya I would come over!!! Looking great! Sneaking suspicion your making progress...hint, hint!! ;D
 
Oh i'm so sorry folks,I plumb forgot to up-date the post. :eek:

I've been adding some glem to the front and engine.
100_1003.jpg

To keep things moving I had to do a bit of painting and just had to try out some of the AK Interactive Engine and Metal Weathering set. Well pleased with the product and i'll use more of it on the rest of the build.
100_1011.jpg

Happy to have you with me on this.
Tony lee :)
 
Well unca' T, you're really creating a beauty. love the look you've gotten with the AK stuff.

Really diggin' it.
8)
 
Alright my bestist nephew just the guy I need.

How do you paint the tires???? The tire sidewalls bulge out a bunch and my circle template won't fit down enough to cover the tires to paint the rims without getting over spray on the tires.
What do you do paint the rims then use a disk to cover the center and then paint the tire?

Thanks ???
Tony lee
 
fumblethumbs said:
I guess you were a quick study on the AK gear. Looks very reeeaaaal!

Without anyone to show me in this town it's a guts and what the heck attitude Thumbs.
I would never get anything done otherwise.

Get-R-Done
Tony lee :)
 
Well, whatever you're doin'...it's workin'!

Gitr done. :D

The fumble way to paint tires: I use bluetac to stick the wheel to a skewer. Spray prime and drab. Then brush paint the rubber. The skewer works like a mandrel, allowing a slow spin and decent control. It's slow and oldschool, but I'm in no hurry and the results are good.DSC02246.jpgDSC02247.jpg
 
I bet ya I could handle that if I could keep from getting brush stroke marks,Thanks

Tony lee
 

Latest posts

Back
Top