ATHENA - Steampunk Airship
- Thread starter Klaus not Santa
- Start date
Klaus not Santa
Member
- Joined
- May 15, 2013
- Messages
- 281
Thanks ")
I used this kind of rotors before on the CHARON
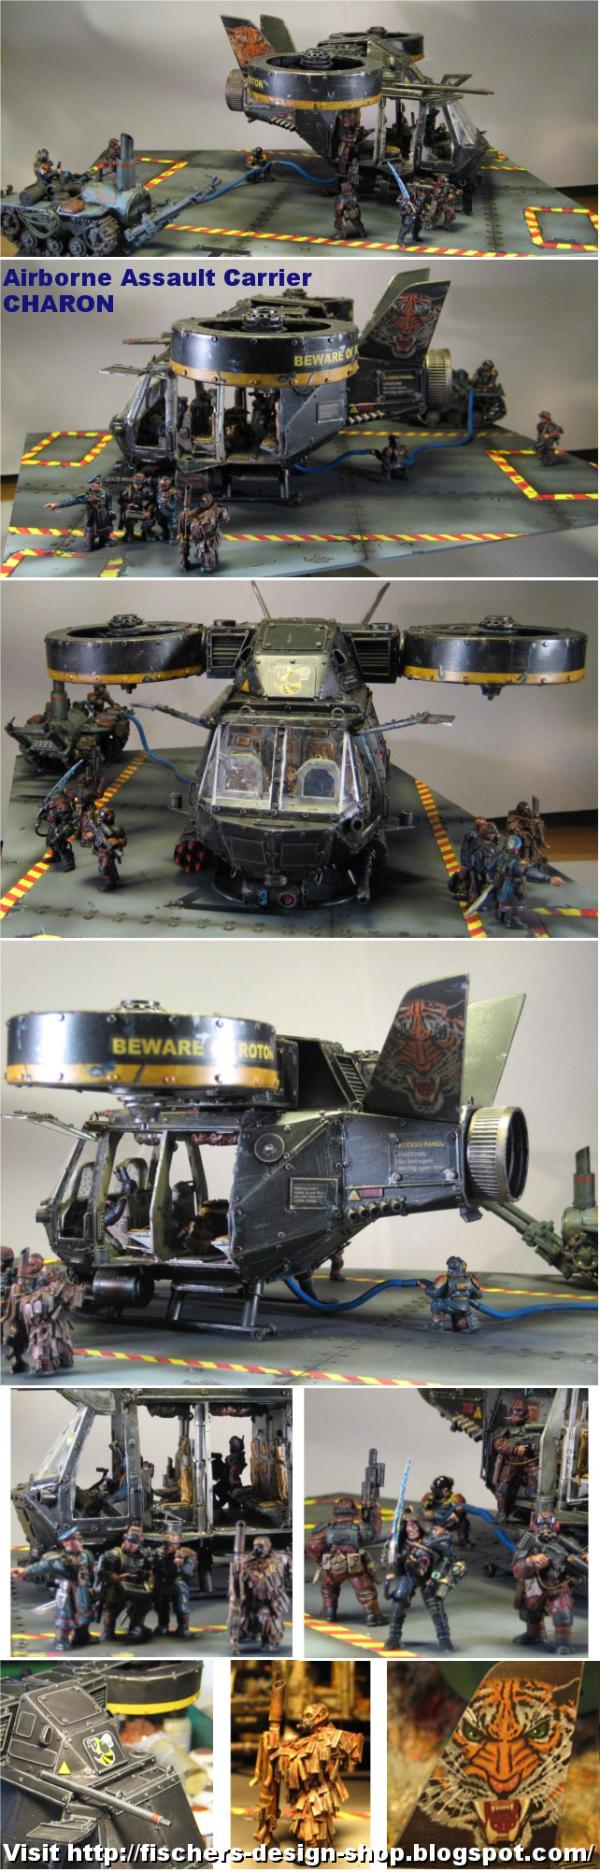
and by being rotatable they are just perfect for the navigation engines

I'm glad you guys like it
Cheers
Klaus
I used this kind of rotors before on the CHARON
and by being rotatable they are just perfect for the navigation engines
I'm glad you guys like it
Cheers
Klaus
Klaus not Santa
Member
- Joined
- May 15, 2013
- Messages
- 281
Thanks guys!
While I do like the general apearance of the duct fans, I realized I need some more decorations or steampunk elements to make them work with the overall style of the ATHENA.
So I reworked the initial duct fan, built a slightly larger rotor, added a driveshaft, and a rear ornament.

The front also got an ornament - in hindsight I realize it looks a bit Batman stylish....

Pleased with the apearance of the test rotor I build the remaining 3 rotors (they are now larger than the actual opening) and positioned the spacers.

While these cured I used my famous rivet scale and marked the rivet positions for the first fan.

I really like the look on the ATHENA.


While only the lower left one is complete, the other 3 ducted fans got their ornaments in place and now "only" need the outside cover and rivets.

Yeah!
Another item off my list.
Cheers
Klaus
While I do like the general apearance of the duct fans, I realized I need some more decorations or steampunk elements to make them work with the overall style of the ATHENA.
So I reworked the initial duct fan, built a slightly larger rotor, added a driveshaft, and a rear ornament.
The front also got an ornament - in hindsight I realize it looks a bit Batman stylish....
Pleased with the apearance of the test rotor I build the remaining 3 rotors (they are now larger than the actual opening) and positioned the spacers.
While these cured I used my famous rivet scale and marked the rivet positions for the first fan.
I really like the look on the ATHENA.
While only the lower left one is complete, the other 3 ducted fans got their ornaments in place and now "only" need the outside cover and rivets.
Yeah!
Another item off my list.
Cheers
Klaus
builder101
New Member
- Joined
- Nov 12, 2012
- Messages
- 131
Wow, this is just a creative and a great build I really can't wait to see this ship painted, but keep going..
All of the rivets you have made did you cut these just from like evergreen styrene? When I cut rod I never get that perfect cut as you seem to be getting and consistency.
Nice job!
Mike
All of the rivets you have made did you cut these just from like evergreen styrene? When I cut rod I never get that perfect cut as you seem to be getting and consistency.
Nice job!
Mike
Cave_Dweller
New Member
- Joined
- Mar 18, 2011
- Messages
- 812
Man, you could have whole games of 40k based ON this ship! Very cool stuff.
Klaus not Santa
Member
- Joined
- May 15, 2013
- Messages
- 281
Thanks guys!
@builder101 - Mike, for the rivets I use this hole punch

Its pretty handy. The only downside is that the smallest rivets it can make is 2mm in diameter, but up to 5mm.
I have another smaller one that can do 1mm disks, but its not as handy as this one.
Here are some of the other tools I use:
http://fischers-design-shop.blogspot.de/p/tools-i-use.html
Cheers
Klaus
@builder101 - Mike, for the rivets I use this hole punch
Its pretty handy. The only downside is that the smallest rivets it can make is 2mm in diameter, but up to 5mm.
I have another smaller one that can do 1mm disks, but its not as handy as this one.
Here are some of the other tools I use:
http://fischers-design-shop.blogspot.de/p/tools-i-use.html
Cheers
Klaus
Klaus not Santa
Member
- Joined
- May 15, 2013
- Messages
- 281
Thanks guys!
;D
While the list of to-do's IS shrinking, there are still many items to do

The first thing was to complete the covers around the duct fans. And even though they were not 100% finished I couldn't resist to take some nice shoots with the 4 duct fans in position...

Also it was time to do another weight check.

I'm really proud of my little Queen, she hardly gained weight. Despite all the nice curves and add-ons she's only 2,42 Kg ( 4.8 pounds) - including two block batteries!

Well, on to the rear....
This is the "balcony" I had originally build and painted for this rear area, with an observation periscope and another plotting table.

But since I now need a good position for the two NEMESIS CIWS, I decided to rather build a new structure.

Rounded and "steampunked"

it will give the two CIWS a nice field of fire.
But to really fit the ATHENA it needs some ornaments.

I can tell you it was some tough cutting !

But I think it was worth the effort

What do you guys think?
Cheers
Klaus
;D
While the list of to-do's IS shrinking, there are still many items to do
The first thing was to complete the covers around the duct fans. And even though they were not 100% finished I couldn't resist to take some nice shoots with the 4 duct fans in position...
Also it was time to do another weight check.
I'm really proud of my little Queen, she hardly gained weight. Despite all the nice curves and add-ons she's only 2,42 Kg ( 4.8 pounds) - including two block batteries!
Well, on to the rear....
This is the "balcony" I had originally build and painted for this rear area, with an observation periscope and another plotting table.
But since I now need a good position for the two NEMESIS CIWS, I decided to rather build a new structure.
Rounded and "steampunked"
it will give the two CIWS a nice field of fire.
But to really fit the ATHENA it needs some ornaments.
I can tell you it was some tough cutting !
But I think it was worth the effort
What do you guys think?
Cheers
Klaus
Klaus not Santa
Member
- Joined
- May 15, 2013
- Messages
- 281
Quick questiuon:
Last night I had the absolutely crazy idea to add wooden planking to the ATHENA deck.
Like this:


Do you think this could work?

Thanks
Klaus
Last night I had the absolutely crazy idea to add wooden planking to the ATHENA deck.
Like this:
Do you think this could work?
Thanks
Klaus
the Baron
Ich bin ja, Herr, in Deiner Macht
- Joined
- May 12, 2009
- Messages
- 2,275
Can wooden decking work? Absolutely, looks great!
I think of actual Victorian technology, as the starting point, and think of the early metal battleships, and even the Dreadnaught and her descendants. Even with steel armor for decking, they were covered with wooden planks. I think it would look natural on the Athena.
I think of actual Victorian technology, as the starting point, and think of the early metal battleships, and even the Dreadnaught and her descendants. Even with steel armor for decking, they were covered with wooden planks. I think it would look natural on the Athena.
Klaus not Santa
Member
- Joined
- May 15, 2013
- Messages
- 281
Hi all you patient followers and readers,
thanks for your feedback!
I think today is one of the last build posts for the ATHENA!
I'm sure that she's now 95% complete and all that is left are some gaps and then millions of rivets
But I still owe you some work in progress updates.
Last I asked what some of you would think if I added wooden planks to the rear deck, and if the carved plastic card I had made was good enough for this purpose.
Well, the response was in unison in favour of the idea
So I cut some .7mm wide PC strips as framework on the deck - it also serves to keep the bridge section in position (remember it is removable)
Some gap filling with green putty, and then I started with the wood PC.
I can tell you, carving the wood pattern is kind of meditation
I did it while watching the Formula One race in Hungary.

The wood sections on deck and also for the actual landing platform/elevator piece.
With the deck sections it looks just great

As Eyescream on WIP suggested I definitely need some railings to keep my drunken sailors on board
This build was a bit fiddly, as I couldn't glue it in place (it has to be removable for painting), but once the top railing was glued onto the wooden posts it got very sturdy.
The upper railing with the corner was a challenge - I cursed a LOT

But now that it's complete I am absolutely proud of it!

As said, the sections are removable

Then I had to add "a few" rivets

Top view

Side shot

The next to last item on the to-do-list was this access ramp on the underside of the body

And the final item was the support frame for the lower gondola

It now keeps everything aligned and in position.
Well, that's it!
Oh, I have a "little" video of her again:
ATHENA final
And now its
RIVETS, RIVETS, RIVETS
and a bit of gap filling and
RIVETS, RIVETS, RIVETS
and then some
RIVETS
I hope you like it.
I'm all with Atreides that its a funny moment, realizing that this project is coming to an end.
Its with one crying eye that I look at her.
But hey, I'll have plenty of hours painting her ahead of me
Cheers
Klaus
thanks for your feedback!
I think today is one of the last build posts for the ATHENA!
I'm sure that she's now 95% complete and all that is left are some gaps and then millions of rivets
But I still owe you some work in progress updates.
Last I asked what some of you would think if I added wooden planks to the rear deck, and if the carved plastic card I had made was good enough for this purpose.
Well, the response was in unison in favour of the idea
So I cut some .7mm wide PC strips as framework on the deck - it also serves to keep the bridge section in position (remember it is removable)
Some gap filling with green putty, and then I started with the wood PC.
I can tell you, carving the wood pattern is kind of meditation
I did it while watching the Formula One race in Hungary.
The wood sections on deck and also for the actual landing platform/elevator piece.
With the deck sections it looks just great
As Eyescream on WIP suggested I definitely need some railings to keep my drunken sailors on board
This build was a bit fiddly, as I couldn't glue it in place (it has to be removable for painting), but once the top railing was glued onto the wooden posts it got very sturdy.
The upper railing with the corner was a challenge - I cursed a LOT
But now that it's complete I am absolutely proud of it!
As said, the sections are removable
Then I had to add "a few" rivets
Top view
Side shot
The next to last item on the to-do-list was this access ramp on the underside of the body
And the final item was the support frame for the lower gondola
It now keeps everything aligned and in position.
Well, that's it!
Oh, I have a "little" video of her again:
ATHENA final
And now its
RIVETS, RIVETS, RIVETS
and a bit of gap filling and
RIVETS, RIVETS, RIVETS
and then some
RIVETS
I hope you like it.
I'm all with Atreides that its a funny moment, realizing that this project is coming to an end.
Its with one crying eye that I look at her.
But hey, I'll have plenty of hours painting her ahead of me
Cheers
Klaus
THE NEW ONE
follow me on twitter @SpaceSavy
- Joined
- Oct 4, 2011
- Messages
- 346
i thinks maybe a flag pole, like these pictures http://www.oldstyle.net/projects.htm
Similar threads
Latest posts
-
-

-

-

-
-

-
 1977 Original Large Box VISIBLE MAN MODEL KIT, Revell Models, 1977! $40.00 OBO!
- Latest: SuperheroSanctum
-