Airbrush & compressor question.

fubar

New Member
Joined
Nov 10, 2011
Messages
502
Hey guys.

While i was rummaging in my garage i found an old Badger 200 airbrush that i'm guessing someone in the long distant past (15+ years) gave me for free. I know absolutly zero about airbrushes and this thing has no instructions that i can find. It looks in good condition but i was wondering do the parts in these things degrade over time? I'm guessing there are O-rings and seals of some sort in it, what are the parts most likely to fail due to age and not being used at all?

I would really love to try it out as at the moment i brush everything, but dont want to waste money and time if age has most likely killed it. lol

Also any websites that may have instructions or tutorials on how to use the thing. lol

Thanks in advance for any help.

TTFN Matt

P.S. Just incase it does work can anyone recommend a good value for money compressor?
 
Unless the thing is rusted out, I would think it should work fine. I would suspect that the o-rings in the valve assembly would be the only thing that would degrade over time. A new valve assembly for a badger is about 15 bucks.

What I would do is take it apart, clean it really well with some lacquer thinner, once put back together make sure all the moving parts are moving without any fuss. You can test the seal by simply hooking it up to a compressor, or some type of air source, if its leaking air you will definitely hear it hiss out of the air brush.

if you are not comfortable taking the airbrush apart there should be some tutorials on you tube about how to do it. its really not hard you just have to be careful not loose any of the tiny parts.

Harbor Freight Tools offer reliable inexpensive air compressors. But they can be very loud.

hope this helps
 
I picked up an Iwata Ninja Jet at Hobby Lobby using one of their 40% off coupons. It's rather simplified with no pressure gauge and it's rather noisy, but it works fine for me.

If I remember correctly there is a company that will service your airbrush for you for a fee.
 
Airbrush restorer from Createx might be something you'd consider using. I used it to get a 15 old Holbein airbrush up and running again. Just soak the AB disassembled overnight, give it a good scrub inside and out, and it should remove old paint buildup and recondition old seals. Be sure that the needle is straight (there's a couple youtube vids out there on how to straighten a bent needle) and that the threads around the needle receiver at the tip of the airbrush are sealed up (a problem on older airbrushes solved with a small amount of thread sealant, beeswax, or plain old paint applied to the threads of the needle receiver).

All my advice comes courtesy of the good people on this forum when I had the exact same issue with the old Holbein!
 
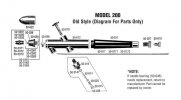
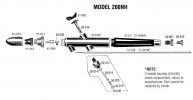
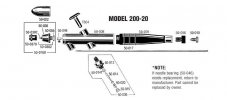
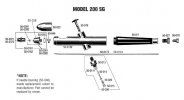
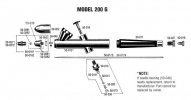
Note there are several variations of the 200.

schem200old.jpg
schem200nh.jpg
schem20020.jpg
schem200sg.jpg
schem200gx.jpg

The first two by a long shot are the most common, the first being colloquially known now as the "old 200" and the second as the 200NH (or "New Head"). I cant recall when they made the switch...I think it was about 10 years ago. Note that the head parts are all different as are the needles so if you decide to order parts make use of the above and get the right stuff.

In any case, unless someone managed to get paint back into the air valve (very unlikely but not impossible) it should be fine. Likewise the Teflon needle bearing needs pro-active abuse to need replacing (and if it does they have a lifetime warranty on either the part or the labor...cant recall which...either way...).

The old 200 used a Teflon washer, 50-055, which could get "crushed" from over tightening. The 200NH has nothing like that. At worst you'll need a new tip and needle (<$20) and you will have a workhorse. I'm not a fan of siphon feed at all and I've long grown past single action but I still use my 200NH for certain paints I don't want to put through my other guns. Still works like the day I got it.
 
Many thanks for the info guys, very much appreciated.

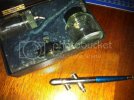
From the look of it i have the 'old 200' model......

IMG_1003.jpg

Not a very good pic i'm affraid. lol

I shall have to get some of this airbrush cleaner and give it a good soaking in it, the airbrush itself looks ok and is rust free but as you may be able to see the box it was in must have been damp at some point because it's all covered in mould and the foam padding has broken up and stuck to everything in the box.

I live in the UK so i dont have access to any of those shops you mention but i'll try online shops for that cleaner.

TTFN Matt
 
Hope you all had a good christmas. 8)

I went ahead and bought an Iwata Reveloution CR with a Power Jet Lite compressor in the end, i believe i can also use this with the old Badger 200 i found, so far i have used the AB for undercoating and base coating. I have a few questions tho, i have been mixing the paint by eye so to speak and using it when it has a watery look at a pressure of around 20-25psi which the manual says is an average working pressure and it all seems fine so far but now i want to try some highlights on raised panels and i'm wondering if 20-25 psi is a little too high for delicate/fine work? I have looked at LOADS of youtube vids on fine AB painting and weathering and tbh it's left me a little confused, some say to use a very wet paint solution at a pressure of 5-15 psi, but others say use a thick solution at a higher psi and mist it on from a long way away from the model! ???

Is either of these correct or if both are correct which is the easier for a beginner like me? Also is there an easy way to measure 'parts' out when your mixing paint i.e. 1 part paint thinner to 2 parts paint. Like i said i've been working by eye so far but i'm sure thats not the best way to do it! ;D

TTFN Matt
 
Delicate/fine work means we want a smaller spay pattern, which you simply must get in closer to achieve (from far away, even with the trigger pulled shallow, you get a broad spray). If the paint is quite viscous by design, then you can keep your pressure as high as 20psi or so but most folks will thin their paint down and keep the pressure low, anywhere from 20 on down to 10psi. Even if you can do a tight line at an elevated pressure, working with a lower one tends to make "oops"s a little less...dramatic. :) Thinned paint also means thinned out color which is often desirable when doing fine detail and shading.

Big question is what paint are you using in concert with what thinner? I'm a huge fan of Vallejo's bottle because they have a built in measuring tool: the eyedropper. "X drops of this to Y drops of that" makes mixing colors and thinners easy and repeatable. If you want to get more scientific with other paints you can get pipettes (but then you have to clean them every time). Large straws (with a thumb over the end) work ok for measuring out ratios. At very least you can put your thinner in a small dropper bottle (couple bucks at an art store) to make dispensing that easier.
 
Thanks for the reply sunsanvil.

I'm using Lifecolor paints with Lifecolor thinners at the moment but i also have some Tamiya paints and thinners which i haven't tried out yet.

OK so for fine detail/shading work i'm going to try 10psi and very thin paint, like you say more control is what i'm after and if it means several passes with the AB then thats not a problem. It did sound odd to me when i watched that youtube vid and he said to mist paint on from afar to shade but what do i know i'm newb at all this. lol

Do you dismantle and clean your AB after every use or just once in a while? I put cleaner/foaming cleaner/warm water through every time i'm finished but i haven't taken it apart yet and cleaned the needle.....should i have?

TTFN Matt
 
Try 10psi but with acrylic thinned with acrylic thinner (which itself is not water thin) you may find its not atomizing fully (coarse dot pattern and/or splatter). If so try 15 or so.

So yea, with those bottles, other than experience, the only way to measure is with pipettes, straws, or premix in separate bottles.

As for shading, if you pre-shade then yea I can see misting the main color to get as even a coat as possible. What works for me, and is mush more forgiving than preshading, is to lay down a base coat of black, or really dark version of your final color, then hit the centers of each panel (or whatever) with the main color, trying hard to only hit the center and build it up and up and up until you are happy with the resultant shading.

As for cleaning, I believe many of the lacquers and enamels folks can get away with just flushing since their thinners are sooooo hot, but with acrylics, even with the best alcohol/glycol ether cleaners, if all you do is flush there always seems to be a micron of paint left somewhere in the paint chamber, so yea I do full break down every time. It may seem like a lot of work at first but it quickly becomes routine.
 

Latest posts

Back
Top