1/144th Prometheus scratch build

Evenin All,


Thanks for stopping by, nice to have you all along for the ride

Finally got to the bench this weekend,

JohnSimmons said:
Very clever mate ;)
Oh and I've been watching Bottom lately while I build....


I've been watching this guy

http://www.youtube.com/channel/UCcBnT6LsxANZjUWqpjR8Jpw

Very Cool

But on with the latest........stuff


Lots to show you so lets get going,

Sanded the primer and re-filled the problem areas

main%2520body%2520017.jpg


main%2520body%2520018.jpg


Moved on to the head assembly,

main%2520body%2520020.jpg


main%2520body%2520021.jpg


Neck spacer


main%2520body%2520026.jpg


main%2520body%2520029.jpg


main%2520body%2520030.jpg


main%2520body%2520033.jpg


main%2520body%2520034.jpg


main%2520body%2520040.jpg


Slotted the head and neck to get the correct dimensions

main%2520body%2520041.jpg


main%2520body%2520042.jpg


main%2520body%2520049.jpg


Shaping the nose


main%2520body%2520053.jpg


main%2520body%2520054.jpg


main%2520body%2520056.jpg


main%2520body%2520061.jpg


main%2520body%2520062.jpg


main%2520body%2520065.jpg


main%2520body%2520067.jpg


main%2520body%2520069.jpg


main%2520body%2520072.jpg


main%2520body%2520073.jpg


main%2520body%2520075.jpg


Made some spacers for the top section for later

main%2520body%2520080.jpg


main%2520body%2520081.jpg


Marked


main%2520body%2520082.jpg


Cut


main%2520body%2520083.jpg


Drilled and finished the edges


main%2520body%2520084.jpg


Threaded tubes through the holes


main%2520body%2520085.jpg


Taped in position on the underside


main%2520body%2520088.jpg


Beauty shots


main%2520body%2520093.jpg


main%2520body%2520096.jpg


main%2520body%2520098.jpg


main%2520body%2520101.jpg


That's it so far

Take care

Gag
 
Ello Every Peeps,

Thank you for stopping by chaps,

Once again lots to show so lets get too it...........


Marked out, cut and finished another underside assembly


main%2520body%2520104.jpg


main%2520body%2520105.jpg


Added some tubing for rigidity


main%2520body%2520106.jpg


Drilled wiring holes in all the brace pieces


main%2520body%2520108.jpg


Re-assembled everything, this time gluing as i went


main%2520body%2520110.jpg


main%2520body%2520111.jpg


main%2520body%2520112.jpg


Taped in position


main%2520body%2520117.jpg


Started on the rear underside body


main%2520body%2520120.jpg


main%2520body%2520121.jpg


main%2520body%2520122.jpg


main%2520body%2520123.jpg


main%2520body%2520125.jpg


main%2520body%2520128.jpg


main%2520body%2520131.jpg


main%2520body%2520132.jpg


main%2520body%2520137.jpg


And in position


main%2520body%2520143.jpg


main%2520body%2520148.jpg


main%2520body%2520149.jpg


Then back to the main section

Some supports


main%2520body%2520156.jpg


Glued to a sheet of 1mm styrene sheet


main%2520body%2520158.jpg


Then wrapped around the spacers to achieve the correct shape


main%2520body%2520163.jpg


Then both sides are trimmed


main%2520body%2520165.jpg


Then more underside supports are added and the edge is finished to this support


main%2520body%2520166.jpg


main%2520body%2520167.jpg


Added a hole for the stand


main%2520body%2520169.jpg


Then some supports for the tapered transition piece


main%2520body%2520175.jpg


main%2520body%2520177.jpg


main%2520body%2520178.jpg


main%2520body%2520179.jpg


main%2520body%2520180.jpg


Then on to the front section


main%2520body%2520181.jpg


main%2520body%2520182.jpg


main%2520body%2520185.jpg


Added a spacer cover because it wasn't pretty but i can hide it later whats important is the basic shape


main%2520body%2520188.jpg


main%2520body%2520191.jpg


main%2520body%2520194.jpg


main%2520body%2520197.jpg


And thats about it for now

Still more to come

So stay tuned

Gagster out
 
Eh up buddy,lovin the progress.. it's really takin shape now,this builds gonna
be epic.....top marks me old cock sparra! ;D
have you counted up the number of lights in this monster?
cheers peza
 
Evening Experts,

I have a very serious question for the brother/sisterhood of all things nerd/geek/fanboy/artist/creator/modeller/prop builder.....thatever.

Today, I watched the movie, .......well, the part's with the ship in it to be honest, because lets be honest,

Prometheus the movie- 0 - Visual Perfection 1

After watching said movie, i did in fact notice, that, the number of flashing or strobing lights on the engines was zero

Now the other last week i had a 50 minute conversation with Mr VooDoo himself, Randy, Thanks mate for bieng so honest
and well, just so cool to chat with. You gave me some ideas and i thought i had discovered my solution, four light units, one per engine with strobes, constants and flashers in a small curcuit board for under $60.

But then I watch the film.

I said that this build was more water pistol than cannon, but i think my lights could be better than the original. Strobe, flashers, markers and enough left over for the power unit.

But the down side is the cost, 5 x $60 is a lot of lolly.

I think reality/cannon i could get away with one, may be two.

Just interested to know what you think?


Gag
 
Eh up buddy,is it possible to have it landed and then there's no dear engine lights?
still have all the bling of the other lights though! peza ???
 
More genius stuff going on here mate! Carry on the good work it's really taking shape now.
 
Thanks for the input chaps


I have just found out that some of my pictures have been deleted, this is obviously, very annoying, but not life threatening so, i'll continue on with what we got,

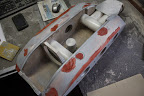
Did this part twice because it was a bit big when done in plastic and not looking so good when dry fit with everything else so I ripped it to bits and started again with foam.

This really is trial and error modelling at its best folks


main%2520body%2520011.jpg


main%2520body%2520012.jpg


Sanded it into shape


main%2520body%2520014.jpg


You can see the nose has changed a bit as well, I put a piece of 1mm to flatten out the top then filled and sanded it to shape, it's now ready for its final coat of epoxy and a good finish sand.


main%2520body%2520016.jpg


Added another strip of 1mm to give a positive front edge, needs to be filled and sanded next.


main%2520body%2520018.jpg


main%2520body%2520021.jpg


Some fat bloke in a mask to give it some scale, she's a big bugger she be


main%2520body%2520038.jpg


And finally a small video 360


[youtube]https://www.youtube.com/watch?v=Ype2b-MoDm4&list=UUHiAjjyN8V35Dg2k-4Fcx1Q&index=1[/youtube]


And thassit for now

Stay tuned

Take care and stay warm friends

Gag

(PS got really chilly here in Miami yesterday, into the low 60's it was :cool:
 
Eh up gagster,sweet update bro!keep them coming,can't wait to start seeing some meat on these bones...
Top job so far,but there's never no doubt with your builds....peza
 

Latest posts

Back
Top