You are using an out of date browser. It may not display this or other websites correctly.
You should upgrade or use an alternative browser.
You should upgrade or use an alternative browser.
Old male armour
- Thread starter Pantherman
- Start date
GaryG64
Well-Known Member
- Joined
- Sep 8, 2022
- Messages
- 2,251
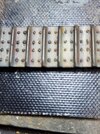
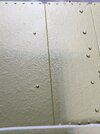
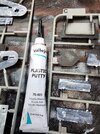
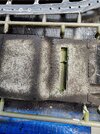
I'm trying a ew style to me which I saw on YouTube. Using Vallejo putty and a little water to thin it out
First step is to paint it over the armored pieces.
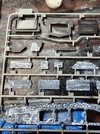
Second, after it has dried is to stiplpe the mixture over the peices.
Third, after that has dried use fine grit sand paper to knock down the bumps just enough to show a rough steel look to the armor.
In my stipple piece it is hard to see the finished part


Last edited:
Pantherman
Well-Known Member
- Joined
- Feb 10, 2022
- Messages
- 3,255
That's a great tip for the gun. I have already refixed it twice due to "manhand" mishaps.I was poking around in mine a little early as well. Guess we'll start on the 7th
I bought the Aber Gun Barrel set for it from scalehobbyist.
View attachment 113359
I went ahead and worked on the guns being as that isn't part of the normal kit. The Aber PE is microscopic. Between the end of the brass gun barrel and the point of the hobby knife there is a spec that is actually the blade for the top of the gun sight. The brass piece above it is one of the four legged brass pieces bent to make a mount for the blade.
View attachment 113360
Even with all my n scale experience I don't think I could work with anything smaller. But it is actually possible to use these. Here is the finished gun. With the site on it
View attachment 113361
After Pantherman (Thanks) mentioned it, I assembled the center section over the side plate.
View attachment 113362
When I mounted the front machinegun, I decided to add reinforcement. I was concerned those two tiny pins on the sides of the gun in the kit wouldn't hold if I accidently hit the barrel. I guarantee my five fingered wrecking ball will hit the barrel on the gun and knock it back inside as soon as I seal it up if it isn't reinforced. I just cut the additional piece from the side of the sprue, and glued it under the receiver to reinforce it.
View attachment 113363
I noticed the same drive wheel issue in my kit. Mine also had some of those pins broken. After studying the kit I realized it was a Mark IV kit with some additional parts for Building a Mark 1. There appears to be quite a few extra parts in the Takom Mark 1 kit. There is a set of Mark IV drive wheels that are not used people can steal the pins off of if needed.
Here's the Mark 1 on the right and Mark IV on the left. I put the broken pin on the left on the drive wheel on the right.

Loving the details on the gun barrel, it's such a pity that most of the interior is hidden. I think I am going to try making one side pod removable so that I can spray up the inside to show off the kits excellent details.
Glad the template tip was helpful. Pantherman
Pantherman
Well-Known Member
- Joined
- Feb 10, 2022
- Messages
- 3,255
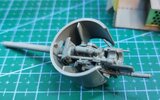
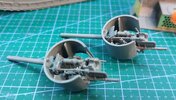
These turret guns are a bit fiddley, pity they don't show on the finished build.Also a little warning to others. The spokes on the track drive wheels are very fragile, several of mine were bent over flat but still just barely attached.
I CA glued them back upright apart for one which must have broken off and into the bag that the sprue was in. So check your bags before they get bined.
I had to make my missing spoke, no biggy, but annoying. Pantherman
View attachment 113357
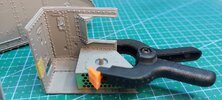
With the side pod I found that jumping ahead a few steps to use other parts as guides worked well when it came to fitting it all together later on. Pantherman
Pantherman
Well-Known Member
- Joined
- Feb 10, 2022
- Messages
- 3,255
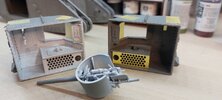
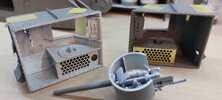
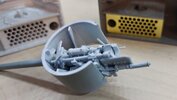
I have made up the other side pod and decided to paint the interior of one of them just to say that I did it.These turret guns are a bit fiddley, pity they don't show on the finished build.
With the side pod I found that jumping ahead a few steps to use other parts as guides worked well when it came to fitting it all together later on. Pantherman View attachment 113391View attachment 113392View attachment 113393View attachment 113394View attachment 113395
I have been trying to find a way to fit the painted pod so that I can remove it in the future but it's fixed to the hull by a tiny recessed rim. Anything I add to make a flange all the way around the pod so that it slides in will ruin the interior.
Might just have to give up on the idea. Pantherman
Pantherman
Well-Known Member
- Joined
- Feb 10, 2022
- Messages
- 3,255
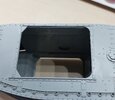
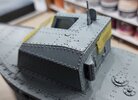
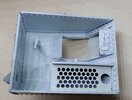
I have done some photos of the problem. It's all still in need of some sprue goo and cleaning so don't be to harsh about the finish.I have made up the other side pod and decided to paint the interior of one of them just to say that I did it.
I have been trying to find a way to fit the painted pod so that I can remove it in the future but it's fixed to the hull by a tiny recessed rim. Anything I add to make a flange all the way around the pod so that it slides in will ruin the interior.
Might just have to give up on the idea. Pantherman
View attachment 113414
View attachment 113415
View attachment 113416
Also the lids haven't been fixed yet until the guns go in first.
 Pantherman
GaryG64
Well-Known Member
- Joined
- Sep 8, 2022
- Messages
- 2,251
Looking pretty darn cool!!These turret guns are a bit fiddley, pity they don't show on the finished build.
With the side pod I found that jumping ahead a few steps to use other parts as guides worked well when it came to fitting it all together later on. Pantherman View attachment 113391View attachment 113392View attachment 113393View attachment 113394View attachment 113395
GaryG64
Well-Known Member
- Joined
- Sep 8, 2022
- Messages
- 2,251
Thank you Mike. This is a fun model... so far lol.That looks really cool!
I just hope there aren't any hiccups along the way or my ever so common habit of loosing a tiny, but important part.
GaryG64
Well-Known Member
- Joined
- Sep 8, 2022
- Messages
- 2,251
I would like to build a trench diorama with a few soldiers in the trench possibly installing planks, and a couple of soldiers next to the tank. I don't know if I would be able to pull it off. Lots of wood planks lining the walls of the trench and raised wooden walkways.
I will need to start drawing it out to plan this massive build.
Or just a couple of soldiers next to the tank on some summer grass.
I will need to start drawing it out to plan this massive build.
Or just a couple of soldiers next to the tank on some summer grass.
GaryG64
Well-Known Member
- Joined
- Sep 8, 2022
- Messages
- 2,251
GaryG64
Well-Known Member
- Joined
- Sep 8, 2022
- Messages
- 2,251
No problem. ThanksSorry, cannot help as never built this, but very nice work!
MystRacing
Active Member
- Joined
- Nov 7, 2023
- Messages
- 56
I have a Takom Mark IV kit with a full interior. I'm planning on using the sponson cranes and trailer with that model to made a diorama with the sponson removed. The guns are so nice it is a shame to hide them but it would be a huge project to scratch build something for this kit.
I'm planning on building this in the basic Gaza Sania Desert Scheme. Doesn't make sense to me to put the cranes on the top as they would have been removed before leaving wherever the sponsons were attached. The rear steering wheels weren't used in Gaza because it was actually later in the war and the only reason the tanks in Gaza were Mark 1's is because they sent the training tanks to Gaza.
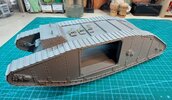
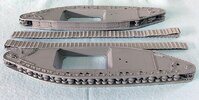
I've done a little more on mine, got the sides and tracks together last night.
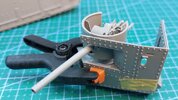
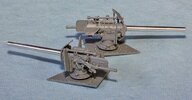
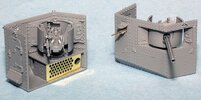
I did the guns with the Aber barrels and got the sponsons this far this morning. The sponsons are definately fiddly IMO. You kind of have to glue it all together at once so you can adjust the panels while the glue still has some flexibility. That way you can move it around a little to square everything up.
I'm planning on building this in the basic Gaza Sania Desert Scheme. Doesn't make sense to me to put the cranes on the top as they would have been removed before leaving wherever the sponsons were attached. The rear steering wheels weren't used in Gaza because it was actually later in the war and the only reason the tanks in Gaza were Mark 1's is because they sent the training tanks to Gaza.
I've done a little more on mine, got the sides and tracks together last night.

I did the guns with the Aber barrels and got the sponsons this far this morning. The sponsons are definately fiddly IMO. You kind of have to glue it all together at once so you can adjust the panels while the glue still has some flexibility. That way you can move it around a little to square everything up.


Pantherman
Well-Known Member
- Joined
- Feb 10, 2022
- Messages
- 3,255
Thanks. PMLooking pretty darn cool!!

