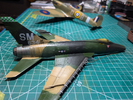
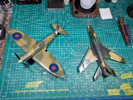
"Century Series" #1 "The Hun" 1/48 from Trumpeter

Fully cured Tamiya X and XF paints are dissolved by ~90% isopropyl alcohol.

Remind me again what "MLT" is?
 
WELL in my opinion i think your paint work looks great but then i had the same probs on my phantom but leave yours be but thats just me
chrisb
 
here are 10-15 layers of paint sprayed extremely thin as if what they call a "filter" that I do as post-shading. I found pre-shading harder to control by the time I came to the end.
I find that a little odd, given that the pre-shading technique depends on what you seem to be very good at: spraying thin layers that don't cover well, so you can control how much of the pre-shade comes through.

Remind me again what "MLT" is?
Mr. Leveling Thinner.
 
I find that a little odd, given that the pre-shading technique depends on what you seem to be very good at: spraying thin layers that don't cover well, so you can control how much of the pre-shade comes through.
Indeed. I think I can explain the dichotomy simply.

I am trying to spray thicker color, while I kind of like the effect of hyper-thin, I am learning the drawbacks. Via the use of post-shading instead of pre-shading I can stop worrying about obliterating the light/dark paint underneath and work the lights and darks in on top after a more solid base layer of pure color.

I'm a long way from getting it down. Techniques are new to me and require a lot more patience than the other method. I do think they'll help me solve my first issue though, if I ever get it right.
 
Pre-shading is not for me. My airbrush skills are not good enough to consistently spray translucent coats, and in any case I don't have the patience to be faffing about with an airbrush for long enough to achieve it. I much prefer spraying a coat that covers well for the base colour and then highlight the panels instead, as I find it requires less effort as well as less technical skill.
 
I think preshading saves little time versus post, but barely. Post shading allows the addition of color variations that risk obscuring the underlying shades. Or, if you make a mistake, it can be corrected with more paint. Plus I've been having trouble with the super thin coats being delicate before getting clear coated.

I've NOT made up my mind, I intend to just keep trying various things until I find the results I want. It is all a give-and-take, effort divided by reward or vice versa.
 
Just showing some updates of my tests with "weathering" the paint off of the rear fuselage due to heat.

1750777053599.png

1750777067319.png

I am playing around with this technique using parts that will end up with little paint left. As I gain confidence those marks will advance forward.
 
HI Edbert i think you need a tad more blue in the fusealage where the burnts section is as when i see the real plane back in the early 70s it was nearly all blues an blacks but just my opinion
chrisb
 
If you look at the pictures of the F-100 in Viet Nam, the burned areas near the exhaust have had camouflage paint applied over the areas previously discolored by heat. When that paint gets hot enough (and the discolored metal is proof that it was hot enough) the paint burns, leaving white, black, and brownish residue, which is what burnt paints leave. Note that in Jakko's second and third pictures, there is no paint on that part of the fuselage.


Write your reply...

Latest posts

Back
Top