1/200 USS IOWA

Hi all, Kevin, great build.... watching and learning as I go.... with notepad and a coffee !

I used to do a lot of modelling years ago and felt I was fairly competant, so now I have a dedicated workshop and more time on my hands thought I would take this hobby up again. I done the Trumpeter F35b 1-32 scale fighter plane and it turned out 'good' - room for improvement but overall very pleased.

So I decided to take the plunge and get the 1-200 Missouri + Pontos detail up kit - I also have the 1-200 Yamato waiting in the wings !!

All is going well so far, apart from one thing that is really bugging me, I'm at an early stage, getting paint on hull etc and started to look at the PE to go on the hull.
There are lots of templates in the Pontos set for a series of 0.3mm holes for individual ladder rungs... I cannot for the life of me figure out how to get a 0.3mm hole in plastic...

I've tried a few options, have all the drill bits imaginable, it's a case of the plastic is to hard & the drill bits are so fragile... any hints or tips/techniques would be greatly appreciated.

Sorry if this is the wrong forum/thread for the question, but like I said, I will be following this with great interest.

Thanks in advance.
 
Welcome to the forum paul-b.
apart from one thing that is really bugging me,
Those individual ladder rungs have really frustrated me. I started at the stern. I broke three .3mm bits, got CA glue on my tweezers, fingers, and a little on the model. I got about eight rungs on, but they weren't perfectly straight like the pictures. So I scrapped them off.
Ordered more drill bits and Tried again on the first level of the super structure. Again no joy, broke half of the new drill bits.
With all the other ladders and stairs on the lower levels I'm going to skip the individual ladder rungs. I'll try again higher up where the individual rungs are the only option.
I'll try not to drill completely through the plastic because thats when I'm breaking my bits, just as it punches through. I'm gonna just drill halfway and try that.
That's the only advice I can offer at this point because I have yet to successfully install those tiny rungs.
Good luck to you, and again welcome.
 
Last edited:
Thanks Kevin, that's useful to know... I did kinda make a rule to myself - If I can't see it, it ain't going on.... The ladder rungs are border line !! I'll give it a go but it's no biggy I guess..

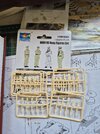
I like the figures, I may have to investigate further... :)
 
ive never painted figures... but it looks like all those will take half as long as the whole build !
 
I was never very good at painting figures in 1/35, my only attempt at 1/16 came out better than I was expecting. On these 1/200s it's just gonna be basic color and hope for the best.

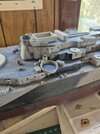
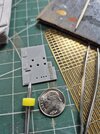
paul-b inspired me to try the individual ladder rungs again. Best result so far, by not drilling all the way through the plastic ( only broke one bit ). I applied the CA glue to the plastic with a toothpick so it never touched the tweezers or my fingers, for the most part. Not perfect, but it might be acceptable, gotta let the glue dry and get some primer on it to know for sure.17472397846688439596208221437297.jpg
 
I was never very good at painting figures in 1/35, my only attempt at 1/16 came out better than I was expecting. On these 1/200s it's just gonna be basic color and hope for the best.

paul-b inspired me to try the individual ladder rungs again. Best result so far, by not drilling all the way through the plastic ( only broke one bit ). I applied the CA glue to the plastic with a toothpick so it never touched the tweezers or my fingers, for the most part. Not perfect, but it might be acceptable, gotta let the glue dry and get some primer on it to know for sure.View attachment 147683
Absolutely the best way to apply PE parts that are too small to handle any other way. Always apply the CA to the plastic part and place the PE and position as needed. You can always use an accelerator or IPA to set the part quickly. You can save small drill bits by using a pin or small sewing needle heated up and pressed into the plastic enough for the PE to have a foundation. If the plastic raises from the heat, simply sand it smooth than apply the PE.
 
Hey Kevin, great effort on the ladders, considering how small they are... top marks. I cut two out the PE and I swear they just vanished, they didn't 'ping' off but I just couldn't find them. Maybe I need stronger reading glasses !!

Dan, what a great piece of advice regarding the needle, such a good tip and one of those 'why didn't I think of that' moments... both of you have inspired me to have another go at this.....
 
HI Kevin love this battleship an how long is the hull ? an how many parts ? an cost if you dont mind me askin ? but if you do then dont answer as i would love to buy one but cant make up my mind on which ship to buy out of the 4 ships an you are doin a great job on yours as im followin your build sir
chrisb
 
Boatman, the ship is 53 1/2 " long. The box says it's 1525 + parts. Add to that the Pontos detail - up kit ....18 sheets PE, 303 pieces of brass. The model cost me just under $400.00, and the Pontos set was just over $400.00.
It's definitely an investment, but hey, you only live once.
 
It's definitely an investment, but hey, you only live once.
Considering the skilled labour, the time out of your life it took to develop those skills, the pure enjoyment/entertainment you (and we) will gain while building the ship, the lasting legacy of the artifact you are fashioning... that's a pretty good deal!
Compare that to the cost for a couple of hours at a concert, or even more ridiculous, good seats at a basketball game.
 
I've done quite a lot of Adult Lego stuff, whilst I love the brand, quality, innovation and technology involved putting the big sets together it is just an exersize in blindly following basic instructions so skill level is really low.
My Missouri + Pontos cost around £750.00 and to do it justice will take a long time + as mentioned gaining a great skill set as well. Spend the same on lego its probably a couple of weeks.
Value for money as far as hours go is an absolute no brainer.

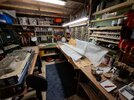
Hopefully a pic below of where the magic happens, just masked up the hull for more paint !!

shed.jpg
 
WELL Kevin she'about 5inches longer than my USS HORNET an thats a nice size as ive just bought 6 shelfs to fit all my models on just got to hope i dont run out of wall lol but you sir are doin a grand job of building this battle wagon as these ships are my faves in the battleship range better i think than the yammy an bissy an tirpy as near everyone builds the yammy an i would love too but when so many are bein built to me it luses it appeal but you keep on a building an i'll follow on as when i see your lady finished i just may buy one but jen says ive got enough kits but i may buy it on the Q/T LOL
chrisb
 
I was never very good at painting figures in 1/35, my only attempt at 1/16 came out better than I was expecting. On these 1/200s it's just gonna be basic color and hope for the best.

paul-b inspired me to try the individual ladder rungs again. Best result so far, by not drilling all the way through the plastic ( only broke one bit ). I applied the CA glue to the plastic with a toothpick so it never touched the tweezers or my fingers, for the most part. Not perfect, but it might be acceptable, gotta let the glue dry and get some primer on it to know for sure.
that turned out really nice. even when they "disappear" after painting , it will be a good detail. hopefully some panel liner will make them stand out. i would look at those every day and smile
 
. i would look at those every day and smile
Yes, I have until it was painted. It really brought out the imperfections and dried glue. It's not washed or highlighted yet.
At least they are in a hard to see place on the finished model.
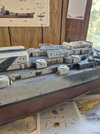
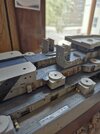
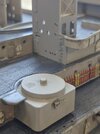
I am satisfied that I got a set of rungs completely installed. I'm really gonna have to up my game on the high vis rungs.17474057741151762038074379812914.jpg1747405919015325752070012719249.jpg


Write your reply...

Latest posts

Back
Top