Your best quick tip/technique/diy
- Thread starter Junkie
- Start date
Jamaicanmodels69
New Member
- Joined
- Apr 17, 2011
- Messages
- 604
Scribing panel lines....... Many tips technique explained
http://s8.photobucket.com/albums/a40/3dimensionalmanagement/Concept%20A-wing/?action=view¤t=013-1.mp4
http://s8.photobucket.com/albums/a40/3dimensionalmanagement/Concept%20A-wing/?action=view¤t=013-1.mp4
adampolo13
New Member
- Joined
- Dec 7, 2011
- Messages
- 2,633
Well, since its starting to get colder... Don't eat yellow snow.... 
kiwi gav
New Member
- Joined
- Sep 8, 2012
- Messages
- 144
LOL adampolo13
Im always on the lookout, posted this earlier today
http://www.scalemodeladdict.com/index.php/topic,7227.0.html
also found some cool paint trays at my local supermarket. They are the trays that hold the deodorants this picture is one that had the roll on variety. the supermarkets will just throw them away, just ask for them I'm sure they will give you heaps. Good for the kids paints also. I haven't tested them on solvents yet, they are thin plastic.
andrei383
New Member
- Joined
- Feb 29, 2012
- Messages
- 506
Hi all, I visited my local hobby shop too pick up some styrene, paint, etc. and noticed a Badger paint mixer tool. It was then i remembered seeing something similar at Ikea and lo and behold I found this:

http://www.ikea.com/us/en/catalog/products/10076320/
Its a milk frother to make the foamed milk for cappuccinos, but i realized it was perfect as a paint mixer. I picked two up (one for acrylic and one for enamel paints) for the ridiculous price of 0.99 Euros each (probably a sale here?)! I found that the heads fit perfectly in the Revell Aqua paint bottles and in the AK Interactive bottles as well! So if you are in an Ikea one day, try looking for these!
http://www.ikea.com/us/en/catalog/products/10076320/
Its a milk frother to make the foamed milk for cappuccinos, but i realized it was perfect as a paint mixer. I picked two up (one for acrylic and one for enamel paints) for the ridiculous price of 0.99 Euros each (probably a sale here?)!
I found that the heads fit perfectly in the Revell Aqua paint bottles and in the AK Interactive bottles as well! So if you are in an Ikea one day, try looking for these!andrei383
New Member
- Joined
- Feb 29, 2012
- Messages
- 506
hi all, with the advent of my new 99 cent paint stirrers (see above), i realized i needed to protect myself from paint splatter when using them thus i came up with this:


basically its a little styrene sleeve which fits over the Revell Aqua paint jars, as you can see it has already saved me a few shirts. ;D i might try to work on one for AK Interactive bottles now...
basically its a little styrene sleeve which fits over the Revell Aqua paint jars, as you can see it has already saved me a few shirts. ;D i might try to work on one for AK Interactive bottles now...
Chris S
Its a bit like being handcuffed to a lunatic !
- Joined
- Feb 14, 2011
- Messages
- 4,573
Trying to paint a figure without a proper holder/vise can be frustrating . Well here's a quick any easy solution .
Drill and pin either one or both feet ,if the figure is kneeling ,drill the knee in contact with the ground ,same for sitting etc ,drill and pin the contact area .
Use a cocktail stick or paper clip depending on the size of the figure . Leave a good length on the pin for now .
For smaller figures (54mm) etc Get an empty Tamiya jar , fill it with Blu tak , silly putty or plasticine ,drill a hole in the top the same diameter as the pin/s ,Now cut your pin so it reaches near the bottom of the jar And simply push the figure down onto the top of the jar , the plasticine / silly putty will hold the pin and secure the figure.
If you want ,put a small drop of CA on one foot just to be sure ,it can easily be popped of with a sharp blade later .
For larger figures ,just use a bigger jar /container

If you're worried about it falling over use Spud's tip on widening the base
Chris.
Drill and pin either one or both feet ,if the figure is kneeling ,drill the knee in contact with the ground ,same for sitting etc ,drill and pin the contact area .
Use a cocktail stick or paper clip depending on the size of the figure . Leave a good length on the pin for now .
For smaller figures (54mm) etc Get an empty Tamiya jar , fill it with Blu tak , silly putty or plasticine ,drill a hole in the top the same diameter as the pin/s ,Now cut your pin so it reaches near the bottom of the jar And simply push the figure down onto the top of the jar , the plasticine / silly putty will hold the pin and secure the figure.
If you want ,put a small drop of CA on one foot just to be sure ,it can easily be popped of with a sharp blade later .
For larger figures ,just use a bigger jar /container
If you're worried about it falling over use Spud's tip on widening the base
Chris.
Grendels
Active Member
- Joined
- Nov 24, 2009
- Messages
- 9,092
Chris S said:Trying to paint a figure without a proper holder/vise can be frustrating . Well here's a quick any easy solution .
Drill and pin either one or both feet ,if the figure is kneeling ,drill the knee in contact with the ground ,same for sitting etc ,drill and pin the contact area .
Use a cocktail stick or paper clip depending on the size of the figure . Leave a good length on the pin for now .
For smaller figures (54mm) etc Get an empty Tamiya jar , fill it with Blu tak , silly putty or plasticine ,drill a hole in the top the same diameter as the pin/s ,Now cut your pin so it reaches near the bottom of the jar And simply push the figure down onto the top of the jar , the plasticine / silly putty will hold the pin and secure the figure.
If you want ,put a small drop of CA on one foot just to be sure ,it can easily be popped of with a sharp blade later .
For larger figures ,just use a bigger jar /container
If you're worried about it falling over use Spud's tip on widening the base
Chris.

Thanks! For a project I want to do very soon, this will come in handy!
andrei383
New Member
- Joined
- Feb 29, 2012
- Messages
- 506
When sanding plastic, resin, etc. it is common that your sandpaper, sanding stick, or file gets clogged up with the dust. Many of us simply throw these away when they get clogged and use a new one, but they usually still have quite a bit of life in them.
To renew your abrasives, try using a regular white eraser:

Just rub the eraser and it should dislodge and clean away all the dust:

And voila! its not 100% clean, but it will sand more efficiently than when clogged!

Over time your abrasives will wear out and it will be beneficial to replace them, but this should hopefully get more life out of your abrasives! ;D
To renew your abrasives, try using a regular white eraser:
Just rub the eraser and it should dislodge and clean away all the dust:
And voila! its not 100% clean, but it will sand more efficiently than when clogged!
Over time your abrasives will wear out and it will be beneficial to replace them, but this should hopefully get more life out of your abrasives! ;D
Elm City Hobbies
Active Member
- Joined
- May 7, 2009
- Messages
- 3,239
Awesome tip! Thanks Andrei!
Jurasikfrank
What a piece of junk...
- Joined
- Mar 25, 2012
- Messages
- 184
Great tip.
Thanks!
Thanks!
Ian
Member
- Joined
- Aug 29, 2012
- Messages
- 910
I've been using a toothbrush to do the same thing, but the eraser is a great idea.
Here's a great way to mask round items: a draftsman's circle template.
Been using this to either mask the item to be sprayed, or to help cut the appropriate size from masking tape.
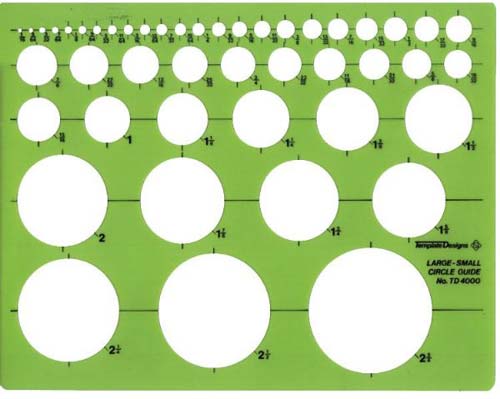
An example after painting...

Here's a great way to mask round items: a draftsman's circle template.
Been using this to either mask the item to be sprayed, or to help cut the appropriate size from masking tape.
An example after painting...
Subhuman1
New Member
- Joined
- Aug 7, 2012
- Messages
- 237
andrei383 said:When sanding plastic, resin, etc. it is common that your sandpaper, sanding stick, or file gets clogged up with the dust. Many of us simply throw these away when they get clogged and use a new one, but they usually still have quite a bit of life in them.
To renew your abrasives, try using a regular white eraser:
And voila! its not 100% clean, but it will sand more efficiently than when clogged!
Awesome tip!
Elm City Hobbies
Active Member
- Joined
- May 7, 2009
- Messages
- 3,239
Dusky said:Not so much a quick tip as a warning, but you can knock over jars of Tamiya liquid cement... :-\
Yup.....been there, done that....many times!
mr lucky
Active Member
- Joined
- Oct 14, 2012
- Messages
- 148
I like to use Removable Mounting Putty for many things! There are several on the market, I like the gray stuff. I use it a lot for test fitting, quick mock-up builds, holding parts for painting, I've even used small balls to hold small parts while gluing. Even when it's been used for painting and has some paint on it, a quick kneading and it's ready to go again.

Erik
Erik
Similar threads
- Replies
- 1
- Views
- 360