Youli's Millenium Falcon from the Rebel Base diorama kit

YOULI

That which does not kill us makes us stronger !
Joined
Nov 28, 2011
Messages
947
It's a bit odd since everybody build a big MPC kit, the Fine molds kits or even the big Revell one... But I've got a small kit for years begging for a better look, this kind of model kit that is great for kids but is in desperate need of conversion.

That's why I decided to build, with your support guys, the Millenium Falcon from the Rebel base kit.
You may remember it, it's a 3 parts kit included in a diorama, snap together kind of kit actually. I built the Hoth battle years ago but never actually did this one.

Some images.


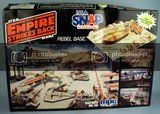
Now you remember or even know where this kit is from... It's amazing how small the figures are, but you can see who they are. Beyond that, don't know why there is a Darth Vader, alone, here. MPC and Airfix seemed to love diorama with multiple timelines, it's the same with the Jabba's palace... And what are those Y wing ? Why can't the make them accurate, it's not that hard. The Rebel transport is fine, and big but really need modifications too. All in all an approximative kit for an approximtive and children playground thing. One can see some potential here though. I sure will give it a try.
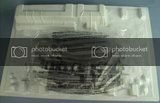
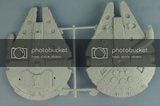
Concerning the Falcon. It's small, it lacks a lot of details, especially engines and sides panels, not to mention the landing gear...
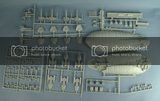
It's quite challenging, all right, but I gathered a number of kit parts, a lot of ideas to make this piece of junk the fastiest starship in the galaxy.

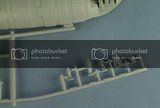
Don't know yet if I will detailed and make a cockpit. Don't know yet if I'll make it with landing gears for a display in the rebel base, or in flight in an asteroid field for example (fought of doing the asteroid worm but at this scale it would be a too big monster to do the trick), it will depend in if i'm doing it in time or not.
The only thing I know is that I will not, repeat, i will not light it. Too much trouble, too much consuming time, really not good at this kind of exercise, and due to the scale it would be better to use fiber optics or very small leds... Don't have money, or time, for it. Sorry about that.
 
Ok, now here is the beast... Thing... Falcon kit parts ! :D


I used it years ago to try some paints, and inks and such... Shame on me, but that doesn't matter. :D
I will, obviously, cut the trenches, replace it with small kit parts but most of all I need to get rid of the raised details on the hull and add the two landing gear panels.
The cockpit need to be redetailed, or even scratchbuilt entirely.
The engines won't be a problem since I like to use some objets i found on the floor (wires and stuff), outside, to detail my kits. Will try to find the english term for it (in french it's "serre-cable", very useful for my detailing)
The exhaust grill will be replaced by photoetched parts from Dragon miniatures, 1/144 tanks.
the Escape pod will be replaced by F-18 1/72 thrusters.
I already gathered a number of turrets from 1/700 battleships for the guns.
The dish is the original one, but I found some potential remplacement parts.

Cant' wait to show you the progress on this project. :D


Just for fun, the two parts seperated just to show you that the parts that allow the two parts to be reunited are supposed to be the landing gears. 3 little plastic trees... The interior is not looking good. It's a tough little ship all right, thick and all..; But that's OK since I need to sand some raised panels and details, I need it to be ready for this kind of operation.

 
Like a challenge, eh, Youli?
That "kit" brings back memories. Especially of those hideous "Y-wings"
 
I don't even remember seeing any Y wing in the Hoth Hangar in the movie. One X-wing I think, a lot of Snowspeeders... Well, logically they had those Y wing somewhere, but not that many and not that awful :D
 
Not much to show but there is the first steps of the detailing i'm planning for...

For the time being, cut the edges is quite a challenge, it's thick and sometimes it broke. The bits will not be re-used after that i'm afraid. The cockpit is cut away for further use and modification.


Kit parts gathered for years... I will not use everything, but it will be useful one day or another. Got a lot of projects on my hands.


Here is a F-18 or maybe F-4 thrusters taken from a 1/72 model kit. It will be used to replace the "escape pods" of the Falcon.


Then I tried to heat some clear plastic, taken from some product, a cloth ? Shoes ? Who cares... It's there and it's useful for what I'me going to do. With a lighter, the plastic is soften and I can do several "print" of the cockpit, to have the correct canopy shape.


If my attempt to do the cockpit this way is nos successful, the impliest manner is to cut a clear plastic of the right shape, like here with a plastic from a package surrounding neoprene glue.


By the way, don't even know if i'll use it for the Hoth Diorama, an Asteroid pursuit... Making from it the "blue strings" version from Revenge of the sith can be an elegant choice.
 
Thanks for the link.

Don't think I would do that this way or even try to do it... Fortunatly i've got some extra snowspeeders, and the X-xing that doesn't look good on the Hoth Battlefield. :D
 
Looking good Youli! This kit looks like a fun build and was made to be acqurized, and you're doing a great job of it. That's what I like about the old MPC/Ertl/AMT kits, there's so much potential for the builder to be creative.

Keep going!
 
I can't agree more !

It's more than that with Revell... Some weathering and you're good to go. And if you're a serious modeler there is always the modification and paint job to do.

I continued to sand the edges, adding two small details in the Mandibles and taking a firemen ladder to do the engine part. I have to sand a little more on that part too, in order to fit and have the right thickness and shape of the Falcon.
 
Some pictures, since I can show you my very little progress on the Falcon.

I used my dremel to sand down the thicknes of the two big parts hull. Some details has been scribbed, I've got to make square holes with a hot screwdriver (after sandring the raised detail it should be clean).
But I made the engine part with the Ladder, and a thin plastic part plus the "serre-cable" (really sorry, don't know the word in english, it's a very useful plastic strip used in many jobs, including construction or security :D). Here is the result so far.


The part I always use on my kitbash is semi-transparent and I put it in the interior side, after adding blue color with a pen.


May I choose to light it up, it could proove to be useful, all right...


For the cockpit, gathered few parts but already glued in place a piece of a... Plastic coffee spoon.


Need to sand a little the "radar dish" too...
 
I use whatever I can find and it's quite something... Need some thinking and memory (AKA like scanning all the kit parts I've got of all my kit).
Did glue some Train parts on the rear, but broke the blade of my tool. Need to find the replacement ones, and that, my friends, will be another kind of challenge. ;)
 
Found the replacement blade... Happy ! ;D
 
I can't believe this! I actually had this kit when I was a kid! Can't believe I forgot about it. Wow, what a cool thing to be reminded of.

I loved that rebel transport. Wonder what happened to it...

Well, YOULI, this is a fascinating project. Look forward to seeing more. :)
 
Actually I worked a little on it, scribing here, scribing there... Not very good at it. And testing a method or two to do the square holes between the armor plates. Hot screwdriver, punch hole, simple scribbing...
I can't do any pictures of that without the proper light.

And I added a H profile plastic file on the engine. Far better than before.

The sad part is that even though I found my replacement blade, I can't fix this since the screw in the tool is broken... My screwdriver has ruined it and I need to get rid of the screw maybe piercing it with my dremel, rally don't know. Anyhow...I'm screwed... :(

I'm going to the mountains, in the south of France, near Spain, Pyrenees.
Fresh air, snow, good people and good food will help me to charge my poor Parisian batteries of mine.
Will get my Millenium Falcon along with me, scribbing will be a long phase, and adding details here and there don't need too much material.

BTW the cockpit is on his way too. ANd maybe (maybe...) simple lighting with a little led christmas decoration. :D
 
Didn't touch it for months and then sudenly, in my little casa in the Pyrenee mountains in the south of France, I gathered the small parts took for the occasion.
And glued.
And cut;
And I'm very satisfied with the result so far, the lighting is delightful.

Can't wait to share this with you guys. But Photobucket is out for the moment. I'll have to be patient. And resume my building of this small Millenium Falcon. :)
 
Wow, Youli, I really thought you might have binned this project. Glad to see I was wrong.

Looking forward to seeing what you've done! :)
 
eh up buddy,lovin ya mods on ya falcon,i`d like to watch this build with alot of interest,keep up the good work mym8
 
Thanks Peza... :)

Back to the Pyrénées, once again. ;)
Didn't post anything for a while, sorry. But I did worked on the Falcon, a lot, some trench-parts are finished glued and painted. The engine part is done and well done.
That's why I did manage to do some electric discovery :)
In fact, my girl friend gave me a christmas light, with batteries, with blue lights. The led are protected by a socket but when you remove it you can access the contacts. That made me think about one solution to have another color lights in the falcon. A white or yellowish light.
I found a led in my leftovers parts, tried it. It works !

Now I will try to print a tiny mini cockpit interior and hide the led in order to illuminate it in a subtile manner.


Here is what the blue lights do in the engine area. Good isn't it ?


The more I think about it the more I believe that the elegant way to expose this Falcon is to do it outside the Hoth hangar (no need for engine lighting here), in a different diorama.
I first thought of the Asteroid filed pursuit and then I remember the Death Star interior Chase. It's just perfect !
This way I can lead the wires on the edge, dissimulated by the many pipes around, the diorama itself shouldn't be that difficult to do (straws, i've got a lot of different plastic trees, runners, that can do the trick).
I'll see if surounded it by X wings and Tie fighters is needed or not (Tie fighter may not be difficult to do, but the X wing from the rebel base, are to be transfigurated, and lighted too, with pink or red leds for the engines).

Stay tune ! :)
 

Latest posts

Back
Top