Weld Seams Using Epoxy Putty?
- Thread starter Alkosh
- Start date
I have something, the only photos I have to hand are my first attempt - it was gaming terrain rather than fins scale modelling however with a bit of practice I got it down to something reasonable on my models as well.
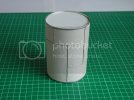
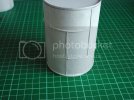
For context - I was converting some simple cans into "tanks / silos" that were then heavily weathered.
My philosophy when making terrain / dioramas is that if someone can obviously see what it's made from, it's not good enough!
A few key points from my attempts;
1. roll out milliput on a CLEAN surface- making such thin rolls it will pick up any dust or contamination and be difficult to apply. Also, make sure the rolls are uniform.
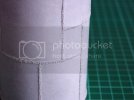
2. I found making a slight seam for the roll of milliput to "sit" into makes it so much easier, thin sausages of the stuff have a mind of their own! (ok, so the gaps in my photos are a bit big, but the end result was ok-ish for what I was trying)
3. Don't press too hard, (some of my example a bit too pronounced) - it doesn't take much to "suggest" the weld beads. Also, I found it a bit easier when the milliput had started to cure so that it wasn't as soft.
4. The milliput can be smoothed before it sures with an old water-damp brush to smooth it a bit - very useful to get different effect.
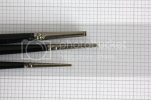
5. I used home made tools - very easy to make and modify to suit what works.
Those in the photo are obviously old paintbrushes.
i. Remove bristles flush with end of ferrule
ii. Scoop out bristles / glue with a drill bit or similar to 1-2mm deep (don't need more)
iii. File end to angle that works
iv. Polish and smooth off metal (2000 grit + cloth and polish compound or buffing pad) - important so that there arn't marks transferred to the milliput.
Since the brush has a chromed brass ferrule, it is really easy to shape because it's soft. Comes ready with a handle fitted!
Alternatively, most people have brass tubes etc. handy - however these may need the end thinning a bit to give a soft edge rather than the blunt end of a cylinder.


Just thought of something else- don't use too much milliput, ideally the tool diameter should be larger than the milliput bead to avoid it squidging out like in my photo... :-[
Note: I cannot find the site I read the article this is derived from, if I recall correctly it was targeted by hackers and destroyed beyond repair in the owners view. So, credit to Anonymous Modeller somewhere for the idea several years ago 8)
Note: I cannot find the site I read the article this is derived from, if I recall correctly it was targeted by hackers and destroyed beyond repair in the owners view. So, credit to Anonymous Modeller somewhere for the idea several years ago 8)
Elm City Hobbies
Active Member
- Joined
- May 7, 2009
- Messages
- 3,241
You can do this with Milliput, Greenstuff, Aves, etc, etc.
Another way to do it is to get some .020 Evergreen rod, lay it where you want and add some liquid cement (Tamiya, Tenax, etc, etc). The styrene is thin enough that the cement will soften it enough that you can use the tools to impart the weld bead on to it.
Another option if you want to spend the money, Archer Transfers make weld beads, basically resin printed onto a decal background. Apply just like any other decal to the plastic before you paint.
Similar threads
- Replies
- 9
- Views
- 785
- Replies
- 58
- Views
- 3K
- Replies
- 0
- Views
- 1K
- Replies
- 15
- Views
- 5K
- Replies
- 22
- Views
- 5K
