Thanks so much for watching. Really appreciate it....some serious physician/modeler crosstalk going on there!hope you were referring to the model and not a patient!
Seriously though, Doc, build looking great.
Trumpeter's SBD 3- Dauntless (as flown by Lt. Cm Richard H Best)-Work in progress
- Thread starter docsudy
- Start date
Airborne01!
Active Member
- Joined
- Apr 22, 2025
- Messages
- 122
You asked what we thought - I think I love it!There are a few things that come to my mind about this build and Trumpeter models compared to Tamiya. The instructions on this model falls way short when compared to Tamiya's. The lack of detail and often very weak diagrams makes this build at times quite difficult. Secondly trying to get all the wonderful detailed parts of the front office together and then close the fuselage halves is very daunting!. Trumpeter uses these cross bars or struts to lock in and support the two halves of the fuselage. After about a good hour or so of frustration the answer came to me with the use of a delicate and measured use of my plastic snippers. Off went a strut or two and problem solved. ! The other challenge was in building the rear gunners' seat, harness and gun itself was again the lack of clarity in the instructions. Its a very fragile piece. I realized that if I glue it into to place now, it will certainly break off then masking off the cockpit prior to painting the bird
all the best
DocsudyView attachment 151330View attachment 151331View attachment 151332View attachment 151333View attachment 151334View attachment 151335View attachment 151336
Steve
Edbert
Well-Known Member
- Joined
- May 16, 2024
- Messages
- 1,585
I would have done the same. This is one of the joys and frustrations of radial engines IMO. I had one where multiple exhaust ports had to come out within multiple openings in the cowl flaps, they fit, but they were not centered in those openings. I had to remove the end that connected to the cylinder heads completely and glue them into place where they'd fit those openings. No way to see the internal end was just floating in open space, you could only see the end that stuck out.I realized no one could see the exhausts and I would glue external exhaust pipes coming from the engine and no one would notice the difference.
Thanks for the updates, it is looking great!
- Joined
- Dec 1, 2024
- Messages
- 371
Dampened paper towels also work. Any of these "stuffing" methods do need to be removed as soon as you are done painting, or the paint can bond them to the model. They can always be replaced as necessary, later. (Learned that the hard way.)I once saw a experienced modeler post in a forum the use of thin foam sheets when cut to specific shapes then literally stuffed into position making a nice seal with the margin of the cockpit or opening
Littlemarten:
Thanks for checking back in. Your support and encouragement are truly appreciated!! Your experience with dampened paper towel is a good one. While I am now expert in the matter I can tell you when using this foam technique in my experience of three builds ( assuming the foam is not too dense ) that the foam does not usually adhere to the model unless completely saturated or soaked in paint. I have left the foam in right up till then end when I am installing the cockpit glass with out any problem. I did have a problem in finding foam. Went to hobby lobby they had some and also found some foam on Amazon which is what I am using now!.
So now on to little bits and preparation for black basing then painting.
All the best
Gary
Docsudy
Last edited:
Hello Edbert:I would have done the same. This is one of the joys and frustrations of radial engines IMO. I had one where multiple exhaust ports had to come out within multiple openings in the cowl flaps, they fit, but they were not centered in those openings. I had to remove the end that connected to the cylinder heads completely and glue them into place where they'd fit those openings. No way to see the internal end was just floating in open space, you could only see the end that stuck out.
Thanks for the updates, it is looking great!
Thanks so much for following my build. Your comments and encouragement mean a lot to me. Thanks so much!!
Glad you approve of my solution for the exhausts with the cowling openings.
Will keep posting, please keep following.
As always your comments and suggestions are always welcomed.
best
Gary
Docsudy
Airborne01You asked what we thought - I think I love it!
Steve
Thanks so much for checking in and following my post. Your words of encouragement are very important to me. Thankyou!
Please keep following and as always your comments and suggestions always welcomed!
All the best
Gary
Docsudy
Thank you so much for your wonderful comments. I really appreciate them. Your encouragement is inspiring to me to keep going and to do the best that I can. Please keep watching. I really appreciate your interest. All the best.Really beautiful work! Painting is incredible, and I was especially impressed with the seat stiching on the gunners seat back... that really jumped off the page at me. Your work is inspirational. Thank you for sharing!
Gary
Docsudy
Thank you so much. Coming from an experienced modeler such as yourself, your comments a lot to me. Thank you so much for watching and keep checking in. Really appreciate.Excellent work on this
my favorite WWII plane
I built the Flyhawk 1/72 and that was one of the most detailed 1/72 kits I had built, but of course only so much can be done at that scale
this one has some impressive details
Best
Gary
Docsudy
Hello friends.
Hope you have been well. I return again with posting more recent work on the Dauntless SBD 3 bomber as flown by Richard Best. Have not made as much progress as I would like but it is summer time with lots of distractions. Since my last post I have secured the
engine and cowling to the fuselage. After this I sprayed the entire plane in Mr Color 1200 black. This was the first step in black basing the plane as previously described by a well known modeler.
I then turned my attention to spraying the undersurface or ventral surface of the fuselage in small controlled bursts to make a mottled appearance . This will then be followed with thinner layers to give the tonal variation which this technique can offer.
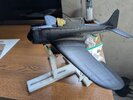
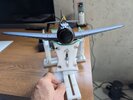
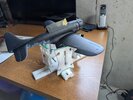
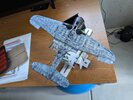
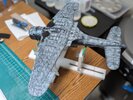


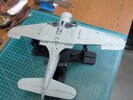
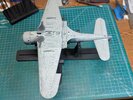
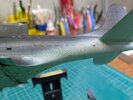
I was able to get to some painting on the Dauntless. It may not seem much particularly in this summer heat. I was able to cover up the initial mottling paint layer on the lower surface of my bird with multiple layers of heavily thinned light sea grey by Mr Color C363 (5:1 thinner to paint) to give me that subtle tonal color variation I was hoping for. I am not sure if my photos demonstrate it well but it did allow the panel lines etc. to show well without any panel line wash ( which will be added later on).
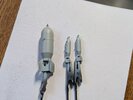
I painted the bombs light sea grey but kept the surface somewhat rough as this was the practice as I understand in mid 1942 by the USN in the pacific. I plan to paint the fins and bomb pins aluminum probably with Tamiya aluminum as it paints well by both airbrush and by hand .
Now on to lay out the border between light sea grey and Blue Grey Mr Color C367 using silly putty of blue tac and begin the process on the upper fuselage. More to come. Please stay tunned!
All the best
Gary
Docsudy


