Satyr's DeAgostini Millenium Falcon Build
- Thread starter LrdSatyr8
- Start date
LrdSatyr8
Member
- Joined
- Dec 21, 2012
- Messages
- 765
And so the painting has begun! I split the painting into two parts. The back half I started painting the panels. The front half I started experimenting with some weathering. I tried several different methods and if I wasn't happy with the way it came out I would wipe it off and start again. I finally settled on a Water Color wash of sorts.
Basically just black water color thinned down to water consistency. Brushed over the surface and allowed to dry for a short time (enough to let it seep into all the nooks and crannies) then wipe it off with a paper towel. I used Tamiya Weathering Pastels to makes the oils streaks along the bottom. I think the effect came out looking pretty good. What do you think?


Now, on the back half, I decided to do the "hairspray" method for the panels. I masked each panel off and began by painting each with a coat of hairspray. The kind I used doesn't matter, its just the bargian bin pump bottle, not the aerosol. Reason why is that you can unscrew the pump top off and pour the hairspray into your airbrush and use it like paint. I let it dry completely overnight then started painting each panel the proper color. I'm using the DOA Falcon Acrylic Paints... great paint set!


Now I let the panels dry completely overnight. When the paints had cured, I went over each one with a water wet Q-tip and wiped it over each panel. I let that set for a few moments and then I took a toothpick and gently scratched the edges of the paint off. Some places were a bit more "weathered" then I liked, so I just touched them up with the same paint and started over. You can't use a paint brush with this method. You should only use a airbrush. Using a paintbrush will cause the hairspray to soften and will gum up the paint and look horrible then you have to start over from scratch (trust me, I KNOW! LOL). In any event, here's what the panels look like when done!


To be continued...
Basically just black water color thinned down to water consistency. Brushed over the surface and allowed to dry for a short time (enough to let it seep into all the nooks and crannies) then wipe it off with a paper towel. I used Tamiya Weathering Pastels to makes the oils streaks along the bottom. I think the effect came out looking pretty good. What do you think?
Now, on the back half, I decided to do the "hairspray" method for the panels. I masked each panel off and began by painting each with a coat of hairspray. The kind I used doesn't matter, its just the bargian bin pump bottle, not the aerosol. Reason why is that you can unscrew the pump top off and pour the hairspray into your airbrush and use it like paint. I let it dry completely overnight then started painting each panel the proper color. I'm using the DOA Falcon Acrylic Paints... great paint set!
Now I let the panels dry completely overnight. When the paints had cured, I went over each one with a water wet Q-tip and wiped it over each panel. I let that set for a few moments and then I took a toothpick and gently scratched the edges of the paint off. Some places were a bit more "weathered" then I liked, so I just touched them up with the same paint and started over. You can't use a paint brush with this method. You should only use a airbrush. Using a paintbrush will cause the hairspray to soften and will gum up the paint and look horrible then you have to start over from scratch (trust me, I KNOW! LOL). In any event, here's what the panels look like when done!
To be continued...
LrdSatyr8
Member
- Joined
- Dec 21, 2012
- Messages
- 765
I got all the panels painted... still need to do some more weathering, but it's coming together nicely. Here's all the panels painted now. Also did the water color wash...


Now that the main bottom hull is painted I can now finally begin to put the greeblies on. Now she's starting to look like the Falcon should!")


Also notice, I cut the areas between the engine vanes to separate them and give them a more natural feel. Will sure be glad to finally get this part finally done so I can set it to the side and work on the top! What do you all think?
Now that the main bottom hull is painted I can now finally begin to put the greeblies on. Now she's starting to look like the Falcon should!
Also notice, I cut the areas between the engine vanes to separate them and give them a more natural feel. Will sure be glad to finally get this part finally done so I can set it to the side and work on the top!
What do you all think?LrdSatyr8
Member
- Joined
- Dec 21, 2012
- Messages
- 765
Thanks guys... glad you're enjoying the build... here's my latest update:
Just like many of you, I have been watching other's build this same model kit with awe and amazement. I've watched how some people tackle a particular problem with detail or inaccuracy and think to myself why didn't I think of that. I've seen some fantastical elaborate ways of solving problems that come out looking extremely incredible... but I think to myself why go thru all that trouble. Well, here's my solution to a problem with the blaster holes on the top hull behind the radar dish.
I don't know why, but it seems as if the scan of those "bullet holes" came out as indentions. Almost as if they are some kind of computer artifact that the computer couldn't quite interpret and just said fudge it and made them all even. Now, I've seen some builders actually cut these holes out completely, use a soldering iron to melt the plastic, burn the plastic... heck... I've even seen some people replace the entire panel itself with their own scratch built part. The problem they all run into is the metal framework behind them. You could cut the framework or try to work around it. Me... my solution doesn't damage the plastic panel or the framework at all. All it takes is a little Epoxy Putty (also known as Apoxie Sculpt, Aves, Magic Sculpt, or any 2 part Epoxy Clay Compound that you mix equal parts together and it hardens by itself)!
Here's the panel I'm talking about...

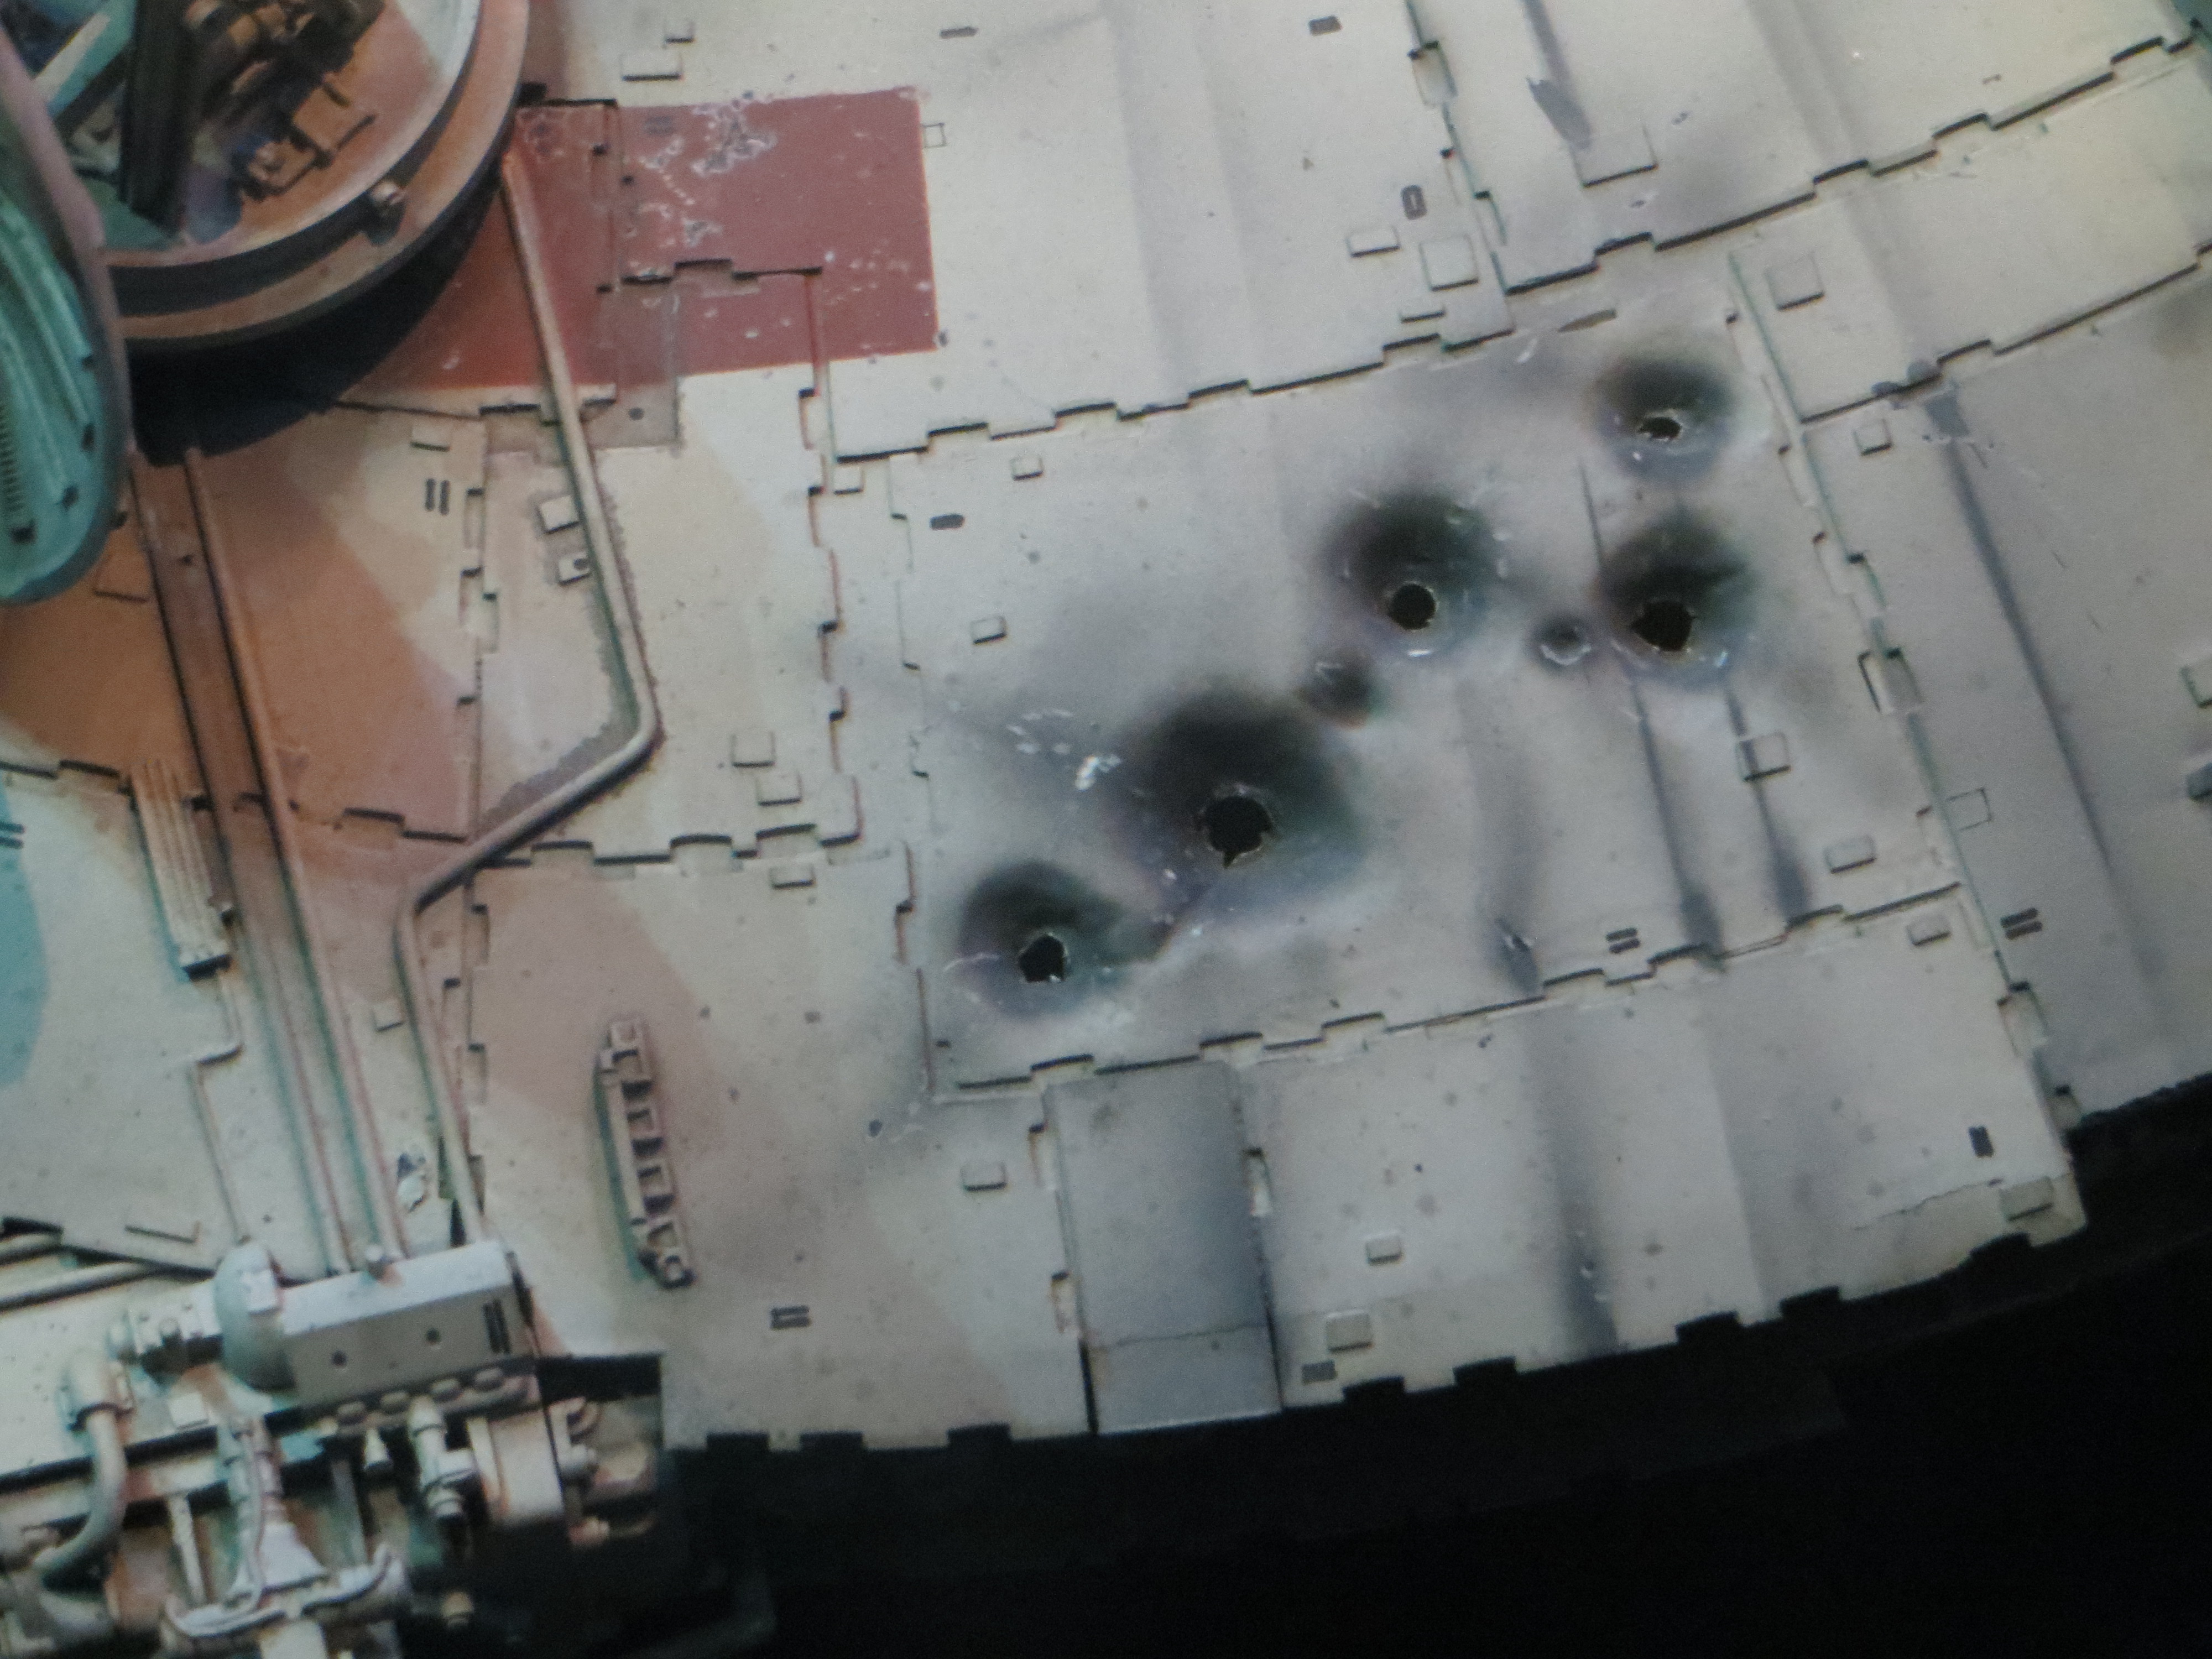
Now notice how nice and symmetrical these blaster holes are? Even thou all the "holes" are in the proper place and position... they don't look anything like they should on the actual prop here (image of the actual prop on display at Star Wars Identities in France photographed by Jean-Marc Deschamps & Olivier Cabourdin)...
So here's my method... take a small ball of putty and place it into the hole.

Squish it down until it fills the entire hole...

then wet your finger and make a depression or dimple in the putty. Smooth it out so that all the edges are even with the top edges of the hole and then take a hobby knife or whatever else that you use for fine detail work and stab it in the middle of the putty. Slowly and gently move it back and forth to create a hole in the middle wiping away the putty from the black inside the hole.

You can work it back and forth to create a realistic hole but not too big. Remember the hole is only in the center of the depression. Use the pushed aside putty gathered around the hole you made to create the torn flaps. Notice that there are 2 completely filled holes here just like on the original prop. Repeat the same process for each hole and set it aside for the putty to cure and harden. Paint to taste!

Viola... you've just created realistic blaster holes without cutting, marring, maiming, melting, defiling or otherwise destroying the plastic whatsoever (however you can berate the plastic and call it names to your hearts content because it doesn't know any better, just make sure to kiss and make up afterward!) and you never have to worry about the framing behind it! When it's dry and all painted up you'll see a world of difference! Hope this little tip helps! Lemme know what you think!
Just like many of you, I have been watching other's build this same model kit with awe and amazement. I've watched how some people tackle a particular problem with detail or inaccuracy and think to myself why didn't I think of that. I've seen some fantastical elaborate ways of solving problems that come out looking extremely incredible... but I think to myself why go thru all that trouble. Well, here's my solution to a problem with the blaster holes on the top hull behind the radar dish.
I don't know why, but it seems as if the scan of those "bullet holes" came out as indentions. Almost as if they are some kind of computer artifact that the computer couldn't quite interpret and just said fudge it and made them all even. Now, I've seen some builders actually cut these holes out completely, use a soldering iron to melt the plastic, burn the plastic... heck... I've even seen some people replace the entire panel itself with their own scratch built part. The problem they all run into is the metal framework behind them. You could cut the framework or try to work around it. Me... my solution doesn't damage the plastic panel or the framework at all. All it takes is a little Epoxy Putty (also known as Apoxie Sculpt, Aves, Magic Sculpt, or any 2 part Epoxy Clay Compound that you mix equal parts together and it hardens by itself)!
Here's the panel I'm talking about...
Now notice how nice and symmetrical these blaster holes are? Even thou all the "holes" are in the proper place and position... they don't look anything like they should on the actual prop here (image of the actual prop on display at Star Wars Identities in France photographed by Jean-Marc Deschamps & Olivier Cabourdin)...

So here's my method... take a small ball of putty and place it into the hole.
Squish it down until it fills the entire hole...
then wet your finger and make a depression or dimple in the putty. Smooth it out so that all the edges are even with the top edges of the hole and then take a hobby knife or whatever else that you use for fine detail work and stab it in the middle of the putty. Slowly and gently move it back and forth to create a hole in the middle wiping away the putty from the black inside the hole.
You can work it back and forth to create a realistic hole but not too big. Remember the hole is only in the center of the depression. Use the pushed aside putty gathered around the hole you made to create the torn flaps. Notice that there are 2 completely filled holes here just like on the original prop. Repeat the same process for each hole and set it aside for the putty to cure and harden. Paint to taste!
Viola... you've just created realistic blaster holes without cutting, marring, maiming, melting, defiling or otherwise destroying the plastic whatsoever (however you can berate the plastic and call it names to your hearts content because it doesn't know any better, just make sure to kiss and make up afterward!) and you never have to worry about the framing behind it!
When it's dry and all painted up you'll see a world of difference! Hope this little tip helps! Lemme know what you think!LrdSatyr8
Member
- Joined
- Dec 21, 2012
- Messages
- 765
Thanks Grens.... hope you had a great weekend...
Well I had a 4 day weekend thanks to the holidays and spent them hand painting and assembling my droids I made for Shapeways. First up was my 1:48 R2. I was very pleased that everything fit together so nice an snug. Didn't even have to use any glue on him at all. He comes with 3 legs and I can position him with either 3 or 2 legs. I will probably not even include him in my diorama at all, but I love this little guy.


Told ya he was tiny, can fit him on a dime, almost so tiny that it's hard to get him to be in focus with my phone camera. But once I put him inside the cargo lounge, he just shined.


Really just puts things into perspective doesn't it? Well... of course I can't have R2 without his lifemate and constant companion, so I began to paint my 3PO. Of course R2 had to oversee the entire operation to make sure I did it right!


Now one of the things about 3D printing is there are limits to just how small you can make things. One of these things are the pistons on his arms and legs. I had to leave them off the 3D print but they are pretty easy to replace with some stretched sprue. You take a straight piece of sprue (you know, that little frame that's left over after you cut all the model parts off of) and hold it over a candle flame until it gets really soft in the middle. Then you pull until you have the right thickness of "wire" you want. Can get really thin wires this way. So... here's the stretched sprue I used from a piece of black plastic sprue I had in my toolbox...

Then I cut some straight lengths out of the thinnest area of the sprue and began to glue them to his arms and leg joints. I painted them to match the rest of him and they came out looking pretty good. Oh... R2 had to show off his 3rd leg and hopped up on an actual DIME... he's such a frisky droid.


And finally... the money shot... yes they both stand on their own. I haven't "permenantly" glued any of 3PO's joints together because I haven't commited to a pose just yet. So many come to mind, and I guess we'll see what happens next. Hope you all had a wonderful weekend... and are enjoying the build so far.

Lemme know what you think!
Well I had a 4 day weekend thanks to the holidays and spent them hand painting and assembling my droids I made for Shapeways. First up was my 1:48 R2. I was very pleased that everything fit together so nice an snug. Didn't even have to use any glue on him at all. He comes with 3 legs and I can position him with either 3 or 2 legs. I will probably not even include him in my diorama at all, but I love this little guy.
Told ya he was tiny, can fit him on a dime, almost so tiny that it's hard to get him to be in focus with my phone camera. But once I put him inside the cargo lounge, he just shined.
Really just puts things into perspective doesn't it? Well... of course I can't have R2 without his lifemate and constant companion, so I began to paint my 3PO. Of course R2 had to oversee the entire operation to make sure I did it right!
Now one of the things about 3D printing is there are limits to just how small you can make things. One of these things are the pistons on his arms and legs. I had to leave them off the 3D print but they are pretty easy to replace with some stretched sprue. You take a straight piece of sprue (you know, that little frame that's left over after you cut all the model parts off of) and hold it over a candle flame until it gets really soft in the middle. Then you pull until you have the right thickness of "wire" you want. Can get really thin wires this way. So... here's the stretched sprue I used from a piece of black plastic sprue I had in my toolbox...
Then I cut some straight lengths out of the thinnest area of the sprue and began to glue them to his arms and leg joints. I painted them to match the rest of him and they came out looking pretty good. Oh... R2 had to show off his 3rd leg and hopped up on an actual DIME... he's such a frisky droid.
And finally... the money shot... yes they both stand on their own. I haven't "permenantly" glued any of 3PO's joints together because I haven't commited to a pose just yet. So many come to mind, and I guess we'll see what happens next. Hope you all had a wonderful weekend... and are enjoying the build so far.
Lemme know what you think!
LrdSatyr8
Member
- Joined
- Dec 21, 2012
- Messages
- 765
Ok folks... time to add a new update to my build. I've been getting alot of questions about my new corridor sconce light sets on Shapeways. I made them because all the offerings so far (PE/SW) have all been too large! You should be able to fit 5 lights per large cushion. All the offerings so far you can only fit 3-4. That don't cut it for my OCD!

They both (the ESB and ANH versions) come with this little tool I designed called the Drill Guide.

But yet, no one can figure out how to use it. I painted it with primer so it's easy to see... It's really simple to use... here's how:
First things first, identify the top of each cushion that needs a light on it. On the back mark the top position so you don't forget. Then, take the edge of my tool and place it on the top edge as shown and push it against the surface of the cushion. Rub it back and forth creating a very light mark on the plastic (not so hard it does damage, and not so light you can't see it). You can prepaint the cushion whatever color you want and it'll make the marking a bit easier as well...

Next, dip the pointed marker ends in a little bit of paint (doesn't really matter what kind, I like to use watercolor or arcylic paint here because it can be removed easily if I make a mistake.

Next, touch the painted tips to the surface along the line you "rubbed" into the cushion previously. Just a dot of paint is all you need. These will be the drill points where you will drill a hole.

Some have worried about how it will work with the convex or concave cushions, well never fear, just by tilting it sideways you can still get a good point mark on those cushions easily as you can see below!
Convex Cushion:

Concave Cushion:

You should now have perfectly spaced dots on each cushion. 5 for the large cushions (try to center them as best you can), 3-4 for the medium cushions and only 1 for the small ones. Now, you want to prepare your holes for drilling, so, take a sharp hobby knife and prep your drill holes. You don't want to make these too big, just large enough to give the drill bit something to grab onto as you start drilling your holes. Make the starter holes for each pin point marking you made earlier. Try to be as precise as possible in this step. If you move off the first line you made it'll show later.

Next you want to take a small drill bit (here I got a 1/16th) and begin drilling the holes in each cushion where you made your marking starter holes.


Now that you got all your small holes drilled, you have 2 options here. #1 you can begin gluing and drilling the large holes all the way thru both the cushion and the corridor parts or #2 you can set the part on the corridor and using the small holes drill thru the corridor. I chose the second option here because my larger drill isn't very delicate, so I have to be careful when I drill with it.


The drill bit to use for my corridor lights will be a 5/16th inch or 3.8mm bit.

Yes I know, an extra step! LOL


Now that all the holes are drilled you're ready to install the lights. Hope this helps and enjoy!

They both (the ESB and ANH versions) come with this little tool I designed called the Drill Guide.
But yet, no one can figure out how to use it. I painted it with primer so it's easy to see... It's really simple to use... here's how:
First things first, identify the top of each cushion that needs a light on it. On the back mark the top position so you don't forget. Then, take the edge of my tool and place it on the top edge as shown and push it against the surface of the cushion. Rub it back and forth creating a very light mark on the plastic (not so hard it does damage, and not so light you can't see it). You can prepaint the cushion whatever color you want and it'll make the marking a bit easier as well...
Next, dip the pointed marker ends in a little bit of paint (doesn't really matter what kind, I like to use watercolor or arcylic paint here because it can be removed easily if I make a mistake.
Next, touch the painted tips to the surface along the line you "rubbed" into the cushion previously. Just a dot of paint is all you need. These will be the drill points where you will drill a hole.
Some have worried about how it will work with the convex or concave cushions, well never fear, just by tilting it sideways you can still get a good point mark on those cushions easily as you can see below!
Convex Cushion:
Concave Cushion:
You should now have perfectly spaced dots on each cushion. 5 for the large cushions (try to center them as best you can), 3-4 for the medium cushions and only 1 for the small ones. Now, you want to prepare your holes for drilling, so, take a sharp hobby knife and prep your drill holes. You don't want to make these too big, just large enough to give the drill bit something to grab onto as you start drilling your holes. Make the starter holes for each pin point marking you made earlier. Try to be as precise as possible in this step. If you move off the first line you made it'll show later.
Next you want to take a small drill bit (here I got a 1/16th) and begin drilling the holes in each cushion where you made your marking starter holes.
Now that you got all your small holes drilled, you have 2 options here. #1 you can begin gluing and drilling the large holes all the way thru both the cushion and the corridor parts or #2 you can set the part on the corridor and using the small holes drill thru the corridor. I chose the second option here because my larger drill isn't very delicate, so I have to be careful when I drill with it.
The drill bit to use for my corridor lights will be a 5/16th inch or 3.8mm bit.
Yes I know, an extra step! LOL
Now that all the holes are drilled you're ready to install the lights. Hope this helps and enjoy!