Ian
Member
- Joined
- Aug 29, 2012
- Messages
- 910
Here's a simple step by step tutorial for photography of your in-progress and finished models.
I'm by no means a professional in this area, but I'm having good results with a very similar setup, and pride myself on having good looking images of my builds.
EQUIPMENT
Camera - this can be anything from an iPhone, a simple Point-and-Shoot, or a professional DSLR with multiple lenses.
I personally use a Sony NEX 5 with a 30mm macro lens in full manual mode, but for these examples I swapped to the 18-55mm 'kit' lens and shot everything in automatic. One thing I highly recommend doing (if your camera offers it) is to shoot in a RAW format. This will allow you far more ease when making adjustments in the post-processing stage.
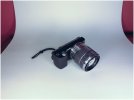
Tripod - highly recommended. If you don't have one try to have the camera sit of a solid surface to reduce its movement when taking the pictures. It's also worth using the timer function on your camera if it has it (as noted by Scott G. in the comments.)
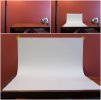
Simply tape this to the wall using low tack masking tape and create a curved 'scoop'.
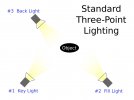
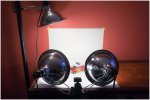
Lighting - your next piece of equipment is essential: lights. One will do, but three are preferable to created a standard "three-point" lighting setup.
The lights I'm using are just a basic hardware store variety costing about $12 ea.
I chose 'warm' 26W CFLs (compact fluorescent lamps) for the bright light and minimal heat output.
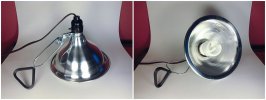
Here's how the setup is looks.
SHOOTING
Below are a few examples of the lighting setup in action. A single light source doesn't provide much, but if properly aimed to the side or just above the camera, you'd still get some nice images.
Two is looking better and might be all you need.
I prefer three just to add a bit of interest in the far background.
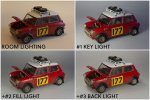
At this stage it might seem a little under exposed, but that's easily corrected in post-processing.
We're looking for nice even lighting for the entire scene and that's the advantage of using the three-point technique.
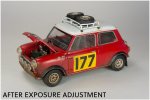
Another very important part of shooting is white balance. This can easily turn a beautifully painted and weathered kit into a horrible visual mess.
If you shoot in RAW this step can be skipped. This format allows you to choose your white balance after the fact in the post-processing stage.
My Sony NEX 5 gives me the following choices when choosing my white balance.
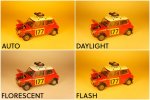
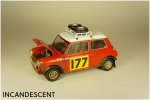
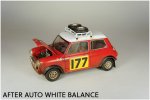
For me it's an easy choice to make when you see each image side-by-side. Obviously AUTO, DAYLIGHT and FLASH are out. FLORESCENT is getting closer (as it should be since I'm using CFL bulbs), but I actually prefer the slightly greener INCANDESCENT setting. This is partly due to the CFL bulbs being "Warm" or around 2600k in color temperature.
Even though it's not perfect, again, this can easily be corrected in post-processing.
Another important issue to pay attention to is focusing. My camera setup allows manual focus but many point-and-shoots are auto only. Be aware of this when composing and framing your shots and take time when pressing the shutter button. Many cameras have a half-press shutter button confirmation of focus too.
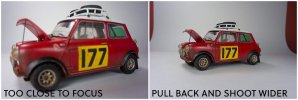
Also, if you find yourself frustrated because the camera can't lock focus or doesn't seem to want to focus, it might be because you're too close when taking the shot. My 18-55mm lens only allows me to focus to within 5-6 inches of the subject, and that was one of the reasons I went with a dedicated macro lens.
If you do have this issue, it can be easily fixed by pulling back 12-14 inches and framing the shot there. This should allow the camera to focus and will also have the added benefit of having more of the model in focus due to the change in the depth of field.
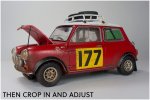
Then simply crop into the image in post-processing and frame to the size you need. Since your final upload image size will generally be much smaller than your camera original, you'll have plenty of image to work with.
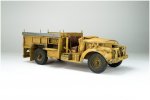
One last item to consider when shooting is the angle and point of view at which the photo is taken. Obviously for detail shots you might have various high or unusual angles, but when framing wider shots try to imagine that you're photographing the real vehicle, be it a car, truck, tank or motorcycle, and think about height and distance you would be from it. If you were standing near it, could you get the bonnet or turret in shot?
POST-PROCESSING
There are a number of dedicated photo editing applications available for both Mac and Windows, and there are even some excellent web-based options too.
I have used the following:
Adobe Lightroom
Adobe Photoshop
Pixlr (http://pixlr.com)
Lightroom is my main app of choice, though for most simple post-processing work on my images I'm using functions that can be found on almost every application out there. I won't go into great detail on this since it's such a broad subject, but I'm generally using cropping and rotation, levels and/or curves for fine tuning the exposure and of course white balance.
HOSTING
I tend to export all my images at 1280px wide for a good sized image that can show the detail, and use Flickr for hosting. Other good services are Photobucket and Imgur.
I hope this SBS proves useful. Please feel free to post questions or comments!
I'm by no means a professional in this area, but I'm having good results with a very similar setup, and pride myself on having good looking images of my builds.
EQUIPMENT
Camera - this can be anything from an iPhone, a simple Point-and-Shoot, or a professional DSLR with multiple lenses.
I personally use a Sony NEX 5 with a 30mm macro lens in full manual mode, but for these examples I swapped to the 18-55mm 'kit' lens and shot everything in automatic. One thing I highly recommend doing (if your camera offers it) is to shoot in a RAW format. This will allow you far more ease when making adjustments in the post-processing stage.

Tripod - highly recommended. If you don't have one try to have the camera sit of a solid surface to reduce its movement when taking the pictures. It's also worth using the timer function on your camera if it has it (as noted by Scott G. in the comments.)
Backdrop - for the backdrop all you need is a table, a wall and a large piece of white (or colored) cardstock or poster paper.One thing I would add is the timer function on your camera. The goal of using a tripod is to elimiate shake, which pretty much eliminates blur. Most cameras have a timer where you can set the camera to take the photo is 2 secs, 10 seconds etc. By using this feature you are able to get your hands off the camera and reduce shake completely. This results in no blur and general a really solid photo.
Simply tape this to the wall using low tack masking tape and create a curved 'scoop'.

Lighting - your next piece of equipment is essential: lights. One will do, but three are preferable to created a standard "three-point" lighting setup.

The lights I'm using are just a basic hardware store variety costing about $12 ea.
I chose 'warm' 26W CFLs (compact fluorescent lamps) for the bright light and minimal heat output.

Here's how the setup is looks.

SHOOTING
Below are a few examples of the lighting setup in action. A single light source doesn't provide much, but if properly aimed to the side or just above the camera, you'd still get some nice images.
Two is looking better and might be all you need.
I prefer three just to add a bit of interest in the far background.

At this stage it might seem a little under exposed, but that's easily corrected in post-processing.
We're looking for nice even lighting for the entire scene and that's the advantage of using the three-point technique.

Another very important part of shooting is white balance. This can easily turn a beautifully painted and weathered kit into a horrible visual mess.
If you shoot in RAW this step can be skipped. This format allows you to choose your white balance after the fact in the post-processing stage.
My Sony NEX 5 gives me the following choices when choosing my white balance.


For me it's an easy choice to make when you see each image side-by-side. Obviously AUTO, DAYLIGHT and FLASH are out. FLORESCENT is getting closer (as it should be since I'm using CFL bulbs), but I actually prefer the slightly greener INCANDESCENT setting. This is partly due to the CFL bulbs being "Warm" or around 2600k in color temperature.
Even though it's not perfect, again, this can easily be corrected in post-processing.

Another important issue to pay attention to is focusing. My camera setup allows manual focus but many point-and-shoots are auto only. Be aware of this when composing and framing your shots and take time when pressing the shutter button. Many cameras have a half-press shutter button confirmation of focus too.
Also, if you find yourself frustrated because the camera can't lock focus or doesn't seem to want to focus, it might be because you're too close when taking the shot. My 18-55mm lens only allows me to focus to within 5-6 inches of the subject, and that was one of the reasons I went with a dedicated macro lens.
If you do have this issue, it can be easily fixed by pulling back 12-14 inches and framing the shot there. This should allow the camera to focus and will also have the added benefit of having more of the model in focus due to the change in the depth of field.
Then simply crop into the image in post-processing and frame to the size you need. Since your final upload image size will generally be much smaller than your camera original, you'll have plenty of image to work with.


One last item to consider when shooting is the angle and point of view at which the photo is taken. Obviously for detail shots you might have various high or unusual angles, but when framing wider shots try to imagine that you're photographing the real vehicle, be it a car, truck, tank or motorcycle, and think about height and distance you would be from it. If you were standing near it, could you get the bonnet or turret in shot?

POST-PROCESSING
There are a number of dedicated photo editing applications available for both Mac and Windows, and there are even some excellent web-based options too.
I have used the following:
Adobe Lightroom
Adobe Photoshop
Pixlr (http://pixlr.com)
Lightroom is my main app of choice, though for most simple post-processing work on my images I'm using functions that can be found on almost every application out there. I won't go into great detail on this since it's such a broad subject, but I'm generally using cropping and rotation, levels and/or curves for fine tuning the exposure and of course white balance.
HOSTING
I tend to export all my images at 1280px wide for a good sized image that can show the detail, and use Flickr for hosting. Other good services are Photobucket and Imgur.
I hope this SBS proves useful. Please feel free to post questions or comments!
