Order of paint layers on a scale model

pmaj

New Member
Joined
Sep 12, 2023
Messages
1
hi everyone!

hope you are all well.

I recently started building aircraft scale models, and as im a newbie i watch a lot of videos on YouTube to learn about tips and tricks.
One on particular video, I found that the guy is using the different layers of paint in the following format:
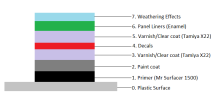
ic2CTBb.png
(layers are not to scale)

the original video is here:
here

as im new to this, i had a few questions to ask:

1- in the above example, isn't there a need to add another layer of varnish/top coat as the 8th step? if so, what brand/model of varnish would you recommend?

2- I am currently building a MiG-21SMT Weekend Edition by Eduard. I would like the main camo to be Aluminium paint, however I am not sure what to use as a varnish, like Satin, Matte or Gloss?

3- if i had a coat of Mr Surfacer 1500 primer thinned with Mr Levelling Thinner, and after a day or so i use a color paint thinned with Mr Levelling Thinner on top of that, would the previous layer of primer be affected by the thinner?? will the fresh thinner start to dissolve the layer underneath?


Many thanks for helping me!
 
Last edited:
A little late to this.

You do not have to follow every last step listed. Nor do you have to use the products called out. Thats that persons preference.

Primer. Very often I simply use flat black paint. I like to use the black to show through the color to varying degrees to help with weathering. Often called black basing. If its a metallic finish, then I use gloss or semi gloss black depending on the effect I want.

Gloss coat. There are dozens of choices from Future to Tamiya to Alclad and on and on. And again, it will depend on what youre doing. I dont use it on metallic finishes.

I have never sealed decals before weathering. The decals represent painted on stuff on the real thing, so they should be as weathered and effected as the rest of the plane. Simply ensure you use Micro set or Solvaset to get the decals ON.

A dull coat goes on after all the decaling and weathering is done. You want to knock back the gloss and seal in what you have done. Again, there are tons of products to try.

As for your specific questions.

1. IMO, there are a lot more steps there than needed. As I outlined. But thats what *I* do.

2. Again, as I said, I dont use a varnish on metallic paints. But if I did, I would use Alclads.

3. Once the primer is set, its set. Yes, the next coat will bite into it, but it wont effect it in any noticeable way. You would have to heavily over spray the next coat to cause the primer to run. But again, you have to allow it to set. 24 hours minimum is usually suggested.
 
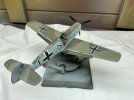
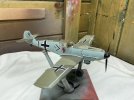
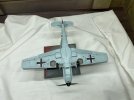
I recently changed my build process. I skip the primer and weathering. Now my first step is a pre-shade of the panel lines with tamiya panel liner, paint, put in dehydrator at 105 for 4 to 5 hours to fully cure the paint, gloss clear coat, decals, flat clear coat and I'm done. Here are some pics of my first try at that. Nothing fancy just an OOB build. Seems to be what I am in the mood for.
IMG_1451.JPGIMG_1453.JPGIMG_1454.JPG
 
I recently changed my build process. I skip the primer and weathering. Now my first step is a pre-shade of the panel lines with tamiya panel liner, paint, put in dehydrator at 105 for 4 to 5 hours to fully cure the paint, gloss clear coat, decals, flat clear coat and I'm done. Here are some pics of my first try at that. Nothing fancy just an OOB build. Seems to be what I am in the mood for.
View attachment 107265View attachment 107266View attachment 107267
It looks great. Pantherman
 
Y'know, looking at the 109, I'm reminded that in the case of some markings, I'll apply the marking color first, then the overall colors.
For example, for the yellow recognition markings the British and the Japanese had on the leading edge of the wings, I'll apply that first, then mask it off and apply the color to the rest of the wing. Or for the USAAF's theater markings. I didn't think of this on a P-51B build, and applied OD and grey, then realized that I needed to apply the white stripes to the wings, rudder and horizontal stabilizers. I had to mask the whole airplane to do that. Had I thought ahead of time, I would applied white to those areas, then masked the stripes, then applied the overall colors.
So, there's an exception for me to "apply the main colors first".
 
The plane looks real nice! The stand that you have in the photos, is that a work stand? it's interesting.
Yes it is for resting it on while you paint if needed. I cannot remember what it is called but it works okay. I typically have been putting my builds on homemade display bases but I'm behind on doing that.
 
The stand is a Flight Pose I believe. I have two. They are excellent stands for work or display. However, he shut down because of the Wuhan bunk and now has not opened back up for other reasons. The sight is still up, so hopefully he will start up again.
 
The stand is a Flight Pose I believe. I have two. They are excellent stands for work or display. However, he shut down because of the Wuhan bunk and now has not opened back up for other reasons. The sight is still up, so hopefully he will start up again.
I was hoping someone else would chime in on that, thanks.
 

Latest posts

Back
Top