the Baron
Ich bin ja, Herr, in Deiner Macht
- Joined
- May 12, 2009
- Messages
- 2,265
Hi, all,
It's high time I shared with you another of my many irons in the modeling fire. This is my second build from the Maschinen Krieger world, the Armored Fighting Suit Mk I. In the MaK story line, it was the first fully powered armored suit used by the mercenaries in their war against the overbearing Strahl Demokratische Republik.
I started taking pictures after I had completed some basic assemblies. MaK kits can go together relatively quickly (famous last words, in any build), and the initial build-up did go pretty quick. Here is the torso, assembled:
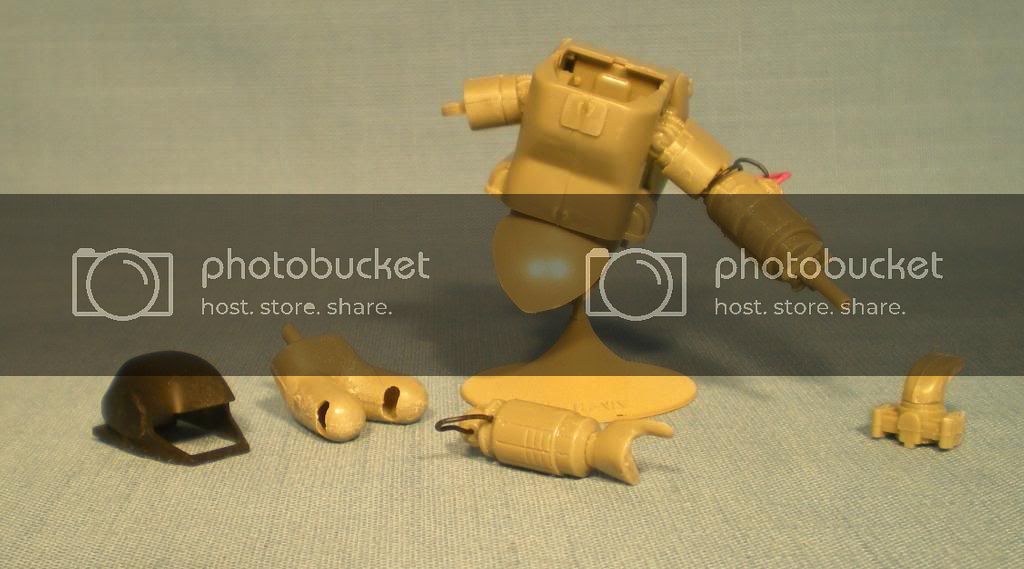
and from the back:

The kit comes with two different heads for the pilot, as the soldiers operating the suits are called. There is a Caucasian male, and a female head with vaguely Oriental features. Both heads are cast bare, no headgear of any kind. I chose the male head for this build, and originally planned to add a padded crash helmet. It was to be an exercise in sculpting, as well as a bit of an improvement to the basic kit. I fashioned something that was halfway between a Soviet tanker's helmet, with its thick, padded ridges, and a modern NFL helmet. I wasn't happy with the result, and then I changed gears altogether. I decided that the suit and pilot were from a Sikh battalion fighting for the mercenaries. Why not? It's science fiction, and I figured that the Sikhs would have maintained their ethnic and military identity 800 years into the future. So I removed the original work (which I did not photograph, so I can't show it), and reworked the head with the full beard that the Sikhs' faith instructs them to wear, and a simple puggree:

The beard, I carved from the original helmet's chin piece, the moustache was new putty work, and the puggree, I made from strips of putty that I rolled thin and applied to the head. I alternated the strips on the left and right sides as I applied them, to replicate how the puggree is wound. I was much more satisfied with this result.
Then, I painted the head, to complete this part of the build. Here is a four-panel shot, showing the sequence:

The colors are a mix of Vallejo, Andrea and craft store acrylics. I mixed a basic flesh with a little burnt siena to get the slightly darker skin tones, and otherwise, it's straight black for the beard, white for the cap, and red for the puggree. I researched historical and contemporary Sikh units and toyed with the idea of using blue, or using the colors from Skinner's Horse in the old imperial Indian Army, before deciding that this unit wears red. After taking that photo, I did some additional touch-up, to narrow the pop-eyes a little more, and set the head aside.
The next area to address was the right hand. The hands on these old Nitto kits represent a weak spot, and most modelers replace them. Here's the kit hand's palm, off the sprues:

The fingers are molded together as another piece, and the hand pretty much dangles uselessly at the figure's right side. There are aftermarket pieces available, or they'll take the hands from the newer Wave kits (which have been improved through re-engineering), or they'll scratchbuild a replacement. I'm taking that last course. This figure will go into a small vignette, and I need the hand posed dynamically, palm flat and fingers splayed, as if resting on a relatively flat surface. So I made a small armature out of florist's wire, shown here inserted in the wrist:

I used Sculpey for this piece, covering the palm, and inserting wire for the fingers:

I fashioned the fingers from more Sculpey, baked it, and wound up with this:

Here it is, side by side with the kit hand, which I also built up, as a backup, in case I don't get a satisfactory result with putty:

I have decided not to use this first effort, it looks a little too Wallice-and-Gromit-y for my purposes. I could sand and file it to remove the rounded shape, but the fingers aren't anchored and come out of the palm too easily as I work with them. I've made a second hand, again with florist's wire for the palm, but with fine beading wire wound around the armature to anchor it, but I'm not happy with that result, either. I have started moving in the direction of using Plastruct tubing to build the hand, with a little putty, but haven't executed that yet. I still may use the kit hand, though to splay it, I'd have to cut the fingers away from one another, and then separate each one at the knuckle joints, drill them out, and wire them back together. Fiddliest of fiddly work.
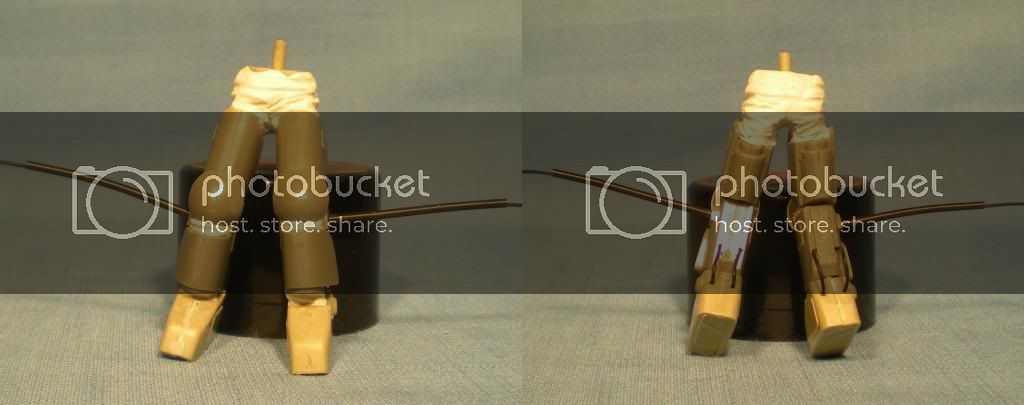
I returned to the torso, and upgraded the joint covers with Apoxie Sculpt, using a toothpick to shape the folds. A couple of shots here:


and the same work on the legs:
and finally, for this post, here is the suit, torso and legs attached, with the initial coat of paint and some weathering and detailing begun:

I'm experimenting with a technique for weathering, using Army Painter matte black as the primer, and then scuffing the top coats to replicate chipping. I goofed, however, in that the technique usually involves using acrylic for the top coat. The acrylic is delicate enough that you can use a Scotch Brite pad to do the scuffing. Without realizing it, thinking only of the color (dark sand), I used a can of Model Master enamel. D'oh. I realized it, when I took the Scotch Brite pad to the model and saw that it didn't even scratch the surface. As Michael Caine said in "A Shock to the System", "You, you and you, panic. The rest of you--stay calm." I took a worn piece of 60-grit sandpaper instead, and found that I could scuff down to the primer, as long as I was careful. I have removed the primer, too, in spots, but I can touch that back up with black acrylic.
You can also see some battle damage, on the torso and on the crotch plate. It represents grazes by heat or particle beam and projectile weapons. For the beam grazes, I used a round rattail file to file a longish gouge in the surface, and for the projectile hit, I used--very carefully--a fine grinding bit chucked into the Dremel, to make little circular gouges. My idea is that in both cases, the weapon superheated the ceramic-metal alloy armor, which then solidified again. My inspiration is David Drake's description of battle damage in his Hammer's Slammers novels. So, each area got some black pastel chalk for the surround, for some carbon staining, then black acrylic in the scars, with flat aluminum to represent the exposed armor. Over that, I will use a very thin blue wash, to replicate the discoloring that some metals show when heated and cooled (again, a nod to Drake and his concept of iridium as the metal used in composite armor in the Hammerverse). I did one attempt, with a wash that I have--without thinking--made from isopropyl and blue ball point pen ink (from cleaning the tubes from used-up pens--never throw anything out!). Of course, that had the effect of liquefying the aluminum paint, and then drying again, and the effect is invisible. Note to self--do not use a wash thinned with an agent that thins the paint below. I can hear William Demarest as Uncle Charlie saying, "Holy cow! What's wrong with you?!"
Anyway, now you're caught up! My next steps are to finish the hand; to add more weathering with filters of oil paints; to add the other joint plates, including one with the Sikh Battalion's formation sign; and to start on the base.
I hope you enjoy having a look, and as always, tips/criticisms/comments are welcome, thanks for looking!
YbiC
Brad
It's high time I shared with you another of my many irons in the modeling fire. This is my second build from the Maschinen Krieger world, the Armored Fighting Suit Mk I. In the MaK story line, it was the first fully powered armored suit used by the mercenaries in their war against the overbearing Strahl Demokratische Republik.
I started taking pictures after I had completed some basic assemblies. MaK kits can go together relatively quickly (famous last words, in any build), and the initial build-up did go pretty quick. Here is the torso, assembled:

and from the back:
The kit comes with two different heads for the pilot, as the soldiers operating the suits are called. There is a Caucasian male, and a female head with vaguely Oriental features. Both heads are cast bare, no headgear of any kind. I chose the male head for this build, and originally planned to add a padded crash helmet. It was to be an exercise in sculpting, as well as a bit of an improvement to the basic kit. I fashioned something that was halfway between a Soviet tanker's helmet, with its thick, padded ridges, and a modern NFL helmet. I wasn't happy with the result, and then I changed gears altogether. I decided that the suit and pilot were from a Sikh battalion fighting for the mercenaries. Why not? It's science fiction, and I figured that the Sikhs would have maintained their ethnic and military identity 800 years into the future. So I removed the original work (which I did not photograph, so I can't show it), and reworked the head with the full beard that the Sikhs' faith instructs them to wear, and a simple puggree:
The beard, I carved from the original helmet's chin piece, the moustache was new putty work, and the puggree, I made from strips of putty that I rolled thin and applied to the head. I alternated the strips on the left and right sides as I applied them, to replicate how the puggree is wound. I was much more satisfied with this result.
Then, I painted the head, to complete this part of the build. Here is a four-panel shot, showing the sequence:
The colors are a mix of Vallejo, Andrea and craft store acrylics. I mixed a basic flesh with a little burnt siena to get the slightly darker skin tones, and otherwise, it's straight black for the beard, white for the cap, and red for the puggree. I researched historical and contemporary Sikh units and toyed with the idea of using blue, or using the colors from Skinner's Horse in the old imperial Indian Army, before deciding that this unit wears red. After taking that photo, I did some additional touch-up, to narrow the pop-eyes a little more, and set the head aside.
The next area to address was the right hand. The hands on these old Nitto kits represent a weak spot, and most modelers replace them. Here's the kit hand's palm, off the sprues:
The fingers are molded together as another piece, and the hand pretty much dangles uselessly at the figure's right side. There are aftermarket pieces available, or they'll take the hands from the newer Wave kits (which have been improved through re-engineering), or they'll scratchbuild a replacement. I'm taking that last course. This figure will go into a small vignette, and I need the hand posed dynamically, palm flat and fingers splayed, as if resting on a relatively flat surface. So I made a small armature out of florist's wire, shown here inserted in the wrist:
I used Sculpey for this piece, covering the palm, and inserting wire for the fingers:
I fashioned the fingers from more Sculpey, baked it, and wound up with this:
Here it is, side by side with the kit hand, which I also built up, as a backup, in case I don't get a satisfactory result with putty:
I have decided not to use this first effort, it looks a little too Wallice-and-Gromit-y for my purposes. I could sand and file it to remove the rounded shape, but the fingers aren't anchored and come out of the palm too easily as I work with them. I've made a second hand, again with florist's wire for the palm, but with fine beading wire wound around the armature to anchor it, but I'm not happy with that result, either. I have started moving in the direction of using Plastruct tubing to build the hand, with a little putty, but haven't executed that yet. I still may use the kit hand, though to splay it, I'd have to cut the fingers away from one another, and then separate each one at the knuckle joints, drill them out, and wire them back together. Fiddliest of fiddly work.
I returned to the torso, and upgraded the joint covers with Apoxie Sculpt, using a toothpick to shape the folds. A couple of shots here:
and the same work on the legs:

and finally, for this post, here is the suit, torso and legs attached, with the initial coat of paint and some weathering and detailing begun:
I'm experimenting with a technique for weathering, using Army Painter matte black as the primer, and then scuffing the top coats to replicate chipping. I goofed, however, in that the technique usually involves using acrylic for the top coat. The acrylic is delicate enough that you can use a Scotch Brite pad to do the scuffing. Without realizing it, thinking only of the color (dark sand), I used a can of Model Master enamel. D'oh. I realized it, when I took the Scotch Brite pad to the model and saw that it didn't even scratch the surface. As Michael Caine said in "A Shock to the System", "You, you and you, panic. The rest of you--stay calm." I took a worn piece of 60-grit sandpaper instead, and found that I could scuff down to the primer, as long as I was careful. I have removed the primer, too, in spots, but I can touch that back up with black acrylic.
You can also see some battle damage, on the torso and on the crotch plate. It represents grazes by heat or particle beam and projectile weapons. For the beam grazes, I used a round rattail file to file a longish gouge in the surface, and for the projectile hit, I used--very carefully--a fine grinding bit chucked into the Dremel, to make little circular gouges. My idea is that in both cases, the weapon superheated the ceramic-metal alloy armor, which then solidified again. My inspiration is David Drake's description of battle damage in his Hammer's Slammers novels. So, each area got some black pastel chalk for the surround, for some carbon staining, then black acrylic in the scars, with flat aluminum to represent the exposed armor. Over that, I will use a very thin blue wash, to replicate the discoloring that some metals show when heated and cooled (again, a nod to Drake and his concept of iridium as the metal used in composite armor in the Hammerverse). I did one attempt, with a wash that I have--without thinking--made from isopropyl and blue ball point pen ink (from cleaning the tubes from used-up pens--never throw anything out!). Of course, that had the effect of liquefying the aluminum paint, and then drying again, and the effect is invisible. Note to self--do not use a wash thinned with an agent that thins the paint below. I can hear William Demarest as Uncle Charlie saying, "Holy cow! What's wrong with you?!"
Anyway, now you're caught up! My next steps are to finish the hand; to add more weathering with filters of oil paints; to add the other joint plates, including one with the Sikh Battalion's formation sign; and to start on the base.
I hope you enjoy having a look, and as always, tips/criticisms/comments are welcome, thanks for looking!
YbiC
Brad
") - well... its SciFi, so what?! I dont care. It looks cool (imho), and ladies are more than welcome!
- well... its SciFi, so what?! I dont care. It looks cool (imho), and ladies are more than welcome! 


