Land Wasser Schlepper pleasure cruise

Leighbo

Active Member
Joined
Sep 15, 2011
Messages
1,033
Hi Guys, Hope Xmas has been good to you all

Heres my latest project, one I've been looking forward to, the Hobby boss Land Wasser Schlepper. I got bogged down with my desert diorama so needed to blow away the cobwebs with a new project.
2011-12-27%25252015.29.22.jpg

This time I'm not getting too hung up on details and am just going to have some fun with it.

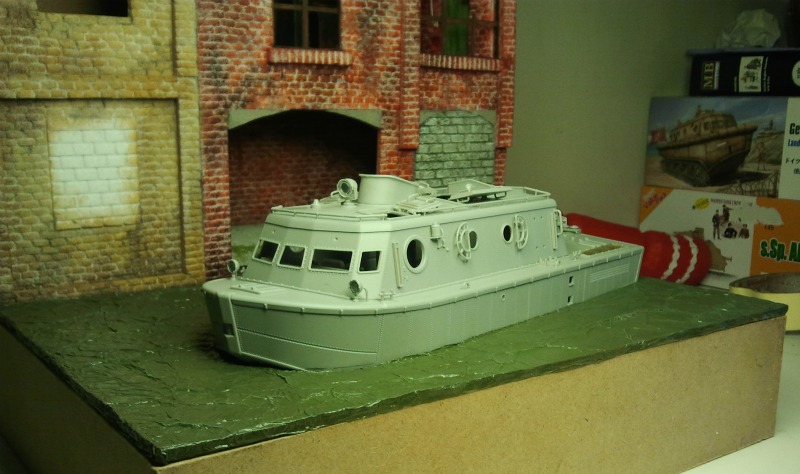
The general idea is that a bunch of soldiers have managed to grab a bit of time and have 'borrowed' the Land Wasser Schlepper. They have hidden behind some riverside factory buildings for a bit of R & R. I have planned lots of figures, playing cards, drinking & fishing

Rather than just a plain building front I plan to give it some depth and interest going on.

Anyway the first job is to sketch it out on the PC to get the general idea straight.
Landwasserschlepper%2525203.jpg

Landwasserschlepper%2525204.jpg

Once this is sorted its on with the build!

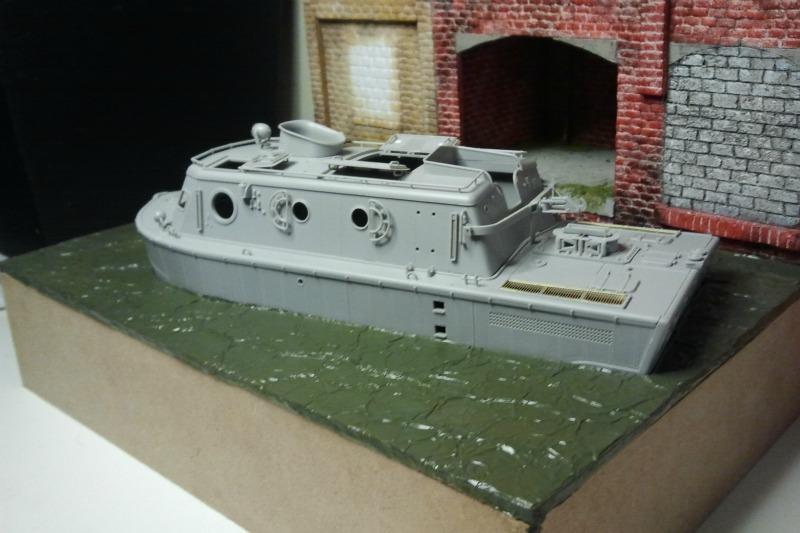
The Hobby Boss kit went together brilliantly, no dramas and very enjoyable. I just fixed a suspension assembly in each corner for stability and left it at that as this will all be underwater.
2011-12-26%25252015.32.42.jpg

2011-12-26%25252017.58.19.jpg

2011-12-27%25252015.18.48.jpg

2011-12-27%25252015.19.00.jpg

2011-12-27%25252015.19.23.jpg

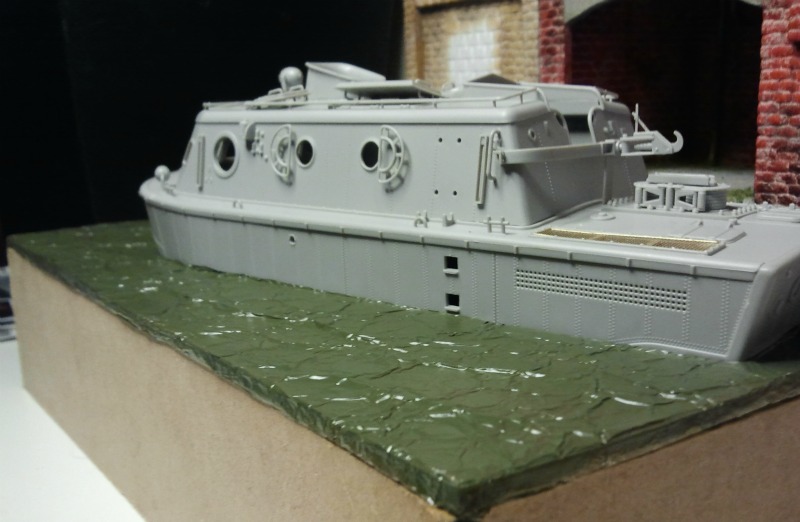
The next task is to try and scratch build the rope bumper, which does not come as part of the kit. I made a wire frame slightly bigger than the shape of the hull and then wound string around, sticking it with white glue as I went.
2011-12-28%25252013.34.47.jpg

2011-12-28%25252014.36.49.jpg

2011-12-28%25252014.37.08.jpg

Once the first layer had dried I wound a smaller layer just at the front and then a third layer even smaller right at the nose.
2011-12-28%25252016.54.10.jpg

2011-12-28%25252016.54.53.jpg

This worked out relly well and saved me about £20!

Now I turned to the figure kits from Masterbox and Dragon. I wanted to try and show the soldiers relaxing and so had the Masterbox group playing cards at the rear of the craft and converted a Dragon flamethrower crew to look as though they were fishing and supplemented these with other figures drinking and one figure drunk asleep in the cabin!
2011-12-28%25252018.42.05.jpg

2011-12-29%25252016.29.51.jpg

2011-12-29%25252016.55.56.jpg

The one area I was dreading was making an MDF 'box' for the kit as my woodworking skills are not what they should be, but it turned out pretty well.
2011-12-29%25252016.32.10.jpg

Anyway I'll keep progress posted, and I'd like to wish everyone a Happy New Year in advance
 
Cool project . Thats a great little kit ,I plan doing one sometime ,I like the figures too ;D Can I suggest tho that it might be an idea to take some height of the building ? It may over power the main peice a bit ...just a thought .

Chris.
 
Thanks for all your comments so far.

Chris you may be right about the building over powering things. I do plan on putting a lot of detail in the buildings and a figure or two on top looking down, so we will see!

Thanks again
 
Hi Guys, just wanted to share my current progress on this build

I've been concentrating on the building and the first job was to cut a piece of foam board to fit and then draw and cut the windows, door and features. I will leave embossing the brick pattern until the interior is done to avoid damage
2011-12-30%25252010.49.44.jpg

2011-12-30%25252016.07.15.jpg

I really love giving the scene details and scratch built an air intake and a hoist from sheet plastic and scrap.
2011-12-30%25252014.04.57.jpg

2011-12-30%25252014.35.16.jpg

I need to construct the interior before I can get the facade finished so using insulation board for the floors, to represent concrete, and more foam board for the walls I measure and cut the panels.

Next I used my trusty modified USB stick to emboss the brick patterns then brushed the walls with a thinned coat of grey so it would seep into the lines.
2011-12-31%25252013.27.09.jpg

Once this was dry I mixed up a brick colour from acrylics and sort of heavily dry brushed the bricks so it left the grey in the mortar lines. I took the base brick colour and added a darker colours and randomly brushed over. I repeated this by adding more colours to the mix to give the brick surface some life. All floors will be done using ths technique.
2011-12-31%25252016.15.17.jpg

I cut some doors from Balsa, scribed plank lines on them and painted and weathered them.
https://lh4.googleusercontent.com/-cAvcGwu86Qs/TwGr0H5CpPI/AAAAAAAAAS8/qUP9HHP0Ges/s800/2011-12-31%25252016.01.39.jpg[img]
I want the bottom floor to represent a loading bay area so just added some rusted ducting from spare sprue and added some moss and weathering. I will add some various junk later.
[img]https://lh5.googleusercontent.com/-8wCU7aX5fEo/TwGr1bpCocI/AAAAAAAAATE/OSh1GjAjWxw/s800/2011-12-31%25252016.16.09.jpg
2011-12-31%25252016.16.31.jpg

I wanted the building to represent a factory so on the second floor I scratch built some rusting machinery and pipework, again from some sheet plastic and bits from the spares box, as well as the barrel of a pen!
2012-01-01%25252011.56.06.jpg

2012-01-01%25252012.45.20.jpg

2012-01-01%25252013.21.38.jpg

Once this was suitably rusted and painted I attached these and added various details to try and build a picture of a dilapidated factory.
2012-01-02%25252011.11.10.jpg

2012-01-02%25252011.11.33.jpg

2012-01-02%25252011.13.11.jpg

2012-01-02%25252011.13.20.jpg

Anyway until next time thanks for looking
 
Wow. Your talents at dios is fantastic gona be an other epic one
 
Man this is going to be great! Love the poses of the figures and the rusty machinery inside the building! You have a lot of talent obviously sir! :)
 
Hi Guys, thanks for the great comments, much appreciated.
I've been working hard so here's the latest progress

To create the river water I have researched lots of techniques and finally decided to create a solid base with a cut out for the LWS, which I cut by making a card and masking tape template.
2012-01-04%25252019.13.53.jpg

This was then transfered onto a fibreboard base and cut with a jigsaw
2012-01-04%25252019.14.18.jpg

After a bit of fettling I got the LWS to fit well, any little gaps will be filled in the next step on the water.
2012-01-04%25252019.15.46.jpg

2012-01-04%25252019.16.17.jpg

2012-01-04%25252019.27.03.jpg

2012-01-04%25252019.27.32.jpg

2012-01-04%25252019.27.43.jpg

I intend to create the water by crumpling aluminium foil then flattening it back out and using white glue to stick it to the base. Once this is dry I will airbrush it a greenish colour and then gloss it with future. It's a bit of an experiment for me, but nothing ventured....

I next moved onto the top room, using the same techniques as the other rooms, but this one filled with rusting barrels.
2012-01-08%25252013.07.13.jpg

I then embossed the brick in front of the building (my fingers ached afterwards) and added some brick detail and the start of the open roof area on the left. This area will have lots of detail and if I can find some suitable child figures I will add them, if not maybe a soldier reading the paper, not to sure yet.
2012-01-09%25252019.42.39.jpg

2012-01-09%25252019.42.47.jpg

2012-01-09%25252019.42.58.jpg

2012-01-09%25252019.43.19.jpg

2012-01-09%25252019.44.11.jpg

Any comments welcome, thanks for looking
 
Truly amazing nice clean build on the ketel thingy and the figures fit well with it and then on to the amazing sctrach build of everything the colour on the factory equipment is spot on and the brick work....10/10 so far


Geegad
 
Hi Guys

Thanks again for all the great comments, here's the latest update

I have painted the bricks on the front of the buildings and started the weathering on the frontage, and painted in all the details, which took a few sessions to complete. Once this was done I was able to construct the window frames. These were made from plastic sheet so I could get a good strong frame and also could bend the top part of the frame easily. As I wanted the buildings derelict I made the windows look damaged and will use clear plastic card to make the glass panes, making sure they are all dirtied up accordingly. I decided after much pondering to use two boys from the Masterbox east European peasants set to give some life to the buildings
2012-01-12%25252019.42.56.jpg

2012-01-12%25252019.43.11.jpg

2012-01-13%25252020.12.54.jpg

I also created the left hand roof area and the tarred roof on the right, the latter was a thin ply sheet cut to fit with some rough sandpaper stuck on and painted black.
2012-01-13%25252020.13.11.jpg

2012-01-13%25252021.47.42.jpg

Once the black had dried I did various layers of dry brushing in different shades and also some washes to try and create a tarred appearance.
2012-01-14%25252014.47.51.jpg

For a break from brickwork I moved on to the water. First I crumpled up aluminium foil and then gentley pulled it out again and then stuck it to the base with white glue. In retrospect I should have added more glue to create some higher peaks, but not bad for my first attempt with a new technique.
2012-01-14%25252015.59.38.jpg

2012-01-14%25252015.59.57.jpg

2012-01-14%25252016.00.08.jpg

Then I sprayed the whole river area with primer, then dark green, followed by Klear to give it a high shine, then I lightly drybrushed the peaks to try and give some definition, before glossing again. I may need some more drybrushing yet when the rest of the scene is in place but overall I think it looks pretty convincing and I haven't had the worry of ruining things with clear epoxy!
2012-01-15%25252010.28.16.jpg

2012-01-15%25252010.28.24.jpg

2012-01-15%25252011.29.39.jpg

Anyway until next time thanks for looking
 
That tin foil technique is great I'm going to have to try it out!
 

Latest posts

Back
Top